주요 콘텐츠로 건너뛰기

Xiaomi Redmi Note 8T Motherboard Cover Removal

단지 전제 조건
이 안내서는 다른 가이드의 선행 작업으로 사용하기 위한 것입니다. 그 자체로는 불완전합니다.

필요한 것

  1. Xiaomi Redmi Note 8T Motherboard Cover Removal, Xiaomi Redmi Note 8T Rear Glass Removal: 1 단계, 이미지 1/1
    • Before you begin, switch off your phone.

    • Apply a heated iOpener to the back of the phone to loosen the adhesive beneath the back cover. Apply the iOpener for at least two minutes.

  2. Xiaomi Redmi Note 8T Motherboard Cover Removal: 2 단계, 이미지 1/3 Xiaomi Redmi Note 8T Motherboard Cover Removal: 2 단계, 이미지 2/3 Xiaomi Redmi Note 8T Motherboard Cover Removal: 2 단계, 이미지 3/3
    • Secure a suction handle to the bottom of the rear glass, as close to the edge as possible.

    • If the phone's rear glass is cracked, the suction handle may not stick. Try lifting it with strong tape, or superglue the suction handle in place and allow it to cure so you can proceed.

    • Lift the rear glass with the suction handle to create a small gap between the glass and the frame.

    • Insert an opening pick into the gap.

    • If you have trouble, apply more heat to further soften the adhesive. Follow the iOpener instructions to avoid overheating.

    • Slide the opening pick to the bottom right corner.

  3. Xiaomi Redmi Note 8T Motherboard Cover Removal: 3 단계, 이미지 1/2 Xiaomi Redmi Note 8T Motherboard Cover Removal: 3 단계, 이미지 2/2
    • Insert a second opening pick and slide it to the bottom left corner to cut the adhesive.

    • Leave the opening picks in place to prevent the adhesive from resealing.

    • Don't remove the suction handle yet. You're going to use it later in the removal procedure as a rear glass stand.

  4. Xiaomi Redmi Note 8T Motherboard Cover Removal: 4 단계, 이미지 1/3 Xiaomi Redmi Note 8T Motherboard Cover Removal: 4 단계, 이미지 2/3 Xiaomi Redmi Note 8T Motherboard Cover Removal: 4 단계, 이미지 3/3
    • Insert a third opening pick at the bottom left corner.

    • Slide the tip of the opening pick from the bottom left corner along the side of the phone to cut the adhesive.

    • Leave the opening pick in its place at the top left corner to prevent the adhesive from resealing.

  5. Xiaomi Redmi Note 8T Motherboard Cover Removal: 5 단계, 이미지 1/2 Xiaomi Redmi Note 8T Motherboard Cover Removal: 5 단계, 이미지 2/2
    • If the adhesive becomes hard to cut, it has most likely cooled down. Use your iOpener to reheat it.

    • Insert a fourth opening pick under the top left corner of the rear glass.

    • Slide the opening pick along the top edge of the phone to cut the adhesive.

    • Leave the opening pick in the top right corner to prevent the adhesive from resealing.

  6. Xiaomi Redmi Note 8T Motherboard Cover Removal: 6 단계, 이미지 1/2 Xiaomi Redmi Note 8T Motherboard Cover Removal: 6 단계, 이미지 2/2
    • Do not insert the opening pick deeper than 5 mm to avoid damaging the fingerprint connector.

    • Insert a fifth opening pick at the top right corner of the phone.

    • Slide the opening pick along the right side to cut the remaining adhesive.

    • Do not remove the rear glass all the way yet, the fingerprint cable is still connected to the motherboard.

  7. Xiaomi Redmi Note 8T Motherboard Cover Removal: 7 단계, 이미지 1/2 Xiaomi Redmi Note 8T Motherboard Cover Removal: 7 단계, 이미지 2/2
    • Carefully fold the rear glass to the right side of the phone. Use the suction handle as a stand for the rear glass.

  8. Xiaomi Redmi Note 8T Motherboard Cover Removal: 8 단계, 이미지 1/2 Xiaomi Redmi Note 8T Motherboard Cover Removal: 8 단계, 이미지 2/2
    • Use a spudger to pry up and disconnect the fingerprint flex cable.

    • Remove the rear glass.

    • During reassembly, this is a good point to power on your phone and test all functions before sealing it up. Be sure to power your phone back down completely before you continue working.

  9. Xiaomi Redmi Note 8T Motherboard Cover Removal, Xiaomi Redmi Note 8T Motherboard Cover Removal: 9 단계, 이미지 1/1
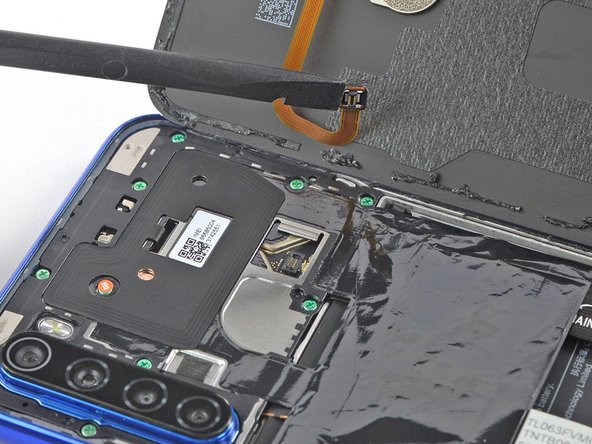
    • Remove the eleven Phillips #00 screws (3.9 mm length).

  10. Xiaomi Redmi Note 8T Motherboard Cover Removal: 10 단계, 이미지 1/2 Xiaomi Redmi Note 8T Motherboard Cover Removal: 10 단계, 이미지 2/2
    • Insert the tip of an opening pick underneath the bottom edge of the motherboard cover.

    • Use the opening pick to pry up the motherboard cover.

  11. Xiaomi Redmi Note 8T Motherboard Cover Removal: 11 단계, 이미지 1/2 Xiaomi Redmi Note 8T Motherboard Cover Removal: 11 단계, 이미지 2/2
    • Remove the motherboard cover including the black protective foil that covers the battery.

결론

To reassemble your device, follow these instructions in reverse order.

다른 한 분이 해당 안내서를 완성하였습니다.

Dominik Schnabelrauch

회원 가입일: 11/23/16

202,546 평판

안내서 682개 작성하였습니다

iFixit iFixit 회원

Staff

135 회원들

안내서 16,718개 작성하였습니다

댓글 0개

댓글 쓰기

조회 통계:

24 시간 전: 0

7일 전: 2

30일 전: 3

전체 시간: 199