주요 콘텐츠로 건너뛰기

ZTE Lever Front Camera Replacement

필요한 것

  1. ZTE Lever Front Camera Replacement, Battery: 1 단계, 이미지 1/1
    • Remove the SD card and the Sim card from the device.

    • The Sim and SD cards are not shown here as our device did not come with them.

  2. ZTE Lever Front Camera Replacement: 2 단계, 이미지 1/2 ZTE Lever Front Camera Replacement: 2 단계, 이미지 2/2
    • Use an iFixit opening tool to separate the back from the device.

  3. ZTE Lever Front Camera Replacement: 3 단계, 이미지 1/2 ZTE Lever Front Camera Replacement: 3 단계, 이미지 2/2
    • Remove the two 1.6mm Phillips #0 screws from the battery plug cover.

    • Remove the cover.

  4. ZTE Lever Front Camera Replacement: 4 단계, 이미지 1/2 ZTE Lever Front Camera Replacement: 4 단계, 이미지 2/2
    • Disconnect the battery cable from the motherboard with a plastic opening tool.

  5. ZTE Lever Front Camera Replacement: 5 단계, 이미지 1/1
    • Use your hands, or a plastic opening tool, to pry the battery from the phone.

  6. ZTE Lever Front Camera Replacement, Front Camera: 6 단계, 이미지 1/2 ZTE Lever Front Camera Replacement, Front Camera: 6 단계, 이미지 2/2
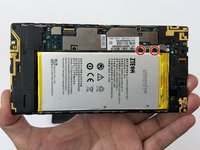
    • Unscrew the three 1.6mm Philllips #0 screws on the plastic cover that are near the top edge of the phone by the camera.

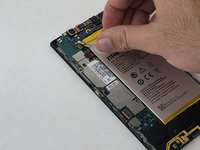
    • Pry off the plastic cover using the iFixit opening tool.

  7. ZTE Lever Front Camera Replacement: 7 단계, 이미지 1/2 ZTE Lever Front Camera Replacement: 7 단계, 이미지 2/2
    • Unplug the front-facing camera press fit connector cable using the iFixit opening tool.

    • Remove the camera from the motherboard.

결론

To reassemble your device, follow these instructions in reverse order.

Eric Lilling

회원 가입일: 10/03/19

169 평판

안내서 2개 작성하였습니다

댓글 0개

댓글 쓰기

조회 통계:

24 시간 전: 0

7일 전: 0

30일 전: 0

전체 시간: 110