주요 콘텐츠로 건너뛰기
Zeki Droid Tablet Reflective Screen Replacement

Zeki Droid Tablet Reflective Screen Replacement

Colleen McFadden

Colleen McFadden3 다른 기여자

최종 수정일 May 7, 2024

40 분
조정
액션 샷
단계 다듬기

Replace the reflective sheet inside of the screen to make images on your tablet clearer.

필요한 것

도구

더보기...

  1. Zeki Droid Tablet Reflective Screen Replacement, Back Casing: 1 단계, 이미지 1개 중 1개
    • Remove the back casing by slowly popping each tab out with a plastic opening tool.

  2. Zeki Droid Tablet Reflective Screen Replacement: 2 단계, 이미지 1개 중 1개
    이 단계에 사용된 도구:
    Tweezers
    $4.99
    • Remove the tapes one by one from the connecting wires with tweezers.

  3. Zeki Droid Tablet Reflective Screen Replacement: 3 단계, 이미지 1개 중 1개
    • Remove the black clips from both sides of the casing with a plastic opening tool.

    • The clips should pop off separate from the speakers.

  4. Zeki Droid Tablet Reflective Screen Replacement: 4 단계, 이미지 1개 중 1개
    • Remove the speakers from the back casing.

    • Do not tug on the speakers because they are connected to fragile wires.

  5. Zeki Droid Tablet Reflective Screen Replacement: 5 단계, 이미지 1개 중 1개
    • Pull the speakers away from the back casing carefullly.

  6. Zeki Droid Tablet Reflective Screen Replacement, Reflective Screen: 6 단계, 이미지 2개 중 1개 Zeki Droid Tablet Reflective Screen Replacement, Reflective Screen: 6 단계, 이미지 2개 중 2개
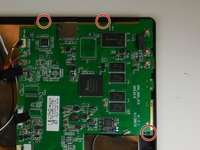
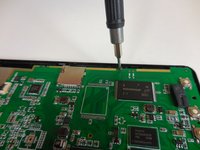
    • Use a Phillips #000 screwdriver to remove the three screws from the motherboard.

    • Make sure to keep track of the screws. They are needed to reattach the motherboard at the end.

  7. Zeki Droid Tablet Reflective Screen Replacement: 7 단계, 이미지 1개 중 1개
    • Use the plastic opening tool to pull the metal and plastic plates away from the interior of the tablet. Slowly pop each tab off until the plates are mostly separated from the base.

  8. Zeki Droid Tablet Reflective Screen Replacement: 8 단계, 이미지 1개 중 1개
    이 단계에 사용된 도구:
    Tweezers
    $4.99
    • Separate the white plastic plate from the metal plate by using the plastic opening tool.

    • While these layers are separated, use your tweezers to gently pull the reflective sheet out from in between them.

결론

To reassemble your device, follow these instructions in reverse order.

다른 한 분이 해당 안내서를 완성하였습니다.

작성자

3다른 기여자 명과 함께

Colleen McFadden

회원 가입일: 03/11/15

268 평판

안내서 2개를 작성함

Colorado Springs, Team 2-6, Panko Spring 2015 Colorado Springs, Team 2-6, Panko Spring 2015 회원

UCCS-PANKO-S15S2G6

3 회원들

안내서 10개를 작성함

댓글 0개

댓글 쓰기

조회 통계:

지난 24시간: 0

지난 7일: 0

지난 30일: 0

전체 시간: 843