주요 콘텐츠로 건너뛰기

Zyxel USG 50 Unified Security Gateway Disassembly

필요한 것

  1. Zyxel USG 50 Unified Security Gateway Disassembly, Removing the screws: 1 단계, 이미지 1/3 Zyxel USG 50 Unified Security Gateway Disassembly, Removing the screws: 1 단계, 이미지 2/3 Zyxel USG 50 Unified Security Gateway Disassembly, Removing the screws: 1 단계, 이미지 3/3
    • Screws

    • Frame kit for the rack (ears)

  2. Zyxel USG 50 Unified Security Gateway Disassembly, Removing DB9 connector: 2 단계, 이미지 1/2 Zyxel USG 50 Unified Security Gateway Disassembly, Removing DB9 connector: 2 단계, 이미지 2/2
    • To remove the cover it is necessary to disconnect the DB9 connector

  3. Zyxel USG 50 Unified Security Gateway Disassembly, Removing the lid: 3 단계, 이미지 1/2 Zyxel USG 50 Unified Security Gateway Disassembly, Removing the lid: 3 단계, 이미지 2/2
    • The lid comes out when sliding

  4. Zyxel USG 50 Unified Security Gateway Disassembly, Motherboard: 4 단계, 이미지 1/3 Zyxel USG 50 Unified Security Gateway Disassembly, Motherboard: 4 단계, 이미지 2/3 Zyxel USG 50 Unified Security Gateway Disassembly, Motherboard: 4 단계, 이미지 3/3
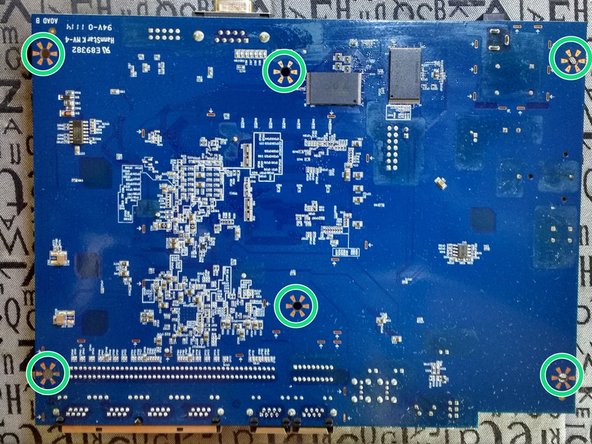
    • To remove the motherboard it is necessary to remove the 6 screws that fix it to the chassis

    • If the device does not save the time, you can replace the battery

    • CR2032 3 Volt Lithium

  5. Zyxel USG 50 Unified Security Gateway Disassembly, Chasis: 5 단계, 이미지 1/1
    • The rubbers prevent the plate from contacting the chassis.

결론

To reassemble your device, follow these instructions in reverse order.

다른 한 분이 해당 안내서를 완성하였습니다.

다음 번역가들에게 특별히 감사 드립니다:

es en

100%

이 번역자 분들은 저희가 세상을 수리하는데 동참해 주시는 분입니다! 기여하시겠습니까?
번역 시작하기 ›

Eneider Colina

회원 가입일: 09/20/13

2,362 평판

안내서 9개 작성하였습니다

Comunidad para traductores de español Comunidad para traductores de español 회원

Community

22 회원들

안내서 187개 작성하였습니다

댓글 0개

댓글 쓰기

조회 통계:

24 시간 전: 0

7일 전: 3

30일 전: 13

전체 시간: 1,128