주요 콘텐츠로 건너뛰기

bObi Robotic Vacuum Left or Right Wheel Replacement

필요한 것

  1. bObi Robotic Vacuum Left or Right Wheel Replacement, Top Cover: 1 단계, 이미지 1/2 bObi Robotic Vacuum Left or Right Wheel Replacement, Top Cover: 1 단계, 이미지 2/2
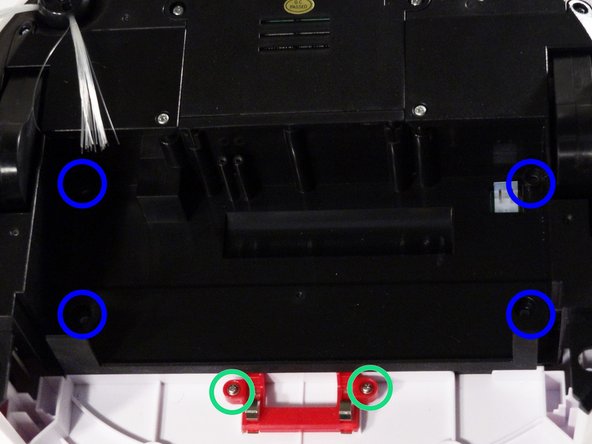
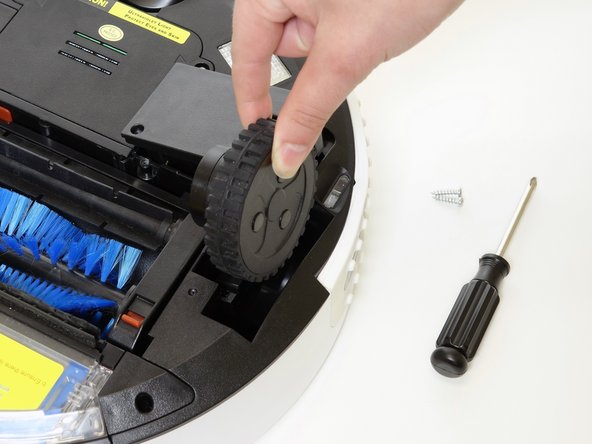
    • Remove bObi’s front wheel to access one of the screws holding bObi together.

    • Make sure the wheel is turned closer to bObi's front touch sensors. Use your screwdriver for leverage, and the wheel will pop up and out.

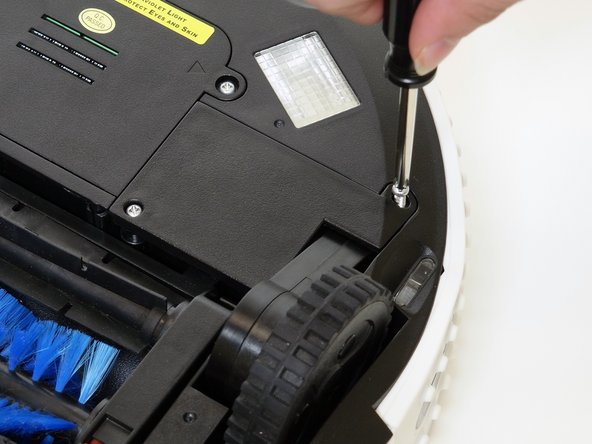
    • Uninstall the larger screw that sits deeper in the wheel compartment.

  2. bObi Robotic Vacuum Left or Right Wheel Replacement: 2 단계, 이미지 1/3 bObi Robotic Vacuum Left or Right Wheel Replacement: 2 단계, 이미지 2/3 bObi Robotic Vacuum Left or Right Wheel Replacement: 2 단계, 이미지 3/3
    • Remove bObi's dustbin.

    • Uninstall the 2 screws close to the bin and 2 smaller screws above her main brushes.

  3. bObi Robotic Vacuum Left or Right Wheel Replacement: 3 단계, 이미지 1/3 bObi Robotic Vacuum Left or Right Wheel Replacement: 3 단계, 이미지 2/3 bObi Robotic Vacuum Left or Right Wheel Replacement: 3 단계, 이미지 3/3
    • Lift the brush holder. To detach completely, unplug it from bObi.

    • Remove the two screws on the dustbin contact point holder inside bObi.

    • There are 4 screws beneath the main brushes. Uninstall these, and open bObi up to expose her main circuit board.

  4. bObi Robotic Vacuum Left or Right Wheel Replacement: 4 단계, 이미지 1/3 bObi Robotic Vacuum Left or Right Wheel Replacement: 4 단계, 이미지 2/3 bObi Robotic Vacuum Left or Right Wheel Replacement: 4 단계, 이미지 3/3
    • Detach the two circuit plugs connecting bObi's cover to the main board and the cover will be completely removed.

  5. bObi Robotic Vacuum Left or Right Wheel Replacement, Left or Right Wheel: 5 단계, 이미지 1/3 bObi Robotic Vacuum Left or Right Wheel Replacement, Left or Right Wheel: 5 단계, 이미지 2/3 bObi Robotic Vacuum Left or Right Wheel Replacement, Left or Right Wheel: 5 단계, 이미지 3/3
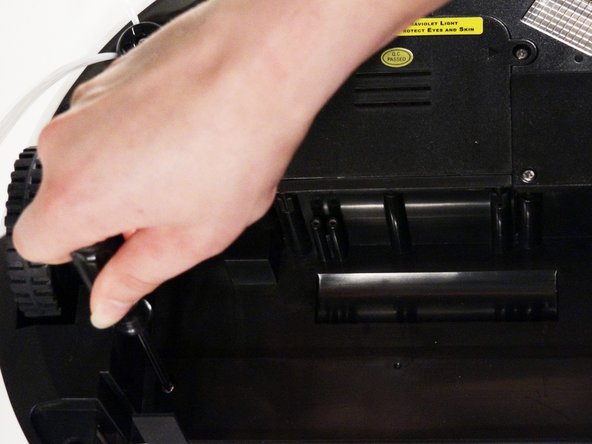
    • The left and right wheels are held on bObi with two screws. Uninstall them from the wheel you’re replacing, and flip bObi over.

  6. bObi Robotic Vacuum Left or Right Wheel Replacement: 6 단계, 이미지 1/3 bObi Robotic Vacuum Left or Right Wheel Replacement: 6 단계, 이미지 2/3 bObi Robotic Vacuum Left or Right Wheel Replacement: 6 단계, 이미지 3/3
    • The left and right wheels attach near the front of the main board. Remove the circuit plug for the wheel you wish to replace. If there is glue on the plug, simply peel it off.

    • Lift bObi up slightly, and feed the wheel’s wiring out of the open space so the whole wheel detaches.

  7. bObi Robotic Vacuum Left or Right Wheel Replacement: 7 단계, 이미지 1/3 bObi Robotic Vacuum Left or Right Wheel Replacement: 7 단계, 이미지 2/3 bObi Robotic Vacuum Left or Right Wheel Replacement: 7 단계, 이미지 3/3
    • Place the new wheel in the open space. Make sure its circuit plug goes through and reaches bObi’s interior. Then plug it in on the mainboard.

    • You may add glue or electrical tape to secure the wires on the inside of bObi.

  8. bObi Robotic Vacuum Left or Right Wheel Replacement: 8 단계, 이미지 1/2 bObi Robotic Vacuum Left or Right Wheel Replacement: 8 단계, 이미지 2/2
결론

To put bObi's cover back together, refer to the Closing bObi's Cover Post-Repair guide.

Chelsea

회원 가입일: 09/24/14

2,278 평판

안내서 31개 작성하였습니다

댓글 0개

댓글 쓰기

조회 통계:

24 시간 전: 0

7일 전: 0

30일 전: 0

전체 시간: 654