주요 콘텐츠로 건너뛰기

hp pavilion 15-cc023cl Headphone Jack Replacement

필요한 것

  1. hp pavilion 15-cc023cl Headphone Jack Replacement, Battery: 1 단계, 이미지 1/2 hp pavilion 15-cc023cl Headphone Jack Replacement, Battery: 1 단계, 이미지 2/2
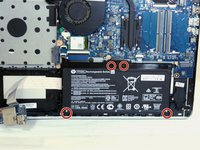
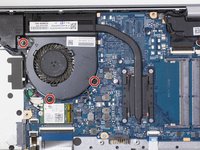
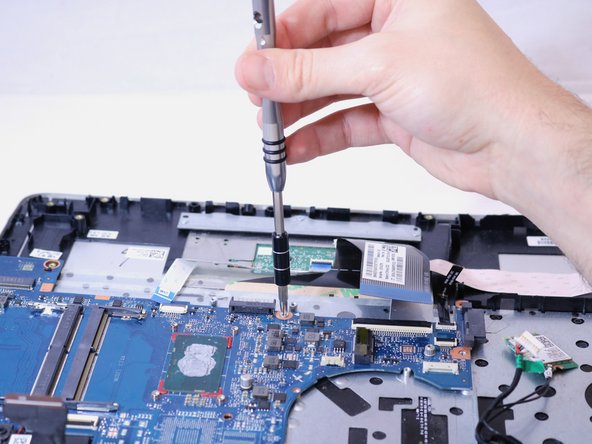
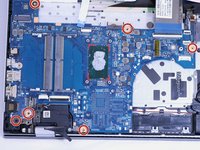
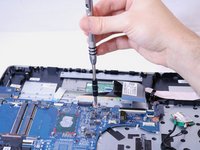
    • Use a PH000 screwdriver to unscrew the eleven 4mm Phillip head screws located on the back panel.

  2. hp pavilion 15-cc023cl Headphone Jack Replacement: 2 단계, 이미지 1/1
    • Using the iFixit opening tool, pry open and remove the back cover of the laptop.

    • Be gentle when applying force to the cover.

  3. hp pavilion 15-cc023cl Headphone Jack Replacement: 3 단계, 이미지 1/2 hp pavilion 15-cc023cl Headphone Jack Replacement: 3 단계, 이미지 2/2
    • Use a PH000 screwdriver to unscrew the four 3.5mm Philips head screws located on the battery.

  4. hp pavilion 15-cc023cl Headphone Jack Replacement: 4 단계, 이미지 1/2 hp pavilion 15-cc023cl Headphone Jack Replacement: 4 단계, 이미지 2/2
    • Disconnect the port connecting the battery and the motherboard and then remove.

  5. hp pavilion 15-cc023cl Headphone Jack Replacement, Hard Drive: 5 단계, 이미지 1/1
    • Use a spudger to lift the latch that holds the hard drive cable in place.

  6. hp pavilion 15-cc023cl Headphone Jack Replacement: 6 단계, 이미지 1/1
    • Use a plastic opening tool to pry the hard drive out.

  7. hp pavilion 15-cc023cl Headphone Jack Replacement: 7 단계, 이미지 1/1
    • Disconnect the hard drive cable.

  8. hp pavilion 15-cc023cl Headphone Jack Replacement: 8 단계, 이미지 1/1
    • Lift the plastic wedges up on both sides of the hard drive.

  9. hp pavilion 15-cc023cl Headphone Jack Replacement, Motherboard: 9 단계, 이미지 1/1
    • Locate the motherboard.

  10. hp pavilion 15-cc023cl Headphone Jack Replacement: 10 단계, 이미지 1/2 hp pavilion 15-cc023cl Headphone Jack Replacement: 10 단계, 이미지 2/2
    • Use a PH0 screwdriver to unscrew the three 3 mm Phillips head screws located on the fan.

  11. hp pavilion 15-cc023cl Headphone Jack Replacement: 11 단계, 이미지 1/1
    • Use a PH1 screwdriver to unscrew the four 3mm Phillips head screws located on the processor cover.

    • Disconnect the cable.

  12. hp pavilion 15-cc023cl Headphone Jack Replacement: 12 단계, 이미지 1/1
    • Disconnect the plastic arm attached to the processor and remove.

    • Disconnect the cable attaching the fan to the motherboard and remove.

  13. hp pavilion 15-cc023cl Headphone Jack Replacement: 13 단계, 이미지 1/1
    • Use a PH1 screwdriver to unscrew one 3mm Phillips head screws on Wifi card.

    • Disconnect the Wifi card.

    • Be careful not to break any of the connectors.

  14. hp pavilion 15-cc023cl Headphone Jack Replacement: 14 단계, 이미지 1/3 hp pavilion 15-cc023cl Headphone Jack Replacement: 14 단계, 이미지 2/3 hp pavilion 15-cc023cl Headphone Jack Replacement: 14 단계, 이미지 3/3
    • Disconnect the 5 cables to keyboard and speakers.

    • Be careful not to break any of the connectors.

    • You may have to pry some up with the spudger.

  15. hp pavilion 15-cc023cl Headphone Jack Replacement: 15 단계, 이미지 1/2 hp pavilion 15-cc023cl Headphone Jack Replacement: 15 단계, 이미지 2/2
    • Use a PH1 screwdriver to unscrew six 3 mm Phillips head screws on the motherboard.

  16. hp pavilion 15-cc023cl Headphone Jack Replacement: 16 단계, 이미지 1/1
    • Use the iFixit opening tools to pry motherboard from back of laptop.

  17. hp pavilion 15-cc023cl Headphone Jack Replacement: 17 단계, 이미지 1/1
    • Disconnect SD and USB card cable.

결론

To reassemble your device, follow these instructions in reverse order.

다른 한 분이 해당 안내서를 완성하였습니다.

Stephanie Henry

회원 가입일: 10/02/18

1,077 평판

안내서 5개 작성하였습니다

댓글 0개

댓글 쓰기

조회 통계:

24 시간 전: 2

7일 전: 5

30일 전: 16

전체 시간: 1,663