주요 콘텐츠로 건너뛰기

iMac 27" 2017 RAM Replacement

필요한 것

  1. iMac 27" 2017 RAM Replacement, Open the RAM door: 1 단계, 이미지 2개 중 1개 iMac 27" 2017 RAM Replacement, Open the RAM door: 1 단계, 이미지 2개 중 2개
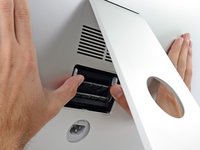
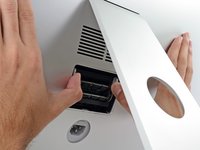
    • While holding the display steady, use the flat end of a spudger to press in on the RAM door release button, located just above the power port.

    • You may have to press fairly hard—keep at it until the bottom of the door pops out about 0.25" from the rear of the iMac.

  2. iMac 27" 2017 RAM Replacement, Remove the RAM door: 2 단계, 이미지 3개 중 1개 iMac 27" 2017 RAM Replacement, Remove the RAM door: 2 단계, 이미지 3개 중 2개 iMac 27" 2017 RAM Replacement, Remove the RAM door: 2 단계, 이미지 3개 중 3개
    • Pull the RAM access door off the back of the iMac.

  3. iMac 27" 2017 RAM Replacement, Unlock the RAM tray: 3 단계, 이미지 3개 중 1개 iMac 27" 2017 RAM Replacement, Unlock the RAM tray: 3 단계, 이미지 3개 중 2개 iMac 27" 2017 RAM Replacement, Unlock the RAM tray: 3 단계, 이미지 3개 중 3개
    • The RAM tray is locked into its upright position with two grey tabs.

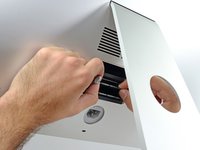
    • Use your thumbs or index fingers to unlock the tray by pushing the tabs outward, away from the RAM.

    • Pull the tabs out and down, swinging the RAM tray down to a near-horizontal position.

  4. iMac 27" 2017 RAM Replacement, Remove the RAM: 4 단계, 이미지 3개 중 1개 iMac 27" 2017 RAM Replacement, Remove the RAM: 4 단계, 이미지 3개 중 2개 iMac 27" 2017 RAM Replacement, Remove the RAM: 4 단계, 이미지 3개 중 3개
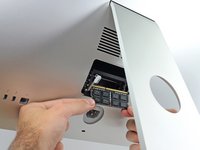
    • Remove a stick of RAM by grabbing it with two hands and pulling straight out of the RAM tray.

    • RAM modules are keyed so that they can only be installed in the proper orientation. Note where the shorter section of contacts is when removing, and reinstalling, your RAM.

    • To install a new module, insert the module into the desired slot in the tray and press it firmly in place. Push the tray back up until it locks in place.

    • The RAM access door is not symmetrical. If it is not flush on both ends, try putting it in the other way.

    • Re-insert the RAM access door back into its place.

결론

To reassemble your device, follow the above steps in reverse order.
Take your e-waste to an R2 or e-Stewards certified recycler.
Repair didn’t go as planned? Check out our Answers community for troubleshooting help.

다른 6명이 해당 안내서를 완성하였습니다.

작성자

1다른 기여자 명과 함께

Adam O'Camb

회원 가입일: 04/11/15

217,267 평판

안내서 416개를 작성함

2가이드 댓글

Thanks Arthur, I got them

walser1 - 답글

bom dia, posso trocar a memoria de 2444MHZ para 2666MHZ? 3000MHZ ?

MARCELO MIRA - 답글

댓글 쓰기

조회 통계:

지난 24시간: 9

지난 7일: 73

지난 30일: 348

전체 시간: 19,159