주요 콘텐츠로 건너뛰기
iMac G5 20" Model A1076 Left Fan Replacement

iMac G5 20" Model A1076 Left Fan Replacement

Andrew Bookholt

Andrew Bookholt4 다른 기여자

최종 수정일 April 25, 2024

예상시간 없음
조정

Keep the temperature low and replace that broken fan!

필요한 것

부품

도구

더보기...

iFixit은 귀하가 이 링크를 통해 구매할 때 커미션을 받습니다.
  1. iMac G5 20" Model A1076 Left Fan Replacement, Rear Panel: 1 단계, 이미지 1개 중 1개
    • Lay the iMac display-side down on a flat surface (putting a cloth under the screen to protect it from bumps).

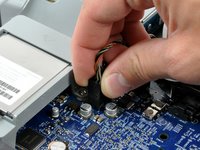
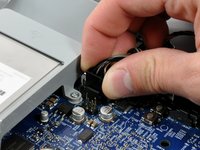
    • Loosen the three Phillips screws securing the rear panel to the iMac.

    • These screws are captive in the iMac. The center screw will stop turning after about 3.5 turns and the outer screws will stop turning after about 5.5 turns. Do not try to remove these screws from your iMac.

  2. iMac G5 20" Model A1076 Left Fan Replacement: 2 단계, 이미지 2개 중 1개 iMac G5 20" Model A1076 Left Fan Replacement: 2 단계, 이미지 2개 중 2개
    • Lift the rear panel slightly near the bottom of the iMac.

    • Pull the rear panel toward yourself and remove it from the iMac.

  3. iMac G5 20" Model A1076 Left Fan Replacement, Left Fan: 3 단계, 이미지 1개 중 1개
    • Remove the two 9.7 mm shouldered T8 Torx screws from the left fan.

  4. iMac G5 20" Model A1076 Left Fan Replacement: 4 단계, 이미지 2개 중 1개 iMac G5 20" Model A1076 Left Fan Replacement: 4 단계, 이미지 2개 중 2개
    • Disconnect both fans by pulling their connectors straight up off the logic board.

    • The connector for the left fan requires a considerable amount of force to remove. If you bend the pins on the logic board, use the fan connector as a guide to bend them straight.

  5. iMac G5 20" Model A1076 Left Fan Replacement: 5 단계, 이미지 1개 중 1개
    • Lift the left fan out of the chassis, minding any cables that may get caught.

결론

To reassemble your device, follow these instructions in reverse order.

다른 2명이 해당 안내서를 완성하였습니다.

작성자

4다른 기여자 명과 함께

Andrew Bookholt

591,907 평판

안내서 619개를 작성함

댓글 0개

댓글 쓰기

조회 통계:

지난 24시간: 1

지난 7일: 4

지난 30일: 4

전체 시간: 6,513