주요 콘텐츠로 건너뛰기

이 안내서에는 최근 변경 사항이 더 있습니다. 최신 비검증 버전으로 전환하십시오.

iMac Intel 21.5" EMC 2389 RAM Replacement

필요한 것

  1. iMac Intel 21.5" EMC 2389 RAM Replacement, Access Door: 1 단계, 이미지 1/2 iMac Intel 21.5" EMC 2389 RAM Replacement, Access Door: 1 단계, 이미지 2/2
    • Unplug your iMac's AC cord along with any peripheral devices.

    • Lay your iMac face-down on a soft, clean surface as shown.

    • Be sure there isn't any dirt or debris on your work surface, as it may scratch the glass panel on the front of your iMac. We recommend placing a towel between the iMac and the work surface.

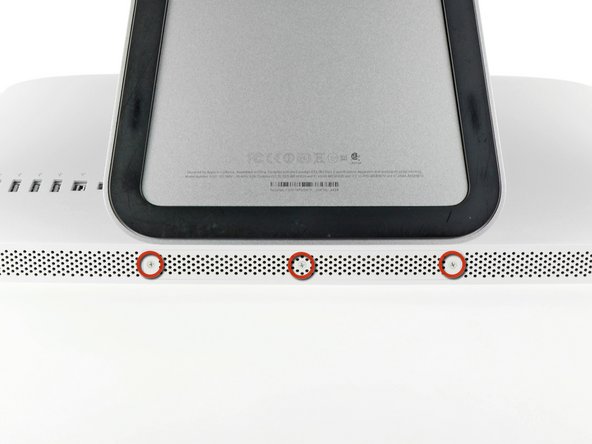
    • Loosen the three Phillips screws securing the access door to the bottom edge of your iMac.

    • All three screws will remain captive in the access door.

    • Remove the access door.

  2. iMac Intel 21.5" EMC 2389 RAM Replacement, RAM: 2 단계, 이미지 1/3 iMac Intel 21.5" EMC 2389 RAM Replacement, RAM: 2 단계, 이미지 2/3 iMac Intel 21.5" EMC 2389 RAM Replacement, RAM: 2 단계, 이미지 3/3
    • Gently slide the black plastic RAM pull tab out from the RAM slot.

    • Pull the black plastic tab away from the bottom edge of the iMac to eject the module(s) on that side of the RAM bay.

    • This may require a bit of force.

  3. iMac Intel 21.5" EMC 2389 RAM Replacement: 3 단계, 이미지 1/1
    • Slide the old RAM module(s) out of their slots in the RAM bay and set them aside.

  4. iMac Intel 21.5" EMC 2389 RAM Replacement: 4 단계, 이미지 1/3 iMac Intel 21.5" EMC 2389 RAM Replacement: 4 단계, 이미지 2/3 iMac Intel 21.5" EMC 2389 RAM Replacement: 4 단계, 이미지 3/3
    • Repeat the process in the previous steps to remove the RAM module(s) from the other side of the RAM bay.

  5. iMac Intel 21.5" EMC 2389 RAM Replacement: 5 단계, 이미지 1/3 iMac Intel 21.5" EMC 2389 RAM Replacement: 5 단계, 이미지 2/3 iMac Intel 21.5" EMC 2389 RAM Replacement: 5 단계, 이미지 3/3
    • When installing new RAM modules, it is important to orient them correctly.

    • Be sure the small notch cut into each RAM module (shown in the first picture) mates with the protrusion in each RAM slot (shown in the second picture).

    • Your iMac has four RAM slots. Be sure to slide each RAM module into its slot horizontally. This will prevent getting the modules stuck between two of the adjacent slots.

    • Once you have oriented the new RAM modules correctly, gently slide them completely into the iMac and use your thumbs to firmly seat them in their sockets.

결론

To reassemble your device, follow these instructions in reverse order.

다른 65명이 해당 안내서를 완성하였습니다.

Andrew Bookholt

586,305 평판

안내서 619개 작성하였습니다

댓글 10개

Can i ad up to 32gb?

Nebirous Szandor - 답글

I need to know this as well.....

Mauritz Janeke -

From what I read in the specs for this model it can support up to 16GB

Hutch Jorgensen -

You can't put 8GB modules in these slots. I tried. Apparently the architecture does not support addressing the extra memory in each slot. My iMac would not successfully boot or run for very long before rebooting. So, you have 2GB and 4GB module options, in pairs, among the 4 slots. That should provide 4GB (two 2GBs), 8GB (four 2GBs or two 4GBs), 12GB (pair of each) and 16GB (four 4GBs) options for total RAM.

I'm no expert, but this was my experience.

Larry -

My iMac is a i3 core, can I do the same thing with the same chips?

tighteststudio - 답글

댓글 쓰기

조회 통계:

24 시간 전: 1

7일 전: 20

30일 전: 124

전체 시간: 49,076