주요 콘텐츠로 건너뛰기

이 안내서에는 최근 변경 사항이 더 있습니다. 최신 비검증 버전으로 전환하십시오.

iMac Intel 21.5" EMC 2428 Power Supply Replacement

필요한 것

  1. iMac Intel 21.5" EMC 2428 Power Supply Replacement, Glass Panel: 1 단계, 이미지 1/2 iMac Intel 21.5" EMC 2428 Power Supply Replacement, Glass Panel: 1 단계, 이미지 2/2
    이 단계에 사용된 도구:
    Heavy-Duty Suction Cups (Pair)
    $14.95
    구매
    • Before beginning, unplug your iMac and lay it on a soft surface as shown.

    • Stick a suction cup near each of the two top corners of the glass panel.

    • To attach the suction cups we sell, first position the suction cup with the movable handle parallel to the face of the glass panel. While lightly holding the suction cup against the glass, raise the movable handle until it is parallel with the other handle.

    • If your suction cups refuse to stick, try cleaning both the glass panel and the suction cup with a mild solvent.

  2. iMac Intel 21.5" EMC 2428 Power Supply Replacement: 2 단계, 이미지 1/2 iMac Intel 21.5" EMC 2428 Power Supply Replacement: 2 단계, 이미지 2/2
    • Gently lift the glass panel perpendicular to the face of the LCD enough to clear the steel mounting pins attached along the underside of the top edge of the glass panel.

    • Pull the glass panel away from the lower edge of the iMac and carefully set it aside.

    • During reinstallation, be sure to meticulously clean the inside of the glass panel and the face of the LCD as any dust or fingerprints trapped inside will be annoyingly visible when the machine is turned on.

  3. iMac Intel 21.5" EMC 2428 Power Supply Replacement, Display: 3 단계, 이미지 1/3 iMac Intel 21.5" EMC 2428 Power Supply Replacement, Display: 3 단계, 이미지 2/3 iMac Intel 21.5" EMC 2428 Power Supply Replacement, Display: 3 단계, 이미지 3/3
    • Remove the eight 8 mm T10 Torx screws securing the display to the outer case.

    • The last two pictures are detail shots of each side of the display.

  4. iMac Intel 21.5" EMC 2428 Power Supply Replacement: 4 단계, 이미지 1/1
    • Slightly lift the top edge of the display out of the outer case.

    • Do not lift it too much. There are several cables attaching the display to the logic board. Twisting or pulling the display assembly with the cables attached will damage your iMac.

  5. iMac Intel 21.5" EMC 2428 Power Supply Replacement: 5 단계, 이미지 1/2 iMac Intel 21.5" EMC 2428 Power Supply Replacement: 5 단계, 이미지 2/2
    • Pull the vertical sync cable connector out of its socket on the LED driver board near the top left corner of your iMac.

  6. iMac Intel 21.5" EMC 2428 Power Supply Replacement: 6 단계, 이미지 1/2 iMac Intel 21.5" EMC 2428 Power Supply Replacement: 6 단계, 이미지 2/2
    • Rotate the display out of the outer case enough to disconnect the LED backlight power cable from the LED driver board.

    • Disconnect the LED backlight power cable by depressing the locking mechanism while pulling the connector away from its socket (toward the bottom edge of the iMac).

  7. iMac Intel 21.5" EMC 2428 Power Supply Replacement: 7 단계, 이미지 1/3 iMac Intel 21.5" EMC 2428 Power Supply Replacement: 7 단계, 이미지 2/3 iMac Intel 21.5" EMC 2428 Power Supply Replacement: 7 단계, 이미지 3/3
    • Grab the plastic pull tab secured to the display data cable lock and rotate it towards upwards.

    • Pull the display data cable straight out of its socket on the logic board.

    • Do not lift up on the display data cable, as its socket is very fragile. Pull the cable parallel to the face of the logic board.

  8. iMac Intel 21.5" EMC 2428 Power Supply Replacement: 8 단계, 이미지 1/2 iMac Intel 21.5" EMC 2428 Power Supply Replacement: 8 단계, 이미지 2/2
    • Disconnect the LCD thermal sensor cable connector from its socket on the logic board.

  9. iMac Intel 21.5" EMC 2428 Power Supply Replacement: 9 단계, 이미지 1/1
    • Carefully pull the display toward the top edge of your iMac and lift it out of the outer case, minding any cables that may get caught.

  10. iMac Intel 21.5" EMC 2428 Power Supply Replacement, Power Supply: 10 단계, 이미지 1/1
    • The next few steps bring your hands close to the exposed face of the power supply. To avoid a high voltage shock from the many large capacitors attached to the board, do not touch the face of the power supply.

    • Remove the following four screws securing the power supply to the outer case:

    • One 9.3 mm T10 coarse-threaded screw

    • One 25 mm T10 coarse-threaded screw

    • Two 22 mm T10 fine-threaded screws

  11. iMac Intel 21.5" EMC 2428 Power Supply Replacement: 11 단계, 이미지 1/1
    • Pull the upper right and lower left corners of the power supply away from the rear case to dislodge the mounting posts attached to the power supply's corners.

  12. iMac Intel 21.5" EMC 2428 Power Supply Replacement: 12 단계, 이미지 1/2 iMac Intel 21.5" EMC 2428 Power Supply Replacement: 12 단계, 이미지 2/2
    • Carefully lift the power supply out of the outer case and rotate it to expose the cable lock as shown, minding the DC-Out and AC-In cables still attaching it to the iMac.

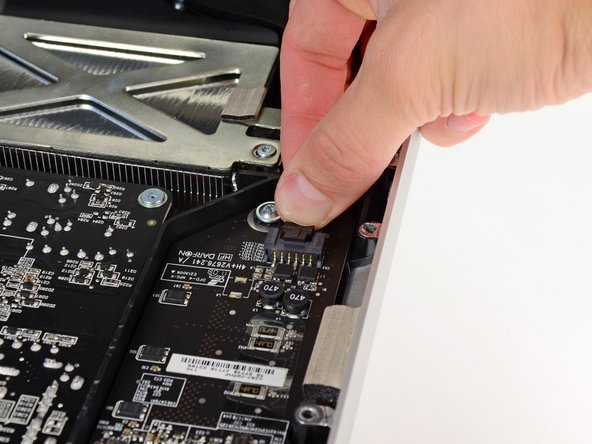
    • Disconnect the DC-Out cable by depressing the locking mechanism on the connector while you pull the connector away from its socket on the power supply.

    • Once the locking mechanism has cleared the socket, pull the DC-In connector away from the power supply.

  13. iMac Intel 21.5" EMC 2428 Power Supply Replacement: 13 단계, 이미지 1/1
    • Disconnect the AC-In cable by depressing the locking mechanism while pulling the connector away from its socket.

    • Remove the power supply from the outer case.

결론

To reassemble your device, follow these instructions in reverse order.

다른 49명이 해당 안내서를 완성하였습니다.

Walter Galan

694,495 평판

안내서 1,203개 작성하였습니다

댓글 10개

I avoided this repair for a while. My iMac would not turn on, no fans or response of any kind from pushing the power button. Reapir took me less than 30 minutes and was very straight forward.

lanekrarup - 답글

is there a fuse in the PCB where it can be replaced instead of replacing the whole power supply unit?

Victor Emmanuel Erames - 답글

Excellent guide! Also watched the video, then dove right in. 27 minutes later my iMac was up and running!

Dave - 답글

What video? I do not see any video on this page. Could you please share the link?

Thank you

vedelfino -

It took me like 20 minutes to replace the power supply. Having somebody hold the display unit while disconnecting/connecting the underneath cables was a big help ;)....and a flashlight to see better inside.

vedelfino - 답글

댓글 쓰기

조회 통계:

24 시간 전: 3

7일 전: 31

30일 전: 118

전체 시간: 34,248