이 번역은 원본 안내서의 최신 업데이트를 반영하지 않을 수 있습니다. 번역 업데이트를 돕거나 아니면 원본 안내서 보기를 참조하세요.
소개
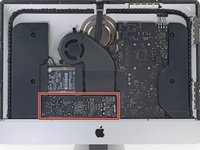
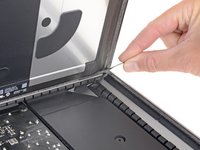
Late 2012 iMac에서 디스플레이를 분리하려면 iMac 전용 여는 도구로 접착제를 잘라야 합니다. 수리를 완료한 후에는 접착 스트립 안내서를 따라 기존 접착제를 긁어내고 새 이중 스틱 접착 스트립으로 교체해야 합니다.
필요한 것


기기를 재조립하려면 이 지침을 역순으로 따르고 접착 스트립 안내서를 사용하여 디스플레이 유리를 다시 부착하세요.
기기를 재조립하려면 이 지침을 역순으로 따르고 접착 스트립 안내서를 사용하여 디스플레이 유리를 다시 부착하세요.
다른 72명이 해당 안내서를 완성하였습니다.
다음 번역가들에게 특별히 감사 드립니다:
96%

Christian Kim님은 저희가 세상을 수리하는데 동참하신 분입니다! 기여하시겠습니까?
번역 시작하기 ›


댓글 22개
It was really easy but the display did not power on for me. Any suggestions?
I got to the point where I fit in the display back on before I pulled the covers off of the adhesive strips. I turned the computer on and the display worked perfectly. Everything worked! The camera was aligned and everything! It must’ve been beginners luck.
I turn the computer off, unplugged the display, pulled the covers off the adhesive strips, plugged the display back in and sealed the display down. When I turn the computer on again I had a blank screen. It wasn’t just blank, it never came back on. The iMac did, but the display didn’t. I tried the old display. Same thing. After some research I found that I had burned up a device on my logic board.
So, I am left with only my iPhone and don’t know how to upload a picture in comments or I would show you exactly which one it is.