주요 콘텐츠로 건너뛰기

iMac Intel 21.5" EMC 2544 Heat Sink Assembly Replacement

단지 전제 조건
이 안내서는 다른 가이드의 선행 작업으로 사용하기 위한 것입니다. 그 자체로는 불완전합니다.

필요한 것

  1. iMac Intel 21.5" EMC 2544 Heat Sink Assembly Replacement, Heat Sink Assembly: 1 단계, 이미지 1/3 iMac Intel 21.5" EMC 2544 Heat Sink Assembly Replacement, Heat Sink Assembly: 1 단계, 이미지 2/3 iMac Intel 21.5" EMC 2544 Heat Sink Assembly Replacement, Heat Sink Assembly: 1 단계, 이미지 3/3
    • Disconnect and remove the SATA data and power cables from the logic board.

  2. iMac Intel 21.5" EMC 2544 Heat Sink Assembly Replacement: 2 단계, 이미지 1/1
    • Remove the four 12 mm T10 shoulder screws from the spring plate behind the CPU.

  3. iMac Intel 21.5" EMC 2544 Heat Sink Assembly Replacement: 3 단계, 이미지 1/1
    • Remove the spring plate from behind the CPU heat sink.

  4. iMac Intel 21.5" EMC 2544 Heat Sink Assembly Replacement: 4 단계, 이미지 1/1
    • Lift and remove the backing plate from behind the CPU heat sink.

    • The backing plate has two posts that fit into alignment holes in the logic board and heat sink.

  5. iMac Intel 21.5" EMC 2544 Heat Sink Assembly Replacement: 5 단계, 이미지 1/2 iMac Intel 21.5" EMC 2544 Heat Sink Assembly Replacement: 5 단계, 이미지 2/2
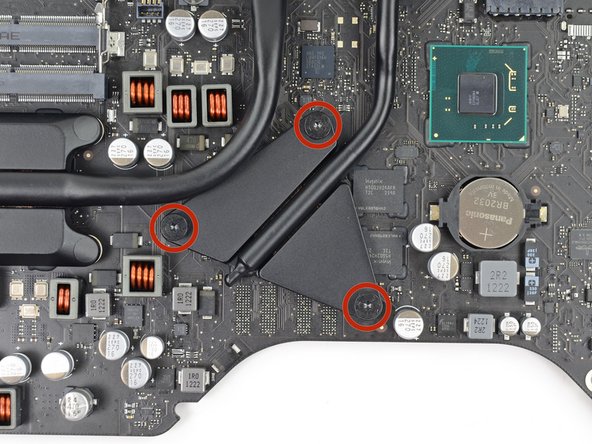
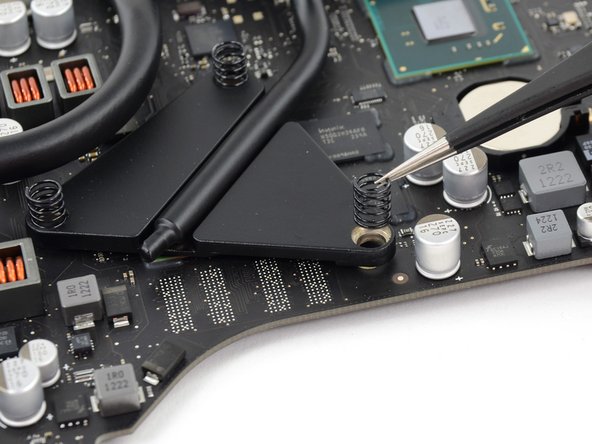
    • Remove the three 12 mm T8 Torx screws securing the GPU heat sink to the logic board.

    • Remove the three springs left behind.

    • These springs might come up with the screws; be careful not to lose track of them.

  6. iMac Intel 21.5" EMC 2544 Heat Sink Assembly Replacement: 6 단계, 이미지 1/2 iMac Intel 21.5" EMC 2544 Heat Sink Assembly Replacement: 6 단계, 이미지 2/2
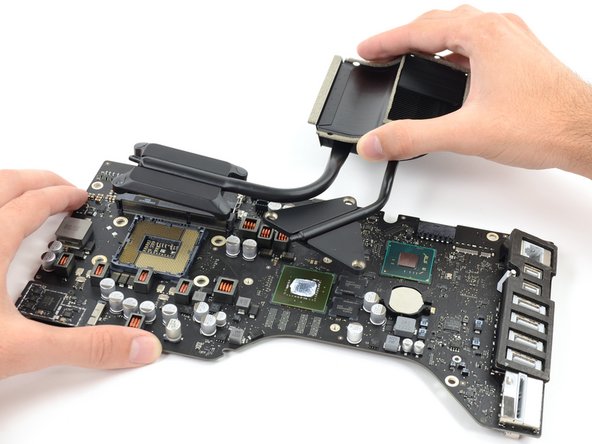
    • Lift and remove the heat sink up off the logic board.

    • The CPU will most likely detach with the heat sink, so be careful about where you lay it down.

결론

To reassemble your device, follow these instructions in reverse order.

Sam Goldheart

회원 가입일: 10/18/12

465,116 평판

안내서 538개 작성하였습니다

iFixit iFixit 회원

Staff

135 회원들

안내서 16,475개 작성하였습니다

댓글 0개

댓글 쓰기

조회 통계:

24 시간 전: 0

7일 전: 0

30일 전: 0

전체 시간: 28