주요 콘텐츠로 건너뛰기

iMac Intel 21.5" Retina 4K Display 2019 Hard Drive Replacement

필요한 것

  1. iMac Intel 21.5" Retina 4K Display 2019 Hard Drive Replacement, Install the iMac service wedge: 1 단계, 이미지 1/1
    이 단계에 사용된 도구:
    iMac Intel 21.5" Cardboard Service Wedge
    $4.99
    구매
    • With the hinge free to move, the iMac will be unbalanced and hard to work on. Place an iMac service wedge, in the stand to stabilize the iMac.

    • If you are using the iFixit cardboard service wedge, follow these assembly directions to put it together.

    • Before beginning any work on your iMac: Unplug the computer and press and hold the power button for ten seconds to discharge the power supply's capacitors.

    • Be very careful not to touch the capacitor leads or any exposed solder joints on the back of the power supply. Only handle the board by the edges.

  2. iMac Intel 21.5" Retina 4K Display 2019 Hard Drive Replacement, Insert the opening tool: 2 단계, 이미지 1/2 iMac Intel 21.5" Retina 4K Display 2019 Hard Drive Replacement, Insert the opening tool: 2 단계, 이미지 2/2
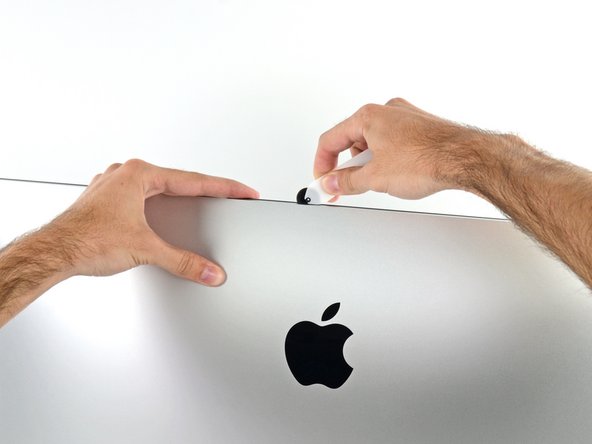
    • Starting on the left side of the display, near the power button, insert the iMac Opening Tool into the gap between the glass panel and the rear enclosure.

    • The hub on the iMac Opening Tool will keep you from pushing the wheel in too far. If using a different tool, insert no more than 3/8" into the display. Otherwise, you risk severing antenna cables and causing serious damage.

  3. iMac Intel 21.5" Retina 4K Display 2019 Hard Drive Replacement, Slice through the display adhesive: 3 단계, 이미지 1/3 iMac Intel 21.5" Retina 4K Display 2019 Hard Drive Replacement, Slice through the display adhesive: 3 단계, 이미지 2/3 iMac Intel 21.5" Retina 4K Display 2019 Hard Drive Replacement, Slice through the display adhesive: 3 단계, 이미지 3/3
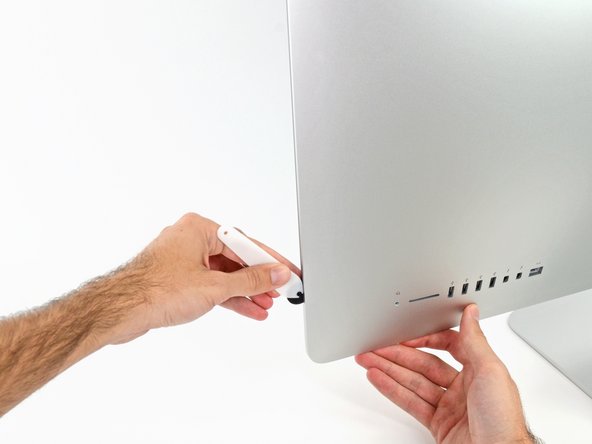
    • Use the tool like a pizza cutter—roll it along the gap, cutting the foam adhesive in between the frame and display.

    • Be sure to always push with the cutting wheel forward. If you pull, the wheel might get pulled out of the handle.

    • Run the tool up along the left side of the display.

  4. iMac Intel 21.5" Retina 4K Display 2019 Hard Drive Replacement: 4 단계, 이미지 1/3 iMac Intel 21.5" Retina 4K Display 2019 Hard Drive Replacement: 4 단계, 이미지 2/3 iMac Intel 21.5" Retina 4K Display 2019 Hard Drive Replacement: 4 단계, 이미지 3/3
    • Continue running the tool up around the top left corner.

  5. iMac Intel 21.5" Retina 4K Display 2019 Hard Drive Replacement: 5 단계, 이미지 1/2 iMac Intel 21.5" Retina 4K Display 2019 Hard Drive Replacement: 5 단계, 이미지 2/2
    • Cut the adhesive along the top left of the display.

  6. iMac Intel 21.5" Retina 4K Display 2019 Hard Drive Replacement: 6 단계, 이미지 1/2 iMac Intel 21.5" Retina 4K Display 2019 Hard Drive Replacement: 6 단계, 이미지 2/2
    • Continue along the top of the display.

    • You may want to run the tool back and forth a few times to ensure you completely cut through the adhesive.

  7. iMac Intel 21.5" Retina 4K Display 2019 Hard Drive Replacement: 7 단계, 이미지 1/3 iMac Intel 21.5" Retina 4K Display 2019 Hard Drive Replacement: 7 단계, 이미지 2/3 iMac Intel 21.5" Retina 4K Display 2019 Hard Drive Replacement: 7 단계, 이미지 3/3
    • Push the tool around the top right corner of the display.

  8. iMac Intel 21.5" Retina 4K Display 2019 Hard Drive Replacement: 8 단계, 이미지 1/2 iMac Intel 21.5" Retina 4K Display 2019 Hard Drive Replacement: 8 단계, 이미지 2/2
    • Push the tool down along the right side of the display.

  9. iMac Intel 21.5" Retina 4K Display 2019 Hard Drive Replacement: 9 단계, 이미지 1/2 iMac Intel 21.5" Retina 4K Display 2019 Hard Drive Replacement: 9 단계, 이미지 2/2
    • Finish pushing the opening tool to the bottom of the right side of the display.

    • At this point, you'll want to run the tool back around the entire display, to ensure you cut as much adhesive as possible.

  10. iMac Intel 21.5" Retina 4K Display 2019 Hard Drive Replacement: 10 단계, 이미지 1/3 iMac Intel 21.5" Retina 4K Display 2019 Hard Drive Replacement: 10 단계, 이미지 2/3 iMac Intel 21.5" Retina 4K Display 2019 Hard Drive Replacement: 10 단계, 이미지 3/3
    이 단계에 사용된 도구:
    Plastic Cards
    $2.99
    구매
    • While the opening tool cut most of the adhesive, the display will still be slightly adhered to the case. A plastic card will be necessary to free up the last of this adhesive.

    • Set the iMac face-up on a table.

    • Starting from the top right corner of the iMac, wedge a plastic card between the display and frame.

    • Be careful not to insert the plastic card more than 3/8", or you may damage internal components.

  11. iMac Intel 21.5" Retina 4K Display 2019 Hard Drive Replacement: 11 단계, 이미지 1/2 iMac Intel 21.5" Retina 4K Display 2019 Hard Drive Replacement: 11 단계, 이미지 2/2
    • Gently twist the plastic card sideways to create a gap between the display and frame.

    • Move slowly and be careful not to stress the display glass too much—you only need to make a gap of about 1/4".

  12. iMac Intel 21.5" Retina 4K Display 2019 Hard Drive Replacement: 12 단계, 이미지 1/3 iMac Intel 21.5" Retina 4K Display 2019 Hard Drive Replacement: 12 단계, 이미지 2/3 iMac Intel 21.5" Retina 4K Display 2019 Hard Drive Replacement: 12 단계, 이미지 3/3
    • Slide the card toward the center of the display to cut any of the remaining adhesive along the top right corner of the iMac.

    • Be sure to stop before the iSight camera, or you may damage it.

  13. iMac Intel 21.5" Retina 4K Display 2019 Hard Drive Replacement: 13 단계, 이미지 1/2 iMac Intel 21.5" Retina 4K Display 2019 Hard Drive Replacement: 13 단계, 이미지 2/2
    • Wedge the plastic card into the top right corner once again, and leave it there to prevent the adhesive from resticking.

  14. iMac Intel 21.5" Retina 4K Display 2019 Hard Drive Replacement: 14 단계, 이미지 1/3 iMac Intel 21.5" Retina 4K Display 2019 Hard Drive Replacement: 14 단계, 이미지 2/3 iMac Intel 21.5" Retina 4K Display 2019 Hard Drive Replacement: 14 단계, 이미지 3/3
    • Insert a second plastic card into the gap between the display and frame near the top left corner of the iMac.

  15. iMac Intel 21.5" Retina 4K Display 2019 Hard Drive Replacement: 15 단계, 이미지 1/2 iMac Intel 21.5" Retina 4K Display 2019 Hard Drive Replacement: 15 단계, 이미지 2/2
    • Gently twist the card upward, slightly increasing the space between the display and frame.

    • As with the other side, twist slowly to allow the adhesive time to separate, and be careful not to over-stress the display glass.

  16. iMac Intel 21.5" Retina 4K Display 2019 Hard Drive Replacement: 16 단계, 이미지 1/3 iMac Intel 21.5" Retina 4K Display 2019 Hard Drive Replacement: 16 단계, 이미지 2/3 iMac Intel 21.5" Retina 4K Display 2019 Hard Drive Replacement: 16 단계, 이미지 3/3
    • Slide the plastic card toward the center.

    • Stop sliding just before the iSight camera to avoid damaging the camera.

  17. iMac Intel 21.5" Retina 4K Display 2019 Hard Drive Replacement: 17 단계, 이미지 1/2 iMac Intel 21.5" Retina 4K Display 2019 Hard Drive Replacement: 17 단계, 이미지 2/2
    • Wedge the plastic card back into the top left corner.

  18. iMac Intel 21.5" Retina 4K Display 2019 Hard Drive Replacement: 18 단계, 이미지 1/3 iMac Intel 21.5" Retina 4K Display 2019 Hard Drive Replacement: 18 단계, 이미지 2/3 iMac Intel 21.5" Retina 4K Display 2019 Hard Drive Replacement: 18 단계, 이미지 3/3
    • With both plastic cards inserted as shown near the corners, gently twist the cards sideways to increase the gap between display and case.

    • If there are any sections that seem to stick and won't separate, stop twisting and use one of the cards to cut the remaining adhesive.

    • Begin to lift the top of the display up from the frame.

    • Only lift the display a few inches—the display data and power cables are still connected to the logic board.

  19. iMac Intel 21.5" Retina 4K Display 2019 Hard Drive Replacement, Display Assembly Cables: 19 단계, 이미지 1/2 iMac Intel 21.5" Retina 4K Display 2019 Hard Drive Replacement, Display Assembly Cables: 19 단계, 이미지 2/2
    • Lift the display up enough to have easy access to the connector, but not so much that you stretch the cables and stress their connections (about 8").

    • Hold the display with one hand while using your other hand to unplug the display power cable.

  20. iMac Intel 21.5" Retina 4K Display 2019 Hard Drive Replacement: 20 단계, 이미지 1/3 iMac Intel 21.5" Retina 4K Display 2019 Hard Drive Replacement: 20 단계, 이미지 2/3 iMac Intel 21.5" Retina 4K Display 2019 Hard Drive Replacement: 20 단계, 이미지 3/3
    • Continuing to support the display with one hand, flip up the metal retaining bracket on the display data cable.

    • Carefully pull the display data cable from its socket on the logic board.

    • Be sure to pull the display data cable connector straight out of its socket, keeping it parallel to the motherboard, to avoid damaging it.

  21. iMac Intel 21.5" Retina 4K Display 2019 Hard Drive Replacement, Separate the display: 21 단계, 이미지 1/2 iMac Intel 21.5" Retina 4K Display 2019 Hard Drive Replacement, Separate the display: 21 단계, 이미지 2/2
    • Lift the display up to a near-vertical position.

    • At this point there is still a strip of adhesive along the bottom of the display that will hold the display to the frame like a hinge. You can loosen this adhesive by working the display up and down a few times.

  22. iMac Intel 21.5" Retina 4K Display 2019 Hard Drive Replacement: 22 단계, 이미지 1/3 iMac Intel 21.5" Retina 4K Display 2019 Hard Drive Replacement: 22 단계, 이미지 2/3 iMac Intel 21.5" Retina 4K Display 2019 Hard Drive Replacement: 22 단계, 이미지 3/3
    이 단계에 사용된 도구:
    Plastic Cards
    $2.99
    구매
    • If necessary, a plastic card can be used to cut any remaining sections of the bottom adhesive strip.

  23. iMac Intel 21.5" Retina 4K Display 2019 Hard Drive Replacement: 23 단계, 이미지 1/3 iMac Intel 21.5" Retina 4K Display 2019 Hard Drive Replacement: 23 단계, 이미지 2/3 iMac Intel 21.5" Retina 4K Display 2019 Hard Drive Replacement: 23 단계, 이미지 3/3
    • Lift the display up from the frame and remove it from the iMac.

    • It may be necessary to slowly lift from one side to peel against the remaining adhesive.

    • Be very careful handling the display—it's big, heavy, and made of glass.

    • After the adhesive is cut, it cannot be used to re-seal the display in place. Follow this guide to replace the adhesive strips that secure the display to the rear enclosure.

  24. iMac Intel 21.5" Retina 4K Display 2019 Hard Drive Replacement, Hard Drive Brackets: 24 단계, 이미지 1/1
    • Remove the following T10 Torx screws securing the hard drive brackets to the iMac:

    • Two 21 mm screws

    • One 9 mm screw

    • One 27 mm screw

  25. iMac Intel 21.5" Retina 4K Display 2019 Hard Drive Replacement: 25 단계, 이미지 1/2 iMac Intel 21.5" Retina 4K Display 2019 Hard Drive Replacement: 25 단계, 이미지 2/2
    • Remove the left and right hard drive brackets from the iMac.

  26. iMac Intel 21.5" Retina 4K Display 2019 Hard Drive Replacement, Hard Drive Assembly: 26 단계, 이미지 1/3 iMac Intel 21.5" Retina 4K Display 2019 Hard Drive Replacement, Hard Drive Assembly: 26 단계, 이미지 2/3 iMac Intel 21.5" Retina 4K Display 2019 Hard Drive Replacement, Hard Drive Assembly: 26 단계, 이미지 3/3
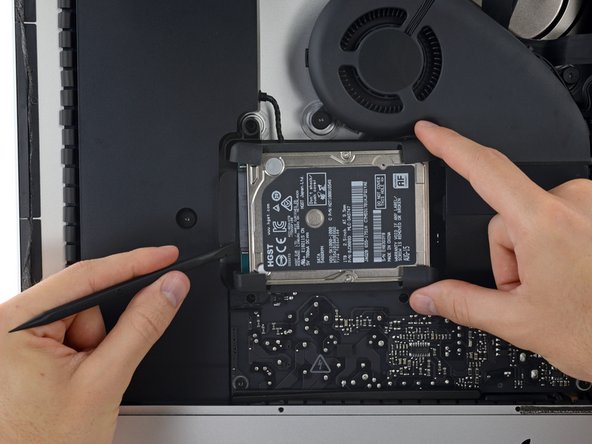
    • Lift the hard drive from the edge nearest the logic board and pull it slightly out of its recess.

    • The hard drive is still attached by its SATA cable; do not attempt to fully remove it from the iMac yet.

  27. iMac Intel 21.5" Retina 4K Display 2019 Hard Drive Replacement: 27 단계, 이미지 1/3 iMac Intel 21.5" Retina 4K Display 2019 Hard Drive Replacement: 27 단계, 이미지 2/3 iMac Intel 21.5" Retina 4K Display 2019 Hard Drive Replacement: 27 단계, 이미지 3/3
    • Use a spudger to disconnect the single SATA cable by prying it gently away from the hard drive.

    • Remove the hard drive assembly from the iMac.

  28. iMac Intel 21.5" Retina 4K Display 2019 Hard Drive Replacement, Hard Drive: 28 단계, 이미지 1/3 iMac Intel 21.5" Retina 4K Display 2019 Hard Drive Replacement, Hard Drive: 28 단계, 이미지 2/3 iMac Intel 21.5" Retina 4K Display 2019 Hard Drive Replacement, Hard Drive: 28 단계, 이미지 3/3
    • Peel the rubber bumper off one side of the hard drive.

    • Repeat for the other side.

    • When installing a new drive, it's helpful to use double-sided tape to stick the bumpers to your new drive.

결론

Compare your new replacement part to the original part—you may need to transfer remaining components or remove adhesive backings from the new part before installing.
To reassemble your device, follow the above steps in reverse order.
Take your e-waste to an R2 or e-Stewards certified recycler.
Repair didn’t go as planned? Check out our Answers community for troubleshooting help.

다른 24명이 해당 안내서를 완성하였습니다.

Adam O'Camb

회원 가입일: 04/11/15

194,899 평판

안내서 416개 작성하였습니다

댓글 14개

Great guide! I had a failing fusion drive and upgraded to an SSD and got the 64gb RAM maxxer kit while I was in there. everything went really smoothly and my computer is so much faster. My only mistake was that I didn’t clone the HDD before taking the imac apart. I had to put it all back together with the old drive, clone to the SSD, take it all apart again, replace the SSD, put it back together to verify that it was even gonna work, then take it all apart again to finish up the RAM upgrade. But… it’s all good. Thanks for the great guide!

Mark Pruett - 답글

You cannot replace a conventional “Hard drive” in this model iMac.

DO NOT attempt this upgrade until you understand two important facts:

1) The drive in your iMac MUST BE a ‘SSD’ or a ‘Fusion drive’. If it is a conventional HDD, stop. There is NO PCIe CONNECTOR inside to connect a new blade drive.

2) Click on the link in this iFixit for "clone your existing hard drive". All the more recent Apple CPU's are now classified as 'T2 secure chips'. Cloning is no longer straightforward, e.g. "Hold down Opt key during restart, etc." You have to bypass/disable certain security features on your iMac, and this is somewhat of a lengthy process. If you do not, when you try to boot from an external drive you will see nothing but a black screen.

Excellent step by step guide, thank you. I will definitely refer to this when I upgrade my 250G SSD which, BTW, is WAY too small. There's only 100G left, and only apps are Logic Pro X, Numbers/Keynote/Pages, iTunes & a few utilities... hardly any actual work

Anti Spam - 답글

Thanks for the information given. One follow-up question having a SSD-only 2019 iMac: Is the 2.5" harddrive enclosure and Sata-Cable included in this one? I would like to a) upgrade the PCIe-SSD but also put in a slightly bigger 2.5" SSD in place of the - currently non-existent - harddrive. Knowing Apple I am pretty sure that they did not include the Harddrive enclosure in SSD-only 2019 iMacs - plus using proprietary Sata connectors probably >.<

Joachim Schneider -

The guide here mentions nothing of upgrading a blade ssd. If I open my imac and see a HDD can't I just swap it with a 2.5'SSD?

Mosheh Herdsman -

Your message is not clear. This guide is for a conventional drive upgrade for a Pre T2 2019 iMac.

This guide is also for an iMac that is Pre-T2, so your second point is not relevant either.

Sure, do not follow this guide if you wish to upgrade your SSD equiped iMac, or a 2020 iMac or iMac Pro.

Charlie Nancarrow -

댓글 쓰기

조회 통계:

24 시간 전: 37

7일 전: 228

30일 전: 986

전체 시간: 28,146