주요 콘텐츠로 건너뛰기

iMac Intel 24" EMC 2134 and 2211 Front Bezel Replacement

필요한 것

  1. iMac Intel 24" EMC 2134 and 2211 Front Bezel Replacement, Access Door: 1 단계, 이미지 1/1
    • Loosen the single Phillips screw in the center of the access door.

    • This screw is captive in the access door.

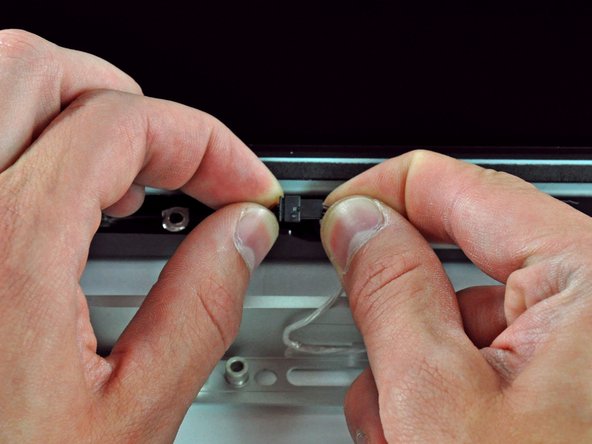
    • Remove the access door from your iMac.

    • The glass panel is fixed onto the front bezel with fourteen magnets around its perimeter.

    • Stick two suction cups to opposing corners of the glass panel.

    • To attach the suction cups we sell, first position the suction cup with the movable handle parallel to the face of the glass panel. While lightly holding the suction cup against the glass, raise the movable handle until it is parallel with the other handle.

    • If your suction cups refuse to stick, try cleaning both the glass panel and the suction cup with a mild solvent such as Windex.

  2. iMac Intel 24" EMC 2134 and 2211 Front Bezel Replacement: 3 단계, 이미지 1/1
    • Gently pull the glass panel straight up off the iMac.

    • The glass panel has several positioning pins around its perimeter. To avoid shearing these pins off the glass panel, be sure to only pull straight up during removal.

    • Be meticulous about cleaning the LCD and the inside face of the glass panel before reinstallation, as any fingerprints or dust trapped inside will be annoyingly visible when the display is on.

  3. iMac Intel 24" EMC 2134 and 2211 Front Bezel Replacement, Front Bezel: 4 단계, 이미지 1/2 iMac Intel 24" EMC 2134 and 2211 Front Bezel Replacement, Front Bezel: 4 단계, 이미지 2/2
    • Remove the following 12 screws securing the front bezel to the rear case:

    • Eight 13 mm T8 Torx screws

    • Four 25 mm T8 Torx screws

    • You may have different-length screws depending on your model:

    • Six 13 mm T8 Torx screws

    • Four 25 mm T8 Torx screws

    • Two 35 mm T8 Torx screws

  4. iMac Intel 24" EMC 2134 and 2211 Front Bezel Replacement: 5 단계, 이미지 1/2 iMac Intel 24" EMC 2134 and 2211 Front Bezel Replacement: 5 단계, 이미지 2/2
    • The front bezel is still attached to the iMac by the microphone cable.

    • Gently lift the front bezel from its top edge off the rear case. It helps to use your thumbs to push down very gently on the corners of the display.

    • Once the top edge of the front bezel has cleared the rear case, rotate the front bezel toward the stand and lift it off the rear case.

    • When reinstalling the front bezel, start at the lower edge and make sure it is flush with the rear case before lowering the top edge onto the iMac.

  5. iMac Intel 24" EMC 2134 and 2211 Front Bezel Replacement: 6 단계, 이미지 1/1
    • Disconnect the microphone cable connector, removing tape as necessary.

    • For the front bezel to sit properly, be sure to tuck the microphone cable and connector into the void next to the camera board.

결론

To reassemble your device, follow these instructions in reverse order.

다른 34명이 해당 안내서를 완성하였습니다.

Brittany McCrigler

회원 가입일: 03/05/12

88,229 평판

안내서 132개 작성하였습니다

iFixit iFixit 회원

Community

141 회원들

안내서 17,643개 작성하였습니다

0 댓글

댓글 쓰기

조회 통계:

24 시간 전: 0

7일 전: 6

30일 전: 66

전체 시간: 23,828