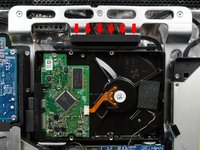
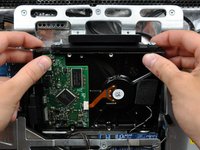
주요 콘텐츠로 건너뛰기

iMac Intel 24" EMC 2134 and 2211 Hard Drive Replacement

단지 전제 조건
이 가이드는 전제 조건 전용 가이드입니다! 이 가이드는 다른 절차의 일부이며 단독으로 사용할 수 없습니다.

필요한 것

  1. iMac Intel 24" EMC 2134 and 2211 Hard Drive Replacement, Hard Drive: 1 단계, 이미지 1개 중 1개
    • If necessary, remove the pieces of tape securing the hard drive/optical drive thermal sensor cables to your iMac.

  2. iMac Intel 24" EMC 2134 and 2211 Hard Drive Replacement: 2 단계, 이미지 1개 중 1개
    • Disconnect the hard drive thermal sensor by pulling its connector upwards toward the top of your iMac.

    • When removing this connector, it is helpful use your thumbnails to push the ears on either side of the connector toward the top of your iMac.

  3. iMac Intel 24" EMC 2134 and 2211 Hard Drive Replacement: 3 단계, 이미지 2개 중 1개 iMac Intel 24" EMC 2134 and 2211 Hard Drive Replacement: 3 단계, 이미지 2개 중 2개
    • Pressing the top of the hard drive bracket down to release it from the rear case requires a substantial amount of force. We recommend laying your iMac stand-side down on a table to avoid knocking it over.

    • Press the hard drive bracket down toward the bottom edge of your iMac to free it from the rear case, then rotate the top of the drive toward yourself.

  4. iMac Intel 24" EMC 2134 and 2211 Hard Drive Replacement: 4 단계, 이미지 2개 중 1개 iMac Intel 24" EMC 2134 and 2211 Hard Drive Replacement: 4 단계, 이미지 2개 중 2개
    • Rotate the hard drive toward yourself, then lift it up off its mounting pins.

    • The hard drive is still connected via the SATA cables.

    • When reinstalling your hard drive, be careful not to push the rubber grommets through the openings in the chassis with the lower hard drive pins as retrieving them may require logic board removal.

  5. iMac Intel 24" EMC 2134 and 2211 Hard Drive Replacement: 5 단계, 이미지 1개 중 1개
    • Insert the flat end of a spudger between the SATA power cable connector and the edge of the hard drive.

    • Twist the spudger to separate the connector from the hard drive.

  6. iMac Intel 24" EMC 2134 and 2211 Hard Drive Replacement: 6 단계, 이미지 1개 중 1개
    • Pull the SATA power connector away from the hard drive.

  7. iMac Intel 24" EMC 2134 and 2211 Hard Drive Replacement: 7 단계, 이미지 1개 중 1개
    • Disconnect the SATA data cable by pulling its connector away from the hard drive.

결론

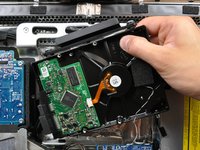
To reassemble your device, follow these instructions in reverse order.

작성자

3다른 기여자 명과 함께

Brittany McCrigler

회원 가입일: 03/05/12

90,490 평판

안내서 142개를 작성함

iFixit iFixit 회원

Staff

123 회원들

안내서 23,788개를 작성함

0가이드 댓글

댓글 쓰기

조회 통계:

지난 24시간: 0

지난 7일: 0

지난 30일: 1

전체 시간: 686