소개
If you are using the iMac 27" late 2009 or 2010 model for games, you might want to upgrade your graphics card to the 6 series of the last 2011 model.
필요한 것
-
이 단계에 사용된 도구:Heavy-Duty Suction Cups (Pair)$14.95
-
Stick a heavy-duty suction cup near each of the two top corners of the glass panel.
-
While lightly holding the suction cup against the glass, raise the movable handle until it is parallel with the other handle (as indicated by the third picture).
-
-
-
-
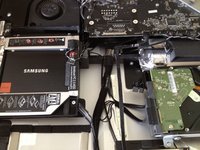
Remove the temperature sensor cable from the hard drive. This will allow the hard drive to be removed.
-
-
-
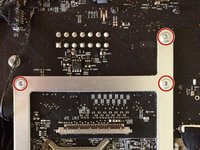
Remove the three T9 Torx screws from the graphics card bezel.
-
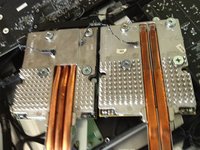
Locate the large heatsink from the graphics card, which should be right above the optical drive.
-
Remove the single screw holding it in place.
-
Carefully remove the graphics card temperature sensor cable from underneath the motherboard.
-
-
-
Remove the metal bezel from the graphics card; only a couple of screws hold it in place.
-
Store your graphics card in a safe place in case you need it again or want to reinstall it.
-
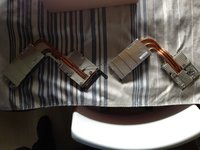
The second image shows both the 4 and 6 series side by side. A little difference in height makes some extra work necessary (see the next step).
-
-
-
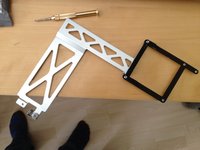
As the 6 series is slightly higher, we need to make a little space on the plastic holder which is beneath the card.
-
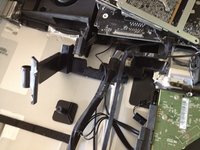
Remove the plastic part, which is shown on the 2nd picture, by removing one screw and carefully pull it from the aluminium case.
-
It's fastened with tape so don't worry about breaking anything.
-
After wiggling and navigating it around the cables, you should have it in your hands.
-
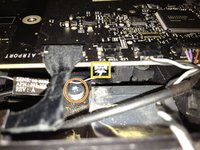
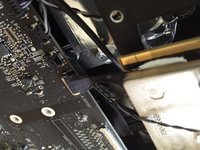
The rectangular space, in picture three where the large cable goes through, use a rotary tool to make it about 5mm wider and 2-3mm deeper.
-
The third image shows the final result we want to achieve.
-
The primary reason for this step is the heatpipe of the 6 series, which takes more space.
-
-
-
Apply the metal bezel to the new 6 series graphics card. Make sure its aligned properly.
-
Now insert the 6 series graphics card carefully.
-
When in place, fix it with the 3 screws.
-
Reinsert the temperature sensor cable. You need fine hands or a good tool to do so. Be patient with this step.
-
-
-
Reassemble the LCD display as explained on iFixit.
-
No other work needs to be done. As you removed the power cable the SMC should reset, which is the chip configuring your hardware.
-
If all goes well, you should be greeted with a welcome screen and "About This Mac" should show the image to the left.
-
Note: I also replaced the optical drive with a 256GB SSD, which can be done easily during the installation process.
-
Last tip: If you remove the optical drive for an SSD, make a minimal bootcamp partition and install Windows on it. It will save you a lot of trouble if you ever need one. Believe me, simply do it. Installing bootcamp with no optical drive is a pain.
-


To reassemble your device, follow these instructions in reverse order.
To reassemble your device, follow these instructions in reverse order.
다른 99명이 해당 안내서를 완성하였습니다.
댓글 128개
works perfectly ;-) just be slow and precised
Just be noticed that this upgrade not work for iMac 27 late 2009 equipped with core 2 duo CPU, but only with the i5 and i7 CPU one!
Paolo -
Did you know you can add an additional SSD drive WITHOUT needing to remove your Optical drive? It installs vertically just to the right of your HDD. I just performed this upgrade last weekend. I believe you can do this to 2009 and up models.
Regretfully Not on the iMac late 2009, because the motherboard has only 2 SATA ports, not 3 like the 2010 and later models...
Just a question: with this mod, are you able to use Airplay Mirroring in Mountain Lion? Since the inhability to use it on these macs is GPU-related, virtually with this Graphic card you may be able to enable it... Let me know please!!