이 버전에는 잘못된 편집 사항이 있을 수 있습니다. 최신 확인된 스냅샷으로 전환하십시오.
필요한 것
-
이 단계는 번역되지 않았습니다. 번역을 도와주십시오
-
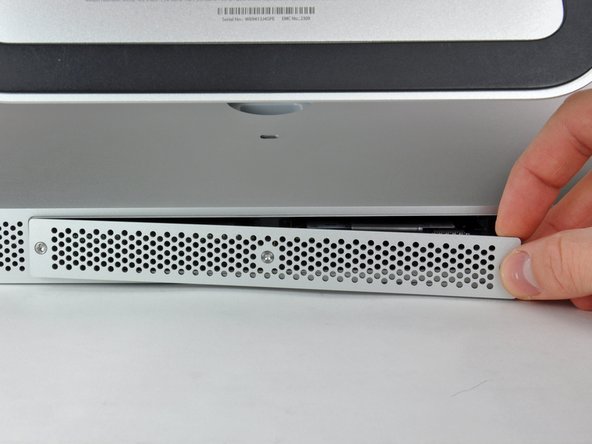
Loosen the three Phillips screws securing the access door to the bottom edge of your iMac.
-
Remove the access door from your iMac.
-
-
-
이 단계는 번역되지 않았습니다. 번역을 도와주십시오
-
Use your fingers or the tip of a spudger to slide the black plastic RAM tray pull tab out of the RAM slot.
-
-
이 단계는 번역되지 않았습니다. 번역을 도와주십시오
-
Pull the black plastic tab away from the iMac to eject the RAM chip from its socket.
-
Use your fingers to slide the RAM chip out of its socket.
-


다른 166명이 해당 안내서를 완성하였습니다.

댓글 8개
Interestingly, the mid 2011 iMac 27 inch also goes to 12GB!
I originally thought I'd be upgrading to 8GB today but found 4 slots instead of 2 :-)
As long as the two front (close to the screen) slots are paired with the exact same RAM config.
For example:
Two front slots Apple 2GB chips = 4GB.
Two rear slots, Crucial Lexar 4GB chips = 8GB
Total 12GB
Hoorah no waste and more RAM, come on Lion... I'm Ready!
Need a#0 screwdriver, not #1
Be sure to really push the RAM all the way into the socket. I had a "no RAM" error beep when I first booted up my iMac after doing this. Just an extra two millimetres was all it needed to be properly installed. It can be quite tough to get in.
Hi,
I've got a 2309 and just received my two additional 4GB RAM Cards. Put them in and I can say that the speed improved (now with 16GB). Not dramatically, however, some applications did always show the little rainbow disc when my Mac was "thinking". This is now gone.
I am on OS X 10.9.5 still and the whole Mac feels as if it can "breathe" more lightly with the additional RAM.
Thanks!
My 11,1 27” 2.66Ghz iMac happy eats up all the 4x8GB I put in there.