주요 콘텐츠로 건너뛰기

이 안내서에는 최근 변경 사항이 더 있습니다. 최신 비검증 버전으로 전환하십시오.

iMac Intel 27" Retina 5K Display 2019 Fan Replacement

필요한 것

  1. iMac Intel 27" Retina 5K Display 2019 Fan Replacement, Install the service wedge: 1 단계, 이미지 1/1
    이 단계에 사용된 도구:
    iMac Intel 27" Cardboard Service Wedge
    $4.99
    구매
  2. iMac Intel 27" Retina 5K Display 2019 Fan Replacement, Insert an opening tool: 2 단계, 이미지 1/3 iMac Intel 27" Retina 5K Display 2019 Fan Replacement, Insert an opening tool: 2 단계, 이미지 2/3 iMac Intel 27" Retina 5K Display 2019 Fan Replacement, Insert an opening tool: 2 단계, 이미지 3/3
    • Starting on the left of the display, near the power button, insert the iMac Opening Tool into the gap between the glass panel and the rear case.

    • The hub on the iMac Opening Tool will keep you from pushing the wheel in too far. If using a different tool, insert it no more than 3/8" (9.5 mm) into the display. You risk severing antenna cables and causing serious damage if you insert the tool too far.

  3. iMac Intel 27" Retina 5K Display 2019 Fan Replacement, Slice through the display adhesive: 3 단계, 이미지 1/3 iMac Intel 27" Retina 5K Display 2019 Fan Replacement, Slice through the display adhesive: 3 단계, 이미지 2/3 iMac Intel 27" Retina 5K Display 2019 Fan Replacement, Slice through the display adhesive: 3 단계, 이미지 3/3
    • Use the tool like a pizza cutter—roll it along through the gap, and it will cut the foam adhesive through the center.

    • Be sure to always push with the handle behind the cutting wheel. If you pull, the wheel might get pulled out of the handle.

    • Run the tool up along the left side of the display.

  4. iMac Intel 27" Retina 5K Display 2019 Fan Replacement, Cut through the remaining adhesive: 4 단계, 이미지 1/3 iMac Intel 27" Retina 5K Display 2019 Fan Replacement, Cut through the remaining adhesive: 4 단계, 이미지 2/3 iMac Intel 27" Retina 5K Display 2019 Fan Replacement, Cut through the remaining adhesive: 4 단계, 이미지 3/3
    • Continue wheeling the tool up around the top left corner.

  5. iMac Intel 27" Retina 5K Display 2019 Fan Replacement: 5 단계, 이미지 1/2 iMac Intel 27" Retina 5K Display 2019 Fan Replacement: 5 단계, 이미지 2/2
    • Cut the adhesive along the top left of the display.

  6. iMac Intel 27" Retina 5K Display 2019 Fan Replacement: 6 단계, 이미지 1/2 iMac Intel 27" Retina 5K Display 2019 Fan Replacement: 6 단계, 이미지 2/2
    • Continue along the top of the display.

    • You may want to run the tool back and forth through what you've already cut a few times, to ensure you get as much of the adhesive separated as possible.

  7. iMac Intel 27" Retina 5K Display 2019 Fan Replacement: 7 단계, 이미지 1/3 iMac Intel 27" Retina 5K Display 2019 Fan Replacement: 7 단계, 이미지 2/3 iMac Intel 27" Retina 5K Display 2019 Fan Replacement: 7 단계, 이미지 3/3
    • Push the tool around the top right corner of the display.

  8. iMac Intel 27" Retina 5K Display 2019 Fan Replacement: 8 단계, 이미지 1/2 iMac Intel 27" Retina 5K Display 2019 Fan Replacement: 8 단계, 이미지 2/2
    • Wheel the tool down along the right side of the display.

  9. iMac Intel 27" Retina 5K Display 2019 Fan Replacement: 9 단계, 이미지 1/2 iMac Intel 27" Retina 5K Display 2019 Fan Replacement: 9 단계, 이미지 2/2
    • Finish pushing the opening tool to the bottom of the right side of the display.

    • At this point, you'll want to run the tool back around the entire display, to ensure you cut as much adhesive as possible.

  10. iMac Intel 27" Retina 5K Display 2019 Fan Replacement: 10 단계, 이미지 1/3 iMac Intel 27" Retina 5K Display 2019 Fan Replacement: 10 단계, 이미지 2/3 iMac Intel 27" Retina 5K Display 2019 Fan Replacement: 10 단계, 이미지 3/3
    이 단계에 사용된 도구:
    Plastic Cards
    $2.99
    구매
    • While the opening tool did the lion's share of the work, the display will still be slightly adhered to the case. A plastic card will be necessary to free up the last of this adhesive.

    • Set the iMac face-up on a table.

    • Starting from the top right corner of the iMac, insert a plastic card between the display and frame.

    • Be careful not to insert it more than 3/8" (9.5 mm), or you may damage internal components.

  11. iMac Intel 27" Retina 5K Display 2019 Fan Replacement: 11 단계, 이미지 1/2 iMac Intel 27" Retina 5K Display 2019 Fan Replacement: 11 단계, 이미지 2/2
    • Gently twist the plastic card to open the space between the display and frame, and cut any remaining adhesive near the corner.

    • Using too much force will crack the glass. Work carefully, and don't try to create a gap any larger than about 1/4" (6 mm).

  12. iMac Intel 27" Retina 5K Display 2019 Fan Replacement: 12 단계, 이미지 1/3 iMac Intel 27" Retina 5K Display 2019 Fan Replacement: 12 단계, 이미지 2/3 iMac Intel 27" Retina 5K Display 2019 Fan Replacement: 12 단계, 이미지 3/3
    • Be sure to stop cutting before the iSight camera in this step, or you may damage it.

    • Slide the card toward the center of the display, to cut any remaining adhesive.

  13. iMac Intel 27" Retina 5K Display 2019 Fan Replacement: 13 단계, 이미지 1/2 iMac Intel 27" Retina 5K Display 2019 Fan Replacement: 13 단계, 이미지 2/2
    • Put the card into the corner again and let it stay there to keep the adhesive from resettling.

  14. iMac Intel 27" Retina 5K Display 2019 Fan Replacement: 14 단계, 이미지 1/3 iMac Intel 27" Retina 5K Display 2019 Fan Replacement: 14 단계, 이미지 2/3 iMac Intel 27" Retina 5K Display 2019 Fan Replacement: 14 단계, 이미지 3/3
    • Insert a second card into the gap between the display and frame in the top left corner.

  15. iMac Intel 27" Retina 5K Display 2019 Fan Replacement: 15 단계, 이미지 1/2 iMac Intel 27" Retina 5K Display 2019 Fan Replacement: 15 단계, 이미지 2/2
    • Gently twist the card, slightly increasing the space between the display and frame.

    • As with the other side, move slowly to allow the adhesive to break, and be careful not to over-stress the display glass.

  16. iMac Intel 27" Retina 5K Display 2019 Fan Replacement: 16 단계, 이미지 1/3 iMac Intel 27" Retina 5K Display 2019 Fan Replacement: 16 단계, 이미지 2/3 iMac Intel 27" Retina 5K Display 2019 Fan Replacement: 16 단계, 이미지 3/3
    • Slide the plastic card toward the center, again stopping just before the iSight camera.

  17. iMac Intel 27" Retina 5K Display 2019 Fan Replacement: 17 단계, 이미지 1/2 iMac Intel 27" Retina 5K Display 2019 Fan Replacement: 17 단계, 이미지 2/2
    • Insert the card back into the top left corner.

  18. iMac Intel 27" Retina 5K Display 2019 Fan Replacement: 18 단계, 이미지 1/3 iMac Intel 27" Retina 5K Display 2019 Fan Replacement: 18 단계, 이미지 2/3 iMac Intel 27" Retina 5K Display 2019 Fan Replacement: 18 단계, 이미지 3/3
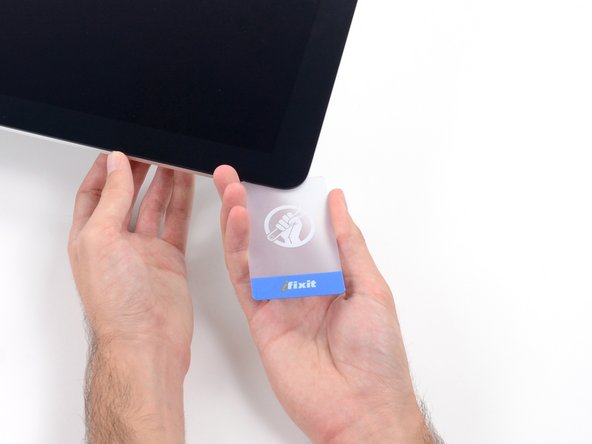
    • With the cards inserted as shown near the corners, gently twist the cards to increase the gap between display and case.

    • If there are any sections that seem to stick and won't separate, stop twisting and use one of the cards to cut the adhesive in the problem area.

    • Begin to lift the top of the display up from the frame.

    • Only lift the display a few inches—it is still attached to the iMac by data and power cables.

  19. iMac Intel 27" Retina 5K Display 2019 Fan Replacement, Disconnect the display cables: 19 단계, 이미지 1/2 iMac Intel 27" Retina 5K Display 2019 Fan Replacement, Disconnect the display cables: 19 단계, 이미지 2/2
    • While holding the display up with one hand, use the other to unplug the display power cable.

    • Lift the display up enough to have easy access to the connections, but not so much that you stretch the cables and stress their connections (about 8").

  20. iMac Intel 27" Retina 5K Display 2019 Fan Replacement: 20 단계, 이미지 1/3 iMac Intel 27" Retina 5K Display 2019 Fan Replacement: 20 단계, 이미지 2/3 iMac Intel 27" Retina 5K Display 2019 Fan Replacement: 20 단계, 이미지 3/3
    • Flip up the metal retaining bracket on the display data cable.

    • Disconnect the display data cable.

    • This is a delicate connection that can easily be broken. Be sure to pull the display data cable connector straight out of its socket, toward the top of the iMac.

  21. iMac Intel 27" Retina 5K Display 2019 Fan Replacement, Lift the display: 21 단계, 이미지 1/2 iMac Intel 27" Retina 5K Display 2019 Fan Replacement, Lift the display: 21 단계, 이미지 2/2
    • Lift the display up to a near-vertical position.

    • At this point there is still a strip of adhesive along the bottom of the display that will hold the display to the frame like a hinge. You can loosen this adhesive by working the display up and down a few times.

  22. iMac Intel 27" Retina 5K Display 2019 Fan Replacement, Remove the remaining adhesive: 22 단계, 이미지 1/3 iMac Intel 27" Retina 5K Display 2019 Fan Replacement, Remove the remaining adhesive: 22 단계, 이미지 2/3 iMac Intel 27" Retina 5K Display 2019 Fan Replacement, Remove the remaining adhesive: 22 단계, 이미지 3/3
    • Be very careful not to touch the capacitor leads or any exposed solder joints on the back of the power supply (boxed in red).

    • Grasp the small tab at the end of one of the bottom edge display adhesive strips and pull the adhesive toward the top of the iMac to remove it.

    • Repeat this step with the other adhesive strip and remove it.

    • If either adhesive strip breaks before it's removed, use a plastic card to slice through the remaining adhesive.

  23. iMac Intel 27" Retina 5K Display 2019 Fan Replacement, Remove the display: 23 단계, 이미지 1/3 iMac Intel 27" Retina 5K Display 2019 Fan Replacement, Remove the display: 23 단계, 이미지 2/3 iMac Intel 27" Retina 5K Display 2019 Fan Replacement, Remove the display: 23 단계, 이미지 3/3
    • Be very careful handling the display—it's big, heavy, and made of glass. The display has fragile edges. Avoid lifting the display by the corners.

    • Lift the display up from the frame and remove it from the iMac. Lay the display face down on a flat, soft surface.

    • It may be necessary to slowly lift from one side, to peel against the remaining adhesive.

    • After the adhesive is cut, it cannot be used to re-seal the display in place. Follow the adhesive replacement guide for your model when your repair is complete to replace the adhesive strips that secure the display to the rear enclosure.

  24. iMac Intel 27" Retina 5K Display 2019 Fan Replacement, Fan: 24 단계, 이미지 1/3 iMac Intel 27" Retina 5K Display 2019 Fan Replacement, Fan: 24 단계, 이미지 2/3 iMac Intel 27" Retina 5K Display 2019 Fan Replacement, Fan: 24 단계, 이미지 3/3
    • Use the tip of a spudger to disconnect the fan cable's connector from its socket on the logic board.

  25. iMac Intel 27" Retina 5K Display 2019 Fan Replacement: 25 단계, 이미지 1/2 iMac Intel 27" Retina 5K Display 2019 Fan Replacement: 25 단계, 이미지 2/2
    • Use your fingers to peel the black tape connecting the fan to the exhaust duct back slightly.

    • Leave the tape in place on the exhaust duct, you only need to expose the join to free the fan.

  26. iMac Intel 27" Retina 5K Display 2019 Fan Replacement: 26 단계, 이미지 1/1
    • Use a T10 Torx screwdriver to remove the three 12.4 mm screws securing the fan.

  27. iMac Intel 27" Retina 5K Display 2019 Fan Replacement: 27 단계, 이미지 1/2 iMac Intel 27" Retina 5K Display 2019 Fan Replacement: 27 단계, 이미지 2/2
    • Remove the fan from the iMac.

결론

Compare your new replacement part to the original part—you may need to transfer remaining components or remove adhesive backings from the new part before installing.

To reassemble your device, follow the above steps in reverse order.

Take your e-waste to an R2 or e-Stewards certified recycler.

Repair didn’t go as planned? Check out our Answers community for troubleshooting help.

다른 2명이 해당 안내서를 완성하였습니다.

Adam O'Camb

회원 가입일: 04/11/15

196,143 평판

안내서 416개 작성하였습니다

댓글 한 개

Thanks for the guide. Do you know the part number for the replacement fan? I have to replace mine. Thanks

CJ Viggers - 답글

댓글 쓰기

조회 통계:

24 시간 전: 4

7일 전: 24

30일 전: 121

전체 시간: 3,793