이 버전에는 잘못된 편집 사항이 있을 수 있습니다. 최신 확인된 스냅샷으로 전환하십시오.
필요한 것
-
-
힌지가 자유롭게 움직이면 iMac의 균형이 맞지 않아 작업하기 어렵습니다. iMac을 눕힌 상태로 수리를 완료할 수 있지만, iMac 서비스 쐐기를 사용하면 더 빠르고 쉽게 수리할 수 있습니다.
-
iFixit 카드보드 서비스 쐐기를 사용하는 경우 다음 조립 지침을 따라 조립하세요.
-
-
-
이 단계는 번역되지 않았습니다. 번역을 도와주십시오
-
Use a Phillips screwdriver to remove the nine 3.2 mm screws securing the support bracket.
-
You may need to peel up the display adhesive lining the bottom edge of the iMac enclosure to access the screws.
-
-
이 단계는 번역되지 않았습니다. 번역을 도와주십시오
-
Remove the lower support bracket (a.k.a. "chin strap") from the iMac enclosure.
-
-
이 단계는 번역되지 않았습니다. 번역을 도와주십시오
-
Unplug the left speaker cable by pulling it straight up out of its socket on the logic board.
-
De-route the cable from the gap between the hard drive and logic board.
-
-
이 단계는 번역되지 않았습니다. 번역을 도와주십시오
-
Use a spudger to disconnect the power button connector from its socket on the logic board.
-
-
이 단계는 번역되지 않았습니다. 번역을 도와주십시오
-
Lift the left speaker straight up, until the power button cable is exposed (about 0.5 inches).
-
-
이 단계는 번역되지 않았습니다. 번역을 도와주십시오
-
Gently de-route the power button cable from its groove in the left speaker.
-
-
이 단계는 번역되지 않았습니다. 번역을 도와주십시오
-
Lift the left speaker straight up and remove it from the iMac.
-
Push from the connector end as you pull from the speaker end to thread the cable under the hard drive's right bracket.
-
-
이 단계는 번역되지 않았습니다. 번역을 도와주십시오
-
Pull straight up on the SATA data/power cable to disconnect it from the drive.
-
-
이 단계는 번역되지 않았습니다. 번역을 도와주십시오
-
Remove two 7.3 mm T10 screws securing the left hard drive bracket to the rear case.
-
-
이 단계는 번역되지 않았습니다. 번역을 도와주십시오
-
Grab the hard drive and left hard drive bracket together.
-
Tilt the left side up away from the rear case, and slide the assembly to the left.
-
Remove the hard drive and left hard drive bracket from the iMac.
-
-
이 단계는 번역되지 않았습니다. 번역을 도와주십시오
-
Remove the following four screws securing the power supply to the rear case (size T8 or T10 depending on the exact model):
-
Two 23.7 mm Torx screws
-
Two 7.3 mm Torx screws
-
-
이 단계는 번역되지 않았습니다. 번역을 도와주십시오
-
Move the power supply board towards the left edge of the case and up to free it from the notch in the logic board.
-
-
이 단계는 번역되지 않았습니다. 번역을 도와주십시오
-
Depress the tab on the DC power cable connector, then pull it straight out of its socket on the back of the logic board.
-
-
이 단계는 번역되지 않았습니다. 번역을 도와주십시오
-
Flip the top of the power supply towards you, like opening a mailbox, to reveal the AC inlet cable connector.
-
Disconnect the AC inlet cable connector.
-
-
이 단계는 번역되지 않았습니다. 번역을 도와주십시오
-
Gently rock the right speaker slightly to the right, to allow access to its cable's connection on the logic board.
-
-
이 단계는 번역되지 않았습니다. 번역을 도와주십시오
-
Use a spudger to loosen the right speaker cable's connector from its socket on the logic board.
-
Pull the connector to the right to remove it from its socket.
-
-
이 단계는 번역되지 않았습니다. 번역을 도와주십시오
-
Use the tip of a spudger to disconnect the fan cable's connector from its socket on the logic board.
-
-
이 단계는 번역되지 않았습니다. 번역을 도와주십시오
-
Peel the black tape connecting the fan to the exhaust duct back slightly.
-
Leave the tape in place on the exhaust duct—you only need to expose the joint to free the fan.
-
-
이 단계는 번역되지 않았습니다. 번역을 도와주십시오
-
Use the flat end of a spudger to disconnect each of the four antenna connectors from the AirPort/Bluetooth card.
-
Leftmost
-
Top
-
Upper right
-
Lower right
-
-
이 단계는 번역되지 않았습니다. 번역을 도와주십시오
-
Flip up the metal retaining bracket on the iSight camera cable.
-
Pull the camera cable connector straight out of its socket, toward the top of the iMac.
-
-
이 단계는 번역되지 않았습니다. 번역을 도와주십시오
-
Use the flat end of a spudger to disconnect the headphone jack cable connector from its socket on the logic board.
-
Gently push the cable out of the way.
-
-
이 단계는 번역되지 않았습니다. 번역을 도와주십시오
-
Remove the following screws from the front of the logic board:
-
Two 23.7 mm T10 screws
-
Four 7.4 mm T10 screws
-
One 20.8 mm T25 spacer screw
-
One captive T10 screw
-
-
이 단계는 번역되지 않았습니다. 번역을 도와주십시오
-
Pull the cable and connector through the right hard drive bracket. Move the cable to the right side of the iMac, out of the way of the exhaust port.
-
-
이 단계는 번역되지 않았습니다. 번역을 도와주십시오
-
Remove two 5.7 mm T10 screws from the top of the heat sink exhaust duct.
-
-
이 단계는 번역되지 않았습니다. 번역을 도와주십시오
-
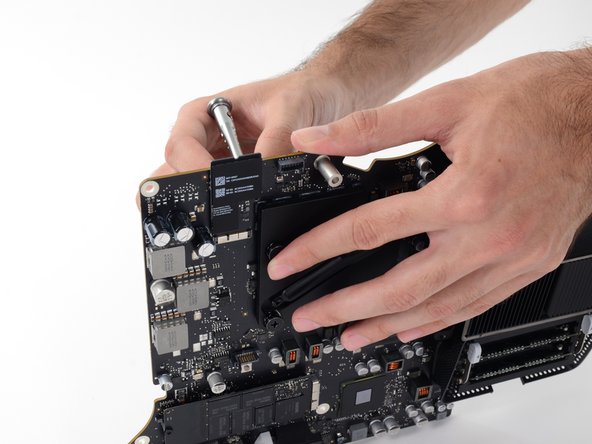
Tilt the logic board slightly forward.
-
Lift the logic board straight up and out of the iMac. Be careful not to snag on any of the screw posts attached to the inside of the rear case.
-
-
이 단계는 번역되지 않았습니다. 번역을 도와주십시오
-
When reassembling your iMac, be very careful to align the exterior I/O ports correctly. The logic board can sit crooked even when secured with all its screws.
-
You can use a USB flashdrive or ethernet cable to ensure the logic board is seated correctly while you screw it in.
-
-
이 단계는 번역되지 않았습니다. 번역을 도와주십시오
-
Pull up on the SATA power cable connector to disconnect it.
-
Unplug the SATA data cable connector by depressing its locking tab and pulling straight up on the connector.
-
Remove the SATA cable from the logic board assembly to get it out of the way and prevent it from being damaged.
-
-
이 단계는 번역되지 않았습니다. 번역을 도와주십시오
-
Remove the four 7.5 mm T8 screws from behind the GPU on the logic board.
-
-
이 단계는 번역되지 않았습니다. 번역을 도와주십시오
-
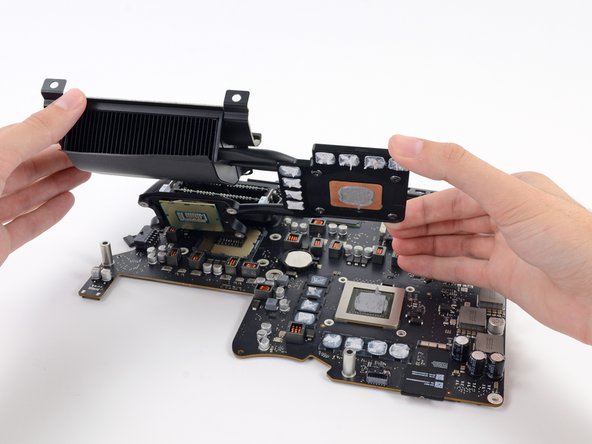
Remove the spring plate from behind the CPU heat sink.
-
Lift and remove the backing plate from behind the CPU heat sink. The backing plate has two posts that fit into alignment holes in the logic board.
-
-
이 단계는 번역되지 않았습니다. 번역을 도와주십시오
-
Use your thumbs or index fingers to unlock the tray by pushing the tabs outward, away from the RAM.
-
Pull the tabs out and up, swinging the RAM tray up to a near-vertical position.
-
-
이 단계는 번역되지 않았습니다. 번역을 도와주십시오
-
Remove a stick of RAM by grabbing it with two hands and pulling straight out of the RAM tray.
-
Remove any remaining sticks of RAM.
-
-
이 단계는 번역되지 않았습니다. 번역을 도와주십시오
-
Lift the end of the AirPort/Bluetooth Card up slightly and pull it straight out of its socket on the logic board.
-
-
이 단계는 번역되지 않았습니다. 번역을 도와주십시오
-
Lift the end of the SSD up slightly and pull it straight out of its socket on the logic board.
-
-
이 단계는 번역되지 않았습니다. 번역을 도와주십시오
-
Remove the power supply cable from its connector by pulling it parallel to the logic board.
-


다른 28명이 해당 안내서를 완성하였습니다.


댓글 16개
Don't forget to use a ESD Wrist Strap and or ESD Mat; you can fry components by touching the wrong surface or part; don't find out the hard way.
Tell us the Manufacturer of the Logic Board please and the Modell Type
C02SX8FRGG7J logic board
I wonder if its possible to install a newer(2017) Logic Board with a better GPU,CPU and faster USB Ports into my late 2015 iMac 5k.
I mean, to buy one costs around 500$, why not to swap it out and sell the 2015 Board. The Upgrade to
a newer GPU and newer System (USB-C, RAM, CPU) may worth the 500$.
After all one could sell the old Logic Board and gain some money back - don´t you think it is a good deal?
After the Upgrade I could finally use the TB3 for eGPUs and all other Benefits of the newer iMac Board.
I know, I would have to deal with the Ports and do some work on the Body of the Mac, but if this is the only problem, then I
think it is manageble. What I really do not know is wether the 2017 Board will fit in the 2015 Body or not, and wether the power supply is the same or not.
Thank you for Answers, I hope there will be some.
I’d like to know the same thing. Theoretically it’s possible but sounds very weird to be that none tried or ask the same thing. I’d be a very bad thing for Apple