주요 콘텐츠로 건너뛰기

이 버전에는 잘못된 편집 사항이 있을 수 있습니다. 최신 확인된 스냅샷으로 전환하십시오.

필요한 것

  1. , 디스플레이: 1 단계, 이미지 1/1
    이 단계에 사용된 도구:
    iMac Intel 27" Cardboard Service Wedge
    $4.99
    구매
    • 힌지가 자유롭게 움직이면 iMac의 균형이 맞지 않아 작업하기 어렵습니다. iMac을 눕힌 상태로 수리를 완료할 수 있지만, iMac 서비스 쐐기를 사용하면 더 빠르고 쉽게 수리할 수 있습니다.

    • iFixit 카드보드 서비스 쐐기를 사용하는 경우 다음 조립 지침을 따라 조립하세요.

  2. : 2 단계, 이미지 1/3 : 2 단계, 이미지 2/3 : 2 단계, 이미지 3/3
    • 디스플레이 왼쪽의 전원 버튼 근처에서 시작하여 유리 패널과 후면 케이스 사이의 틈에 iMac 여는 도구를 끼우세요.

    • iMac 여는 도구의 허브가 휠을 너무 멀리 밀어 넣는 것을 방지합니다. 다른 도구를 사용한다면 디스플레이에 3/8" (9.5mm) 이하로 끼우세요. 안테나 케이블이 끊어져 심각한 손상을 입힐 위험이 있습니다.

  3. : 3 단계, 이미지 1/3 : 3 단계, 이미지 2/3 : 3 단계, 이미지 3/3
    • 피자 커터처럼 생긴 도구를 사용하여—틈새를 따라 굴리면 폼 접착제의 중간이 잘립니다.

    • 항상 커팅 휠 뒤에 있는 손잡이로 밀어야 합니다. 당기면 휠이 손잡이에서 빠질 수 있습니다.

    • 도구를 디스플레이 왼쪽을 따라서 위로 굴리세요.

  4. : 4 단계, 이미지 1/3 : 4 단계, 이미지 2/3 : 4 단계, 이미지 3/3
    • 도구를 계속 위로 밀어 왼쪽 상단 모서리를 따라 돌리세요.

  5. : 5 단계, 이미지 1/2 : 5 단계, 이미지 2/2
    • 디스플레이 왼쪽 상단을 따라 접착제를 자르세요.

  6. : 6 단계, 이미지 1/2 : 6 단계, 이미지 2/2
    • 디스플레이 상단을 따라 계속 진행하세요.

    • 접착제를 최대한 많이 잘라내려면 이미 자른 부분에 도구를 앞뒤로 여러 번 움직이세요.

  7. : 7 단계, 이미지 1/3 : 7 단계, 이미지 2/3 : 7 단계, 이미지 3/3
    • 디스플레이의 오른쪽 상단 모서리를 돌아 도구를 미세요.

  8. : 8 단계, 이미지 1/2 : 8 단계, 이미지 2/2
    • 디스플레이의 오른쪽을 따라 도구를 아래로 미세요.

  9. : 9 단계, 이미지 1/2 : 9 단계, 이미지 2/2
    • 여는 도구를 디스플레이 오른쪽 하단까지 밀어 주세요.

    • 이 시점에서, 가능한 한 많은 접착제를 잘라내기 위해, 도구를 디스플레이 전체를 따라서 다시 돌리는 것이 좋습니다.

  10. : 10 단계, 이미지 1/3 : 10 단계, 이미지 2/3 : 10 단계, 이미지 3/3
    • 여는 도구가 대부분의 작업을 수행했지만 디스플레이는 여전히 케이스에 살짝 부착되어 있습니다. 이 마지막 접착 부분을 분리하려면 플라스틱 카드가 필요합니다.

    • 테이블 위에 iMac의 앞면이 위를 향하도록 놓으세요.

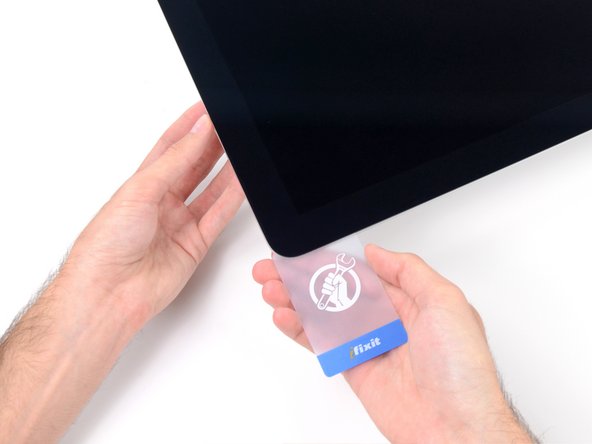
    • iMac의 오른쪽 상단 모서리부터 시작하여 디스플레이와 프레임 사이에 플라스틱 카드를 끼우세요.

    • 3/8" (9.5mm) 이상 끼우지 않도록 주의하세요. 아니면 내부 부품을 손상할 수 있습니다.

  11. : 11 단계, 이미지 1/2 : 11 단계, 이미지 2/2
    • 플라스틱 카드를 살살 비틀어 디스플레이와 프레임 사이의 공간을 열고 모서리 근처에 남아있는 접착제를 잘라내세요.

    • 너무 많은 힘을 사용하면 유리에 금이 갈 수 있습니다. 주의해서 작업하고 약 1/4"(6mm)보다 큰 간격을 만들지 않도록 하세요.

  12. : 12 단계, 이미지 1/3 : 12 단계, 이미지 2/3 : 12 단계, 이미지 3/3
    • 이 단계에서 iSight 카메라 앞에서 자르기를 멈추지 않으면 카메라를 손상할 수 있습니다.

    • 카드를 디스플레이 중앙으로 밀어 남은 접착제를 잘라내세요.

  13. : 13 단계, 이미지 1/2 : 13 단계, 이미지 2/2
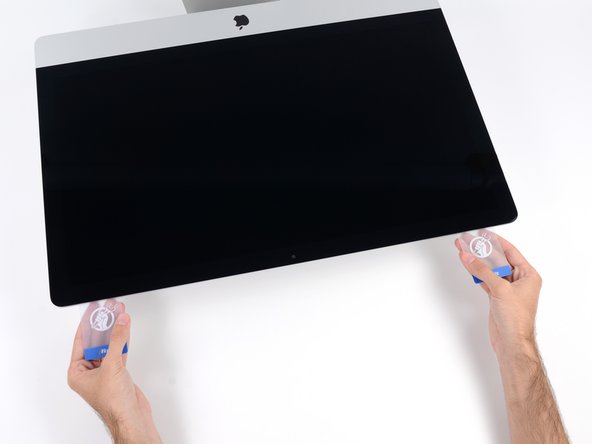
    • 카드를 다시 모서리에 넣고 접착제가 다시 붙지 않도록 그대로 두세요.

  14. : 14 단계, 이미지 1/3 : 14 단계, 이미지 2/3 : 14 단계, 이미지 3/3
    • 왼쪽 상단 모서리에 있는 디스플레이와 프레임 사이의 틈에 두 번째 카드를 끼우세요.

  15. : 15 단계, 이미지 1/2 : 15 단계, 이미지 2/2
    • 카드를 살살 비틀어 디스플레이와 프레임 사이의 공간을 약간 넓히세요.

    • 다른 쪽과 마찬가지로 접착제가 끊어지도록 천천히 움직이고 디스플레이 유리에 과도한 힘을 가하지 않도록 주의하세요.

  16. : 16 단계, 이미지 1/3 : 16 단계, 이미지 2/3 : 16 단계, 이미지 3/3
    • 플라스틱 카드를 중앙으로 밀고 iSight 카메라 바로 앞에서 다시 멈추세요.

  17. : 17 단계, 이미지 1/2 : 17 단계, 이미지 2/2
    • 카드를 왼쪽 상단 모서리에 다시 끼우세요.

  18. : 18 단계, 이미지 1/3 : 18 단계, 이미지 2/3 : 18 단계, 이미지 3/3
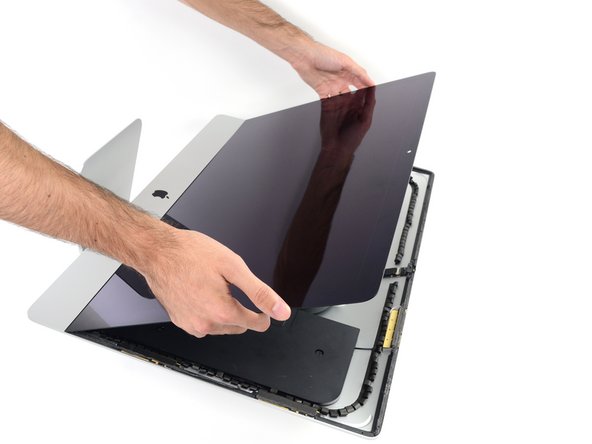
    • 디스플레이를 몇 인치만 들어 올리세요—디스플레이는 여전히 데이터 및 전원 케이블로 iMac에 연결되어 있습니다.

    • 사진처럼 모서리 근처에 카드를 끼운 상태에서 카드를 살살 비틀어 디스플레이와 케이스 사이의 간격을 넓히세요.

    • 만약 단단히 붙어 분리되지 않는 부분이 있으면 비틀기를 멈추고 카드 중 하나를 사용하여 문제 영역의 접착제를 잘라냅니다.

    • 디스플레이 상단을 프레임에서 들어 올리기 시작하세요.

  19. : 19 단계, 이미지 1/2 : 19 단계, 이미지 2/2
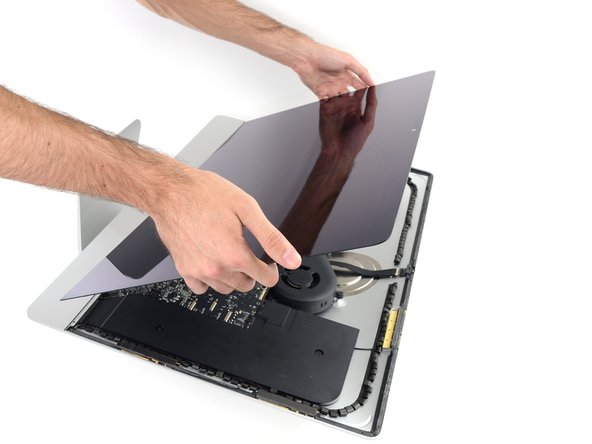
    • 한 손으로 디스플레이를 잡고 다른 손으로 디스플레이 전원 케이블을 뽑아주세요.

    • 연결부에 쉽게 접근할 수 있을 만큼 디스플레이를 들어 올리되, 케이블이 늘어나서 연결부에 무리가 가지 않을 정도로(약 8") 들어 올리세요.

  20. : 20 단계, 이미지 1/3 : 20 단계, 이미지 2/3 : 20 단계, 이미지 3/3
    • 디스플레이 데이터 케이블의 금속 고정 브래킷을 위로 젖히세요.

    • 디스플레이 데이터 케이블을 연결 해제하세요.

    • 이는 쉽게 끊어질 수 있는 약한 연결부입니다. 디스플레이 데이터 케이블 커넥터를 소켓에서 iMac 위쪽을 향해 똑바로 잡아당겨 빼내야 합니다.

  21. : 21 단계, 이미지 1/2 : 21 단계, 이미지 2/2
    • 디스플레이를 거의 수직으로 열어 주세요.

    • 이 시점에서 여전히 디스플레이 하단을 따라 힌지처럼 디스플레이를 프레임에 고정하는 접착제 스트립이 있습니다. 디스플레이를 위아래로 몇 번 움직여 이 접착제를 느슨하게 할 수 있습니다.

    • 바깥쪽 가장자리를 잡고 중앙으로 당기거나 돌려서 접착제를 최대한 많이 제거하세요.

  22. : 22 단계, 이미지 1/3 : 22 단계, 이미지 2/3 : 22 단계, 이미지 3/3
    • 전원 장치 뒷면의 커패시터 리드나 드러난 납땜 접합부(빨간색 표시)를 만지지 않도록 각별히 주의하세요.

    • 필요한 경우 플라스틱 카드를 사용하여 하단 접착 스트립의 남은 부분을 잘라낼 수 있습니다.

  23. : 23 단계, 이미지 1/3 : 23 단계, 이미지 2/3 : 23 단계, 이미지 3/3
    • 디스플레이는 크고 무거우며 유리로 만들어졌습니다—취급할 때 매우 주의하세요. 디스플레이의 가장자리는 깨지기 쉽습니다. 모서리로 디스플레이를 들어 올리지 마세요.

    • 디스플레이를 프레임에서 들어올려 iMac에서 분리하세요. 디스플레이를 평평하고 부드러운 표면에 스크린이 아래로 향하게 놓으세요.

    • 나머지 접착제를 벗겨내려면 한 쪽에서 천천히 들어 올려야 할 수도 있습니다.

    • 접착제를 잘라낸 후에는 디스플레이를 제자리에 다시 붙이는 데 사용할 수 없습니다. 수리가 완료되면 이 안내서를 따라서 디스플레이를 후면 인클로저에 고정하는 접착 스트립을 교체하세요.

  24. : 24 단계, 이미지 1/1
    • 디스플레이 패널을 교체하는 경우 기존 패널에서 새 패널로 추가 부품을 옮겨야 할 수도 있습니다. 기존 디스플레이의 뒷면과 교체용 디스플레이를 비교하세요. 새 디스플레이에는 모든 케이블, 센서 및 폼 쿠션이 없음을 확인하세요.

    • 접착 테이프 아래에 전선이나 케이블이 있는 경우 항상 테이프를 먼저 떼어내세요.

    • 케이블이 섀시에 접착되어 있는 경우 먼저 가열된 iOpener 또는 헤어 드라이어를 사용하여 접착제를 부드럽게 하세요. 그런 다음 케이블 밑으로 여는 픽을 밀어 케이블을 느슨하게 할 수 있습니다. 연약한 커넥터를 절대로 직접 잡아당기지 마세요.

    • 폼 쿠션 조각 아래에서 여는 픽을 밀어 디스플레이에서 분리한 다음 살살 잡아당겨 분리하세요. 새 디스플레이에 다시 부착하려면 양면 테이프가 필요할 수 있습니다.

  25. 이 단계는 번역되지 않았습니다. 번역을 도와주십시오

    : 25 단계, 이미지 1/2 : 25 단계, 이미지 2/2
    • Use a Phillips screwdriver to remove the nine 3.2 mm screws securing the support bracket.

    • You may need to peel up the display adhesive lining the bottom edge of the iMac enclosure to access the screws.

  26. 이 단계는 번역되지 않았습니다. 번역을 도와주십시오

    : 26 단계, 이미지 1/1
    • Remove the lower support bracket (a.k.a. "chin strap") from the iMac enclosure.

  27. 이 단계는 번역되지 않았습니다. 번역을 도와주십시오

    : 27 단계, 이미지 1/1
    • Remove two 10 mm T10 screws.

  28. 이 단계는 번역되지 않았습니다. 번역을 도와주십시오

    : 28 단계, 이미지 1/3 : 28 단계, 이미지 2/3 : 28 단계, 이미지 3/3
    • Unplug the left speaker cable by pulling it straight up out of its socket on the logic board.

    • De-route the cable from the gap between the hard drive and logic board.

    • If the gap between the hard drive and logic board is too narrow for the speaker cable, disconnect it and leave the cable in place.

  29. 이 단계는 번역되지 않았습니다. 번역을 도와주십시오

    : 29 단계, 이미지 1/3 : 29 단계, 이미지 2/3 : 29 단계, 이미지 3/3
    • Be careful not to touch any solder joints on the back of the power supply. Capacitors may be charged enough to give you a dangerous shock.

    • Use a spudger to disconnect the power button connector from its socket on the logic board.

  30. 이 단계는 번역되지 않았습니다. 번역을 도와주십시오

    : 30 단계, 이미지 1/2 : 30 단계, 이미지 2/2
    • Lift the left speaker straight up, until the power button cable is exposed (about 0.5 inches).

  31. 이 단계는 번역되지 않았습니다. 번역을 도와주십시오

    : 31 단계, 이미지 1/3 : 31 단계, 이미지 2/3 : 31 단계, 이미지 3/3
    • Gently de-route the power button cable from its groove in the left speaker.

  32. 이 단계는 번역되지 않았습니다. 번역을 도와주십시오

    : 32 단계, 이미지 1/3 : 32 단계, 이미지 2/3 : 32 단계, 이미지 3/3
    • Lift the left speaker straight up and remove it from the iMac.

    • If the gap between the hard drive and logic board was too narrow to free the speaker cable earlier, gently pull it free as you remove the speaker.

    • Push from the connector end as you pull from the speaker end to thread the cable under the hard drive's right bracket.

  33. 이 단계는 번역되지 않았습니다. 번역을 도와주십시오

    : 33 단계, 이미지 1/2 : 33 단계, 이미지 2/2
    • Pull straight up on the SATA data/power cable to disconnect it from the drive.

  34. 이 단계는 번역되지 않았습니다. 번역을 도와주십시오

    : 34 단계, 이미지 1/1
    • Remove two 7.3 mm T10 screws securing the left hard drive bracket to the rear case.

  35. 이 단계는 번역되지 않았습니다. 번역을 도와주십시오

    : 35 단계, 이미지 1/3 : 35 단계, 이미지 2/3 : 35 단계, 이미지 3/3
    • Grab the hard drive and left hard drive bracket together.

    • Tilt the left side up away from the rear case, and slide the assembly to the left.

    • Remove the hard drive and left hard drive bracket from the iMac.

  36. 이 단계는 번역되지 않았습니다. 번역을 도와주십시오

    : 36 단계, 이미지 1/2 : 36 단계, 이미지 2/2
    • Remove the left hard drive bracket.

  37. 이 단계는 번역되지 않았습니다. 번역을 도와주십시오

    : 37 단계, 이미지 1/2 : 37 단계, 이미지 2/2
    • When working on the power supply, be very careful not to touch the capacitor leads or any exposed solder joints on the back of the power supply. Only handle the board by the edges.

    • Disconnect the power supply control cable from the power supply.

  38. 이 단계는 번역되지 않았습니다. 번역을 도와주십시오

    : 38 단계, 이미지 1/1
    • Remove the following four screws securing the power supply to the rear case (size T8 or T10 depending on the exact model):

    • Two 23.7 mm Torx screws

    • Two 7.3 mm Torx screws

  39. 이 단계는 번역되지 않았습니다. 번역을 도와주십시오

    : 39 단계, 이미지 1/3 : 39 단계, 이미지 2/3 : 39 단계, 이미지 3/3
    • Do not attempt to remove the power supply from the case; it is still attached to the logic board by two cables.

    • Move the power supply board towards the left edge of the case and up to free it from the notch in the logic board.

  40. 이 단계는 번역되지 않았습니다. 번역을 도와주십시오

    : 40 단계, 이미지 1/2 : 40 단계, 이미지 2/2
    • Depress the tab on the DC power cable connector, then pull it straight out of its socket on the back of the logic board.

    • If the cable is too difficult to disconnect, you can remove the power supply board and motherboard together.

  41. 이 단계는 번역되지 않았습니다. 번역을 도와주십시오

    : 41 단계, 이미지 1/3 : 41 단계, 이미지 2/3 : 41 단계, 이미지 3/3
    • Be very careful not to touch the capacitor leads or any exposed solder joints on the back of the power supply. Only handle the board by the edges.

    • Flip the top of the power supply towards you, like opening a mailbox, to reveal the AC inlet cable connector.

    • Disconnect the AC inlet cable connector.

  42. 이 단계는 번역되지 않았습니다. 번역을 도와주십시오

    : 42 단계, 이미지 1/1
    • Remove two 10.0 mm T10 screws.

  43. 이 단계는 번역되지 않았습니다. 번역을 도와주십시오

    : 43 단계, 이미지 1/2 : 43 단계, 이미지 2/2
    • Gently rock the right speaker slightly to the right, to allow access to its cable's connection on the logic board.

  44. 이 단계는 번역되지 않았습니다. 번역을 도와주십시오

    : 44 단계, 이미지 1/3 : 44 단계, 이미지 2/3 : 44 단계, 이미지 3/3
    • Use a spudger to loosen the right speaker cable's connector from its socket on the logic board.

    • Pull the connector to the right to remove it from its socket.

  45. 이 단계는 번역되지 않았습니다. 번역을 도와주십시오

    : 45 단계, 이미지 1/3 : 45 단계, 이미지 2/3 : 45 단계, 이미지 3/3
    • Lift the speaker straight up and remove it from the iMac.

  46. 이 단계는 번역되지 않았습니다. 번역을 도와주십시오

    : 46 단계, 이미지 1/3 : 46 단계, 이미지 2/3 : 46 단계, 이미지 3/3
    • Use the tip of a spudger to disconnect the fan cable's connector from its socket on the logic board.

  47. 이 단계는 번역되지 않았습니다. 번역을 도와주십시오

    : 47 단계, 이미지 1/2 : 47 단계, 이미지 2/2
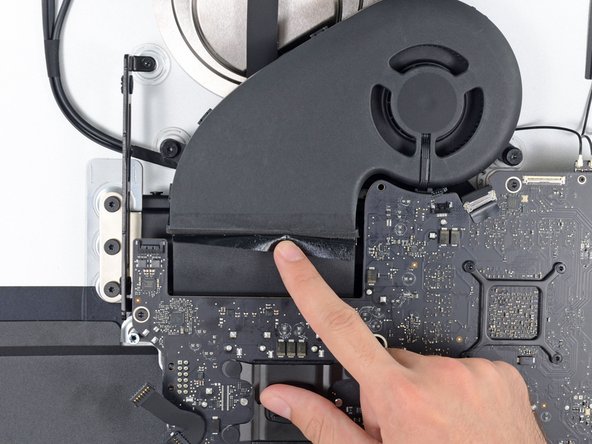
    • Peel the black tape connecting the fan to the exhaust duct back slightly.

    • Leave the tape in place on the exhaust duct—you only need to expose the joint to free the fan.

  48. 이 단계는 번역되지 않았습니다. 번역을 도와주십시오

    : 48 단계, 이미지 1/1
    • Remove three 12.4 mm T10 screws securing the fan to the rear case.

  49. 이 단계는 번역되지 않았습니다. 번역을 도와주십시오

    : 49 단계, 이미지 1/2 : 49 단계, 이미지 2/2
    • Remove the fan from the iMac.

  50. 이 단계는 번역되지 않았습니다. 번역을 도와주십시오

    : 50 단계, 이미지 1/3 : 50 단계, 이미지 2/3 : 50 단계, 이미지 3/3
    • Use the flat end of a spudger to disconnect each of the four antenna connectors from the AirPort/Bluetooth card.

    • Note the original positions for each connector when reconnecting the cables. From left to right on the card, the antennas are connected in the following order:

    • Leftmost

    • Top

    • Upper right

    • Lower right

  51. 이 단계는 번역되지 않았습니다. 번역을 도와주십시오

    : 51 단계, 이미지 1/3 : 51 단계, 이미지 2/3 : 51 단계, 이미지 3/3
    • This is a delicate connection that can be easily broken.

    • Flip up the metal retaining bracket on the iSight camera cable.

    • Pull the camera cable connector straight out of its socket, toward the top of the iMac.

  52. 이 단계는 번역되지 않았습니다. 번역을 도와주십시오

    : 52 단계, 이미지 1/3 : 52 단계, 이미지 2/3 : 52 단계, 이미지 3/3
    • Use the flat end of a spudger to disconnect the headphone jack cable connector from its socket on the logic board.

    • Gently push the cable out of the way.

  53. 이 단계는 번역되지 않았습니다. 번역을 도와주십시오

    : 53 단계, 이미지 1/2 : 53 단계, 이미지 2/2
    • Remove the following screws from the front of the logic board:

    • Two 23.7 mm T10 screws

    • Four 7.4 mm T10 screws

    • One 20.8 mm T25 spacer screw

    • One captive T10 screw

    • This screw is beneath a hole in the logic board. You'll need a fixed screwdriver or the 60 mm extension from an iFixit driver kit to reach it.

  54. 이 단계는 번역되지 않았습니다. 번역을 도와주십시오

    : 54 단계, 이미지 1/3 : 54 단계, 이미지 2/3 : 54 단계, 이미지 3/3
    • The hard drive SATA cable can't be removed just yet, but will get in the way of removing the logic board.

    • Pull the cable and connector through the right hard drive bracket. Move the cable to the right side of the iMac, out of the way of the exhaust port.

  55. 이 단계는 번역되지 않았습니다. 번역을 도와주십시오

    : 55 단계, 이미지 1/1
    • Remove two 5.7 mm T10 screws from the top of the heat sink exhaust duct.

  56. 이 단계는 번역되지 않았습니다. 번역을 도와주십시오

    : 56 단계, 이미지 1/3 : 56 단계, 이미지 2/3 : 56 단계, 이미지 3/3
    • Tilt the logic board slightly forward.

    • Lift the logic board straight up and out of the iMac. Be careful not to snag on any of the screw posts attached to the inside of the rear case.

  57. 이 단계는 번역되지 않았습니다. 번역을 도와주십시오

    : 57 단계, 이미지 1/2 : 57 단계, 이미지 2/2
    • When reassembling your iMac, be very careful to align the exterior I/O ports correctly. The logic board can sit crooked even when secured with all its screws.

    • You can use a USB flashdrive or ethernet cable to ensure the logic board is seated correctly while you screw it in.

  58. 이 단계는 번역되지 않았습니다. 번역을 도와주십시오

    : 58 단계, 이미지 1/3 : 58 단계, 이미지 2/3 : 58 단계, 이미지 3/3
    • Pull up on the SATA power cable connector to disconnect it.

    • Unplug the SATA data cable connector by depressing its locking tab and pulling straight up on the connector.

    • Remove the SATA cable from the logic board assembly to get it out of the way and prevent it from being damaged.

결승점

다른 15명이 해당 안내서를 완성하였습니다.

Sam Goldheart

회원 가입일: 10/18/12

465,762 평판

안내서 538개 작성하였습니다

iFixit iFixit 회원

Staff

135 회원들

안내서 16,817개 작성하였습니다

댓글 6개

Any idea where this sata cable can be bought?

Urban - 답글

Where can I get this S-ATA cable. I bought an Apple iMac 27 inch with 5K display in a BTO configuration with 1 TB internal SSD (flash) and NO internal HDD (classic drive) and would like to put a big (like 6 TB) disk in it. After opening the iMac I realized that the S-ATA cable (mentioned above) is missing. Any hint to a source is appreciated.

Doctor Macintosh - 답글

me too. I'm looking for this cable!!!!

ilminia - 답글

Hi, are you sure that is the same cable? i have the same question, because there is says its a replacement hard drive power and data cable for the late 2014 through Mid 2015 iMac 27"

andres -

댓글 쓰기

조회 통계:

24 시간 전: 7

7일 전: 24

30일 전: 194

전체 시간: 17,478