주요 콘텐츠로 건너뛰기

iON SnapCam 1045 Wearable HD Video Camera Lens Replacement

필요한 것

  1. iON SnapCam 1045 Wearable HD Video Camera Lens  Replacement, Battery: 1 단계, 이미지 1/1
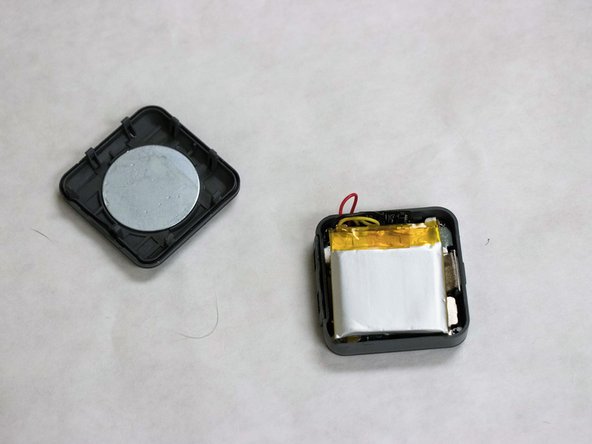
    • Detach the magnetic clip from the bottom of the camera.

    • The magnetic clip gets in the way of disassembly because it constantly spins and therefore a distraction so it is imperative to detach.

  2. iON SnapCam 1045 Wearable HD Video Camera Lens  Replacement: 2 단계, 이미지 1/1
    • Use a spudger to gently detach the memory card and USB slot cover.

  3. iON SnapCam 1045 Wearable HD Video Camera Lens  Replacement: 3 단계, 이미지 1/1
    • Use a Phillips #000 Screwdriver to loosen the 0.008 mm screw located between the USB and memory card slots.

    • This screw is really tiny and can easily fall off and get lost! Make use of a magnetic mat to hold it in place or better still put the magnetic clip to use for keeping the screw safe.

  4. iON SnapCam 1045 Wearable HD Video Camera Lens  Replacement: 4 단계, 이미지 1/2 iON SnapCam 1045 Wearable HD Video Camera Lens  Replacement: 4 단계, 이미지 2/2
    • Once again use the spudger to gently open the encasement.

    • The case is a little fragile and forceful entry could lead to damage of the plastic case. Thread carefully.

    • The Battery can be safely detached and replaced.

  5. iON SnapCam 1045 Wearable HD Video Camera Lens  Replacement, Motherboard: 5 단계, 이미지 1/1
    • To get to the motherboard, safely lift the battery to expose an Aluminium plate that shields and holds the motherboard in place.

    • The plates are held down by four Phillips 0.008 mm screws on all four corners. Use a Phillips head #000 to safely loosen the screws.

  6. iON SnapCam 1045 Wearable HD Video Camera Lens  Replacement: 6 단계, 이미지 1/1
    • To replace the motherboard gently insert a plastic opening tool into one end and lift up.

    • Be careful to avoid inserting material that is rough and too sturdy as it can damage components on the motherboard.

  7. iON SnapCam 1045 Wearable HD Video Camera Lens  Replacement, Lens: 7 단계, 이미지 1/1
    • The motherboard is in plain sight . The lens assembly is located on the lower left part of the motherboard just to the left of the power button.

    • To replace the lens assembly, simply flip it up and detach.

결론

To reassemble your device, follow these instructions in reverse order.

Jessica Matias

회원 가입일: 12/09/17

201 평판

안내서 2개 작성하였습니다

IUPUI, Team S3-G3, Wilson Fall 2017 IUPUI, Team S3-G3, Wilson Fall 2017 회원

IUPUI-WILSON-F17S3G3

3 회원들

안내서 3개 작성하였습니다

댓글 0개

댓글 쓰기

조회 통계:

24 시간 전: 0

7일 전: 5

30일 전: 8

전체 시간: 323