이 버전에는 잘못된 편집 사항이 있을 수 있습니다. 최신 확인된 스냅샷으로 전환하십시오.
필요한 것
-
-
냄비나 팬에 iOpener가 완전히 잠길 정도로 충분한 물을 채우세요.
-
물이 끓을 때까지 가열하세요. 불을 끄세요.
-
iOpener를 뜨거운 물에 2~3분간 담그세요. iOpener가 물에 완전히 잠겼는지 확인합니다.
-
집게를 사용하여 뜨거운 물에서 가열된 아이오페너를 꺼내세요.
-
수건으로 iOpener를 완전히 말리세요.
-
iOpener를 사용할 준비가 되었습니다! iOpener를 재가열해야 한다면 물을 끓인 후 불을 끄고 2~3분 동안 iOpener를 물에 담가 두세요.
-
-
이 단계는 번역되지 않았습니다. 번역을 도와주십시오
-
If your display glass is cracked, keep further breakage contained and prevent bodily harm during your repair by taping the glass.
-
Lay overlapping strips of clear packing tape over the iPad's display until the whole face is covered.
-
Do your best to follow the rest of the guide as described. However, once the glass is broken, it will likely continue to crack as you work, and you may need to use a metal prying tool to scoop the glass out.
-
-
이 단계는 번역되지 않았습니다. 번역을 도와주십시오
-
Lay the iOpener flat on the right edge of the iPad, smoothing it out so that there is good contact between the surface of the iPad and the iOpener.
-
Let the bag sit on the iPad for approximately 90 seconds before attempting to open the front panel.
-
-
이 단계는 번역되지 않았습니다. 번역을 도와주십시오
-
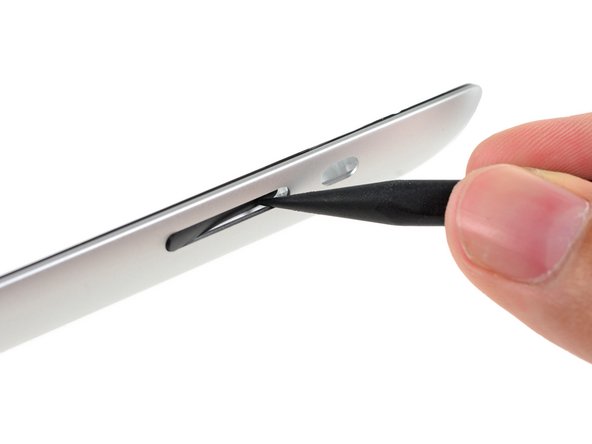
There is a small gap in the iPad's adhesive ring in the upper right corner of the iPad, approximately 2.0 inches (~5 cm) from the top of the iPad. You are going to exploit this weakness.
-
Align the tool with the mute button. Insert the tip of a plastic opening tool into the gap between the front glass and the plastic bezel. Just insert the very tip of the opening tool, just enough to widen the crack.
-
-
이 단계는 번역되지 않았습니다. 번역을 도와주십시오
-
Make sure you place the tool in the proper spot—between the plastic display bezel and the front panel glass.
-
-
이 단계는 번역되지 않았습니다. 번역을 도와주십시오
-
Keeping the tip of the plastic opening tool wedged between the front glass and plastic bezel, slide a plastic opening pick in the gap, right next to the plastic opening tool.
-
-
이 단계는 번역되지 않았습니다. 번역을 도와주십시오
-
Remove the plastic opening tool from the iPad, and push the opening pick further underneath the front glass to a depth of ~0.5 inches.
-
-
이 단계는 번역되지 않았습니다. 번역을 도와주십시오
-
While you work on releasing the adhesive on the right side of the iPad, reheat the iOpener, and replace it on the bottom edge of the iPad.
-
-
이 단계는 번역되지 않았습니다. 번역을 도와주십시오
-
While the bottom edge is being heated by the iOpener, begin releasing the adhesive from the right edge of the iPad.
-
Slide the opening pick down along the edge of the iPad, releasing the adhesive as you go.
-
-
이 단계는 번역되지 않았습니다. 번역을 도와주십시오
-
If the opening pick gets stuck in the adhesive, "roll" the pick along the side of the iPad, continuing to release the adhesive.
-
-
이 단계는 번역되지 않았습니다. 번역을 도와주십시오
-
Before removing the first opening pick from the bottom corner of the iPad, insert a second pick under the right edge of the front glass to keep the adhesive from re-adhering.
-
Re-heat the iOpener, and move it to the top edge of the iPad.
-
-
이 단계는 번역되지 않았습니다. 번역을 도와주십시오
-
You will have to release the adhesive securing the antenna to the front panel without damaging the delicate parts attaching the antenna to the bottom of the iPad. Follow the next steps carefully.
-
-
이 단계는 번역되지 않았습니다. 번역을 도와주십시오
-
Slide the opening pick around the bottom right corner of the iPad, releasing the adhesive there.
-
-
이 단계는 번역되지 않았습니다. 번역을 도와주십시오
-
Slide the tip of the opening pick along the bottom edge of the iPad, releasing the adhesive over the Wi-Fi antenna.
-
-
-
이 단계는 번역되지 않았습니다. 번역을 도와주십시오
-
Once you have moved past the Wi-FI antenna (approximately 3" (75 mm) from the right edge, or right next to the home button) re-insert the opening pick to its full depth.
-
Slide the pick to the right, releasing the adhesive securing the Wi-Fi antenna to the front glass.
-
The antenna is attached to the bottom of the iPad via screws and a cable. This step detaches the antenna from the front panel, ensuring that when you remove the panel, the antenna will not be damaged.
-
-
이 단계는 번역되지 않았습니다. 번역을 도와주십시오
-
Continue releasing the adhesive along the bottom of the iPad, pulling the opening pick out far enough to go around the home button, and re-inserting it to a depth of 1/2 inch (10 mm) once the pick is past the home button.
-
-
이 단계는 번역되지 않았습니다. 번역을 도와주십시오
-
Continue releasing the adhesive all the way along the bottom edge of the iPad.
-
Leave the opening pick wedged underneath the front glass near the home button.
-
-
이 단계는 번역되지 않았습니다. 번역을 도와주십시오
-
Reheat the iOpener in the microwave and set it on the left edge of the iPad to start warming the adhesive in that section.
-
-
이 단계는 번역되지 않았습니다. 번역을 도와주십시오
-
Slide the opening pick along the top edge of the iPad, pulling it out slightly to go around the front-facing camera bracket.
-
The adhesive along this section is very thick, and a fair amount of force may be required. Work carefully and slowly, making sure to not slip and damage yourself or your iPad.
-
-
이 단계는 번역되지 않았습니다. 번역을 도와주십시오
-
Continue releasing the adhesive along the top edge of the iPad, and slide the opening pick around the top left corner.
-
-
이 단계는 번역되지 않았습니다. 번역을 도와주십시오
-
Slide the opening pick along the left edge of the iPad, releasing the adhesive as you go. The adhesive is thin here due to the digitizer along the whole left side. Make sure the pick is not too deep (max 1/2 inch) 10 mm to prevent damaging the digitizer.
-
-
이 단계는 번역되지 않았습니다. 번역을 도와주십시오
-
Using the opening pick that is still underneath the bottom edge of the iPad, release the adhesive along the bottom left corner.
-
-
이 단계는 번역되지 않았습니다. 번역을 도와주십시오
-
Using one of the opening picks, pry up the bottom right corner of the iPad and grab it with your fingers.
-
-
이 단계는 번역되지 않았습니다. 번역을 도와주십시오
-
Holding the iPad by the top and bottom right corners, rotate the front glass away from the iPad.
-
-
이 단계는 번역되지 않았습니다. 번역을 도와주십시오
-
Remove the four 2.0 mm Phillips screws securing the LCD to the rear case.
-
-
이 단계는 번역되지 않았습니다. 번역을 도와주십시오
-
Lift the LCD from its long edge closest to the volume buttons and gently flip it out of the rear case—like turning the page in a book.
-
Set the LCD face down on the front panel.
-
-
이 단계는 번역되지 않았습니다. 번역을 도와주십시오
-
Use a pair of tweezers to remove the rubber cover up off the rear-facing camera housing.
-
-
이 단계는 번역되지 않았습니다. 번역을 도와주십시오
-
Remove the single 3.3 mm Phillips screw from the rear-facing camera metal retainer clip.
-
-
이 단계는 번역되지 않았습니다. 번역을 도와주십시오
-
Lift the rear-facing camera metal retainer clip straight up from its recess in the rear case.
-
-
이 단계는 번역되지 않았습니다. 번역을 도와주십시오
-
Use a plastic opening tool to pry the rear-facing camera connector up from its socket on the control board.
-
Remove the rear-facing camera.
-
-
이 단계는 번역되지 않았습니다. 번역을 도와주십시오
-
Remove the single 2.0 mm Phillips #000 screw securing the camera bracket.
-
-
이 단계는 번역되지 않았습니다. 번역을 도와주십시오
-
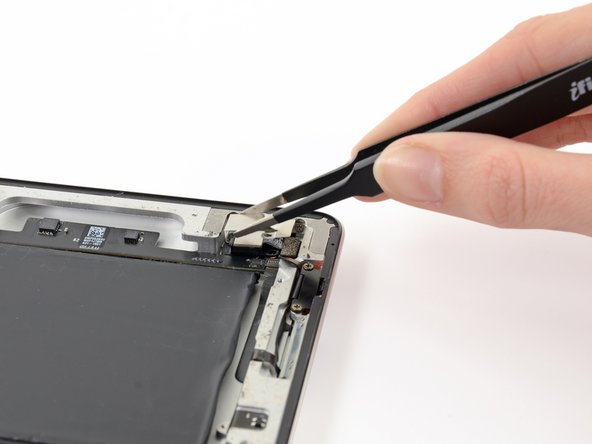
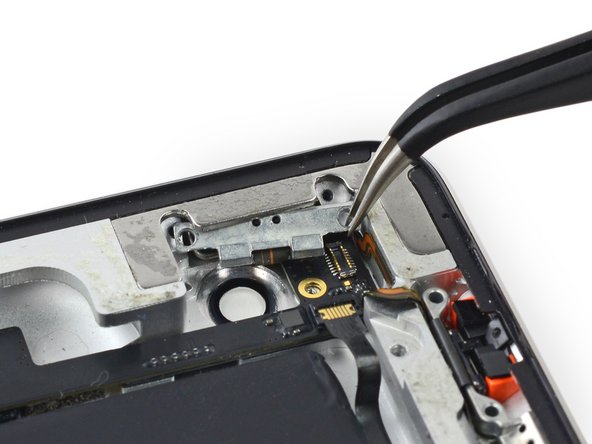
Use the point of a spudger to flip the retaining tab on the button cable ZIF connector.
-
Pull the button cable straight out of its socket on the upper component board.
-
-
이 단계는 번역되지 않았습니다. 번역을 도와주십시오
-
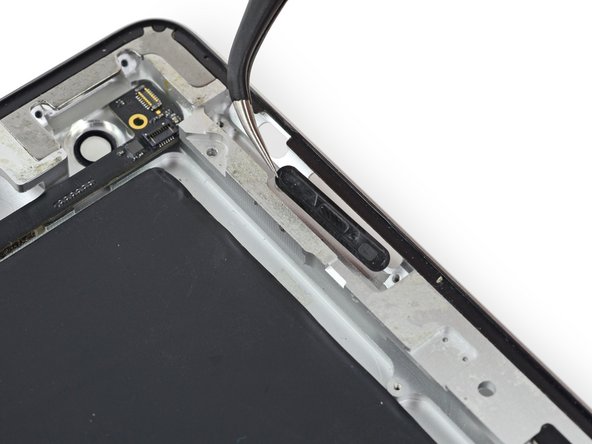
Remove the following screws from the volume/power button assembly cable:
-
Two 3.0 mm Phillips #000 screws at a 45º angle, securing the power button bracket
-
Two 5.0 mm Phillips #000 screws
-
One 2.0 mm Phillips #000 screw at a 45º angle
-
-
이 단계는 번역되지 않았습니다. 번역을 도와주십시오
-
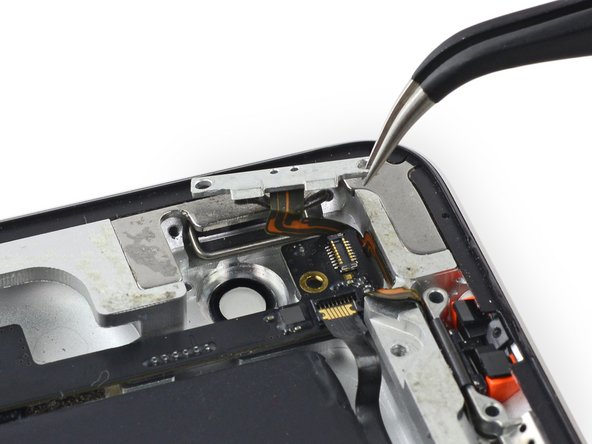
Pull the power button cable out of the recess in the rear case and bend it out of the way.
-
-
이 단계는 번역되지 않았습니다. 번역을 도와주십시오
-
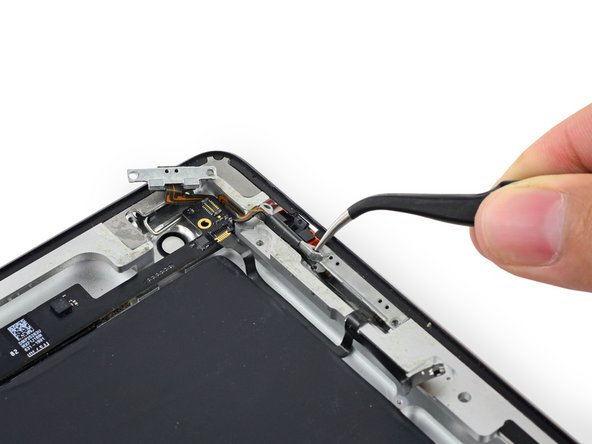
Use the point of an opening pick to gently peel the Smart Cover sleep/wake sensor up off the rear case.
-
-
이 단계는 번역되지 않았습니다. 번역을 도와주십시오
-
Use the center screw hole of the volume control bracket to tilt it out toward the edge of the case and then pull it up out of its recess.
-
-
이 단계는 번역되지 않았습니다. 번역을 도와주십시오
-
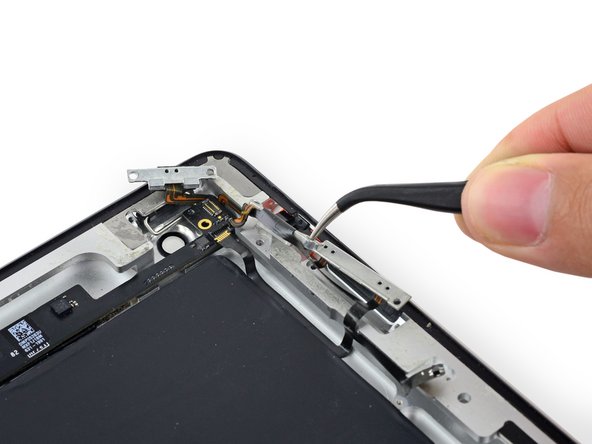
Carefully peel the connector end of the button cable up off of the rear case.
-
Stop peeling before the cable branches off to the volume buttons.
-
-
이 단계는 번역되지 않았습니다. 번역을 도와주십시오
-
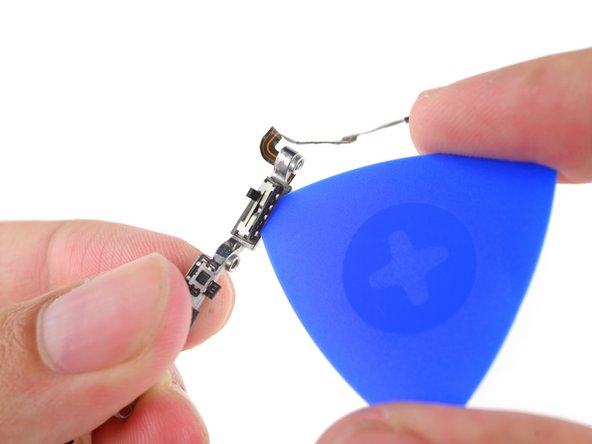
Insert the point of an opening pick between the rotation lock/silent switch and its bracket to sever the adhesive there.
-
-
이 단계는 번역되지 않았습니다. 번역을 도와주십시오
-
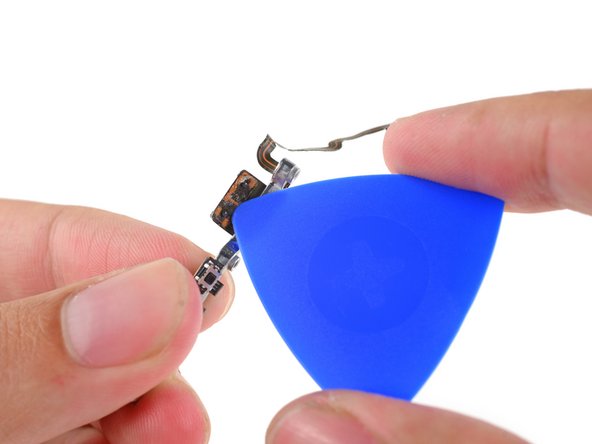
Slide the opening pick under the remaining portion of the rotation lock/silent switch to peel it up off the button bracket.
-
-
이 단계는 번역되지 않았습니다. 번역을 도와주십시오
-
Use the point of the opening pick to peel the mechanical volume buttons up from the bracket.
-
Remove the button cable assembly from the button bracket.
-
-
이 단계는 번역되지 않았습니다. 번역을 도와주십시오
-
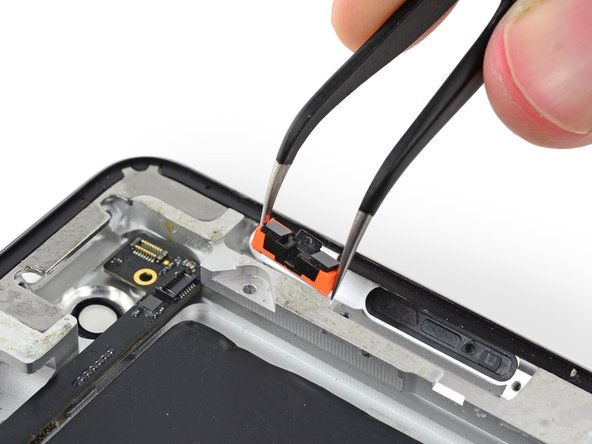
Use the tip of a spudger to push the volume rocker into the interior of the rear case.
-
Remove the volume rocker from the rear case.
-


다른 45명이 해당 안내서를 완성하였습니다.


댓글 4개
Depends on what’s not working Mariano. If no power, your install may be good. Sometimes the contacts on the batteries for this model don’t make a connection and require ever-so-slight bending before you secure it with the set screw. Give it a try. There are a couple YouTube videos on this. Good luck. I’m doing my 1st flex cable install with this tutorial. Amazingly accurate and graphically stunning presentation. Love the zoom feature. These guys deserve a statue!
Thanks for the great guide, this was a tricky one, power and volume did not work after installation. I had a look around and noticed the small ZIF connector was a bit askew, probably due to the new cable being stiff, straighten it out and taped the cable down(the self-adhesive was too weak) and now tests good!