주요 콘텐츠로 건너뛰기

iPad 3G Logic Board Replacement

필요한 것

  1. iPad 3G Logic Board Replacement, Display Assembly: 1 단계, 이미지 1/3 iPad 3G Logic Board Replacement, Display Assembly: 1 단계, 이미지 2/3 iPad 3G Logic Board Replacement, Display Assembly: 1 단계, 이미지 3/3
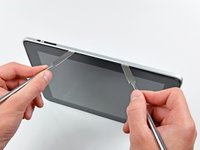
    • If your display glass is cracked, keep further breakage contained and prevent bodily harm during your repair by taping the glass.

    • Lay overlapping strips of clear packing tape over the iPad's display until the whole face is covered.

    • This will keep glass shards contained and provide structural integrity when prying and lifting the display.

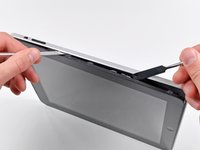
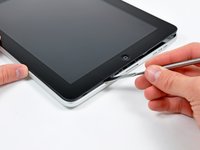
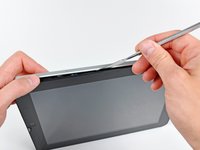
    • Do your best to follow the rest of the guide as described. However, once the glass is broken, it will likely continue to crack as you work, and you may need to use a metal prying tool to scoop the glass out.

    • Wear safety glasses to protect your eyes, and be careful not to damage the LCD screen.

  2. iPad 3G Logic Board Replacement: 2 단계, 이미지 1/2 iPad 3G Logic Board Replacement: 2 단계, 이미지 2/2
    • The iPad shown in the photos may look slightly different from your iPad, but the procedure is the same.

    • Insert a metal spudger between the right edge of the display assembly and the rear panel assembly.

    • Rotate the spudger away from you to release the tabs along the top edge of the display.

  3. iPad 3G Logic Board Replacement: 3 단계, 이미지 1/2 iPad 3G Logic Board Replacement: 3 단계, 이미지 2/2
    • Insert a second metal spudger between the top edge of the display assembly and the rear panel assembly to keep the tabs from snapping back into place.

    • Pry the display assembly away from the rear panel.

  4. iPad 3G Logic Board Replacement: 4 단계, 이미지 1/2 iPad 3G Logic Board Replacement: 4 단계, 이미지 2/2
    • Continue prying the display assembly away from the rear panel along the bottom and left edges of the iPad.

    • Use extreme caution as you approach the top edge of the iPad. The digitizer ribbon cable is located near the edge of the rear panel and can easily be damaged.

  5. iPad 3G Logic Board Replacement: 5 단계, 이미지 1/1
    • Lift the display assembly away from the rear panel assembly by its bottom edge.

    • Do not excessively lift the display assembly off the rest of the iPad, as a fragile antenna cable with very little slack still connects the two components.

  6. iPad 3G Logic Board Replacement: 6 단계, 이미지 1/1
    • Use the flat end of a spudger to pry the antenna connector closest to the bottom of the iPad up off its socket on the communications board.

  7. iPad 3G Logic Board Replacement: 7 단계, 이미지 1/1
    • In the following steps, you will disconnect the three cables attaching the display assembly to the logic board. The cables are for the following components:

    • Digitizer

    • Ambient Light Sensor

    • Display Data Cable

  8. iPad 3G Logic Board Replacement: 8 단계, 이미지 1/3 iPad 3G Logic Board Replacement: 8 단계, 이미지 2/3 iPad 3G Logic Board Replacement: 8 단계, 이미지 3/3
    • Use the edge of an iPod opening tool to flip up the retaining flaps holding the digitizer ribbon cables in their sockets on the logic board.

    • Be sure you are flipping up the retaining flap, not the socket itself.

    • Pull the digitizer ribbon cables straight out of their sockets.

  9. iPad 3G Logic Board Replacement: 9 단계, 이미지 1/1
    • Use an iPod opening tool to remove the ambient light sensor connector from its socket by gently prying upward.

  10. iPad 3G Logic Board Replacement: 10 단계, 이미지 1/2 iPad 3G Logic Board Replacement: 10 단계, 이미지 2/2
    • Disconnect the display data cable from the main board by flipping up the metal retainer by its black plastic pull tab.

    • Pull the cable connector away from its socket.

    • Pull the connector parallel to the face of the logic board.

  11. iPad 3G Logic Board Replacement: 11 단계, 이미지 1/1
    • Remove the display assembly from the rear panel assembly.

  12. iPad 3G Logic Board Replacement, Communications Board: 12 단계, 이미지 1/1
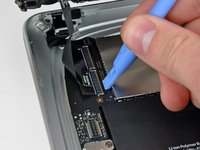
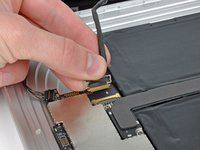
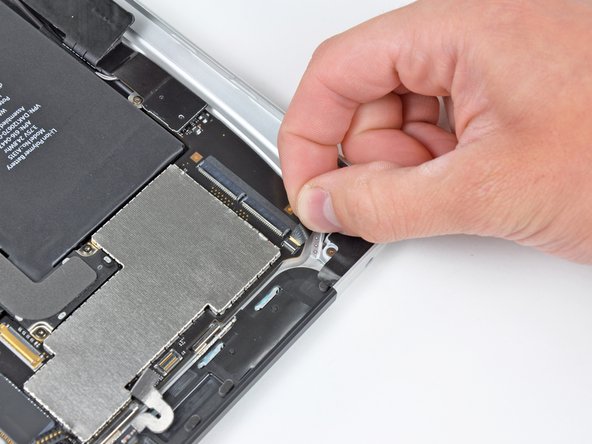
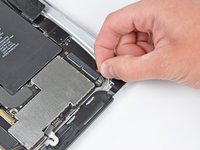
    • Use the edge of an iPod opening tool to carefully pry the remaining antenna connector up off the communications board.

  13. iPad 3G Logic Board Replacement: 13 단계, 이미지 1/2 iPad 3G Logic Board Replacement: 13 단계, 이미지 2/2
    • De-route the control button cable along the top edge of the communications board.

    • Pull the communications cable upward to lift its connector up and out of the socket on the logic board.

  14. iPad 3G Logic Board Replacement: 14 단계, 이미지 1/1
    • Remove the single T5 Torx screw securing the communications board to the rear case.

  15. iPad 3G Logic Board Replacement: 15 단계, 이미지 1/2 iPad 3G Logic Board Replacement: 15 단계, 이미지 2/2
    • If necessary, lift the right edge of the communications board upward to release it from the adhesive pad attached to the rear case.

    • Pull the communications board away from its socket on the logic board.

  16. iPad 3G Logic Board Replacement, Logic Board: 16 단계, 이미지 1/1
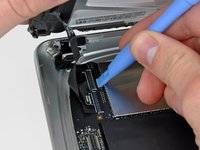
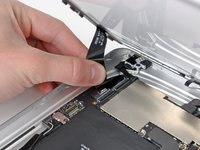
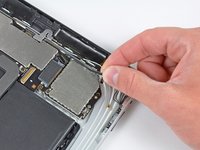
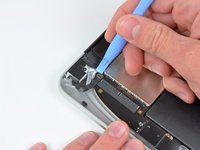
    • Carefully peel back the rubber EMI shield covering the GPS antenna socket.

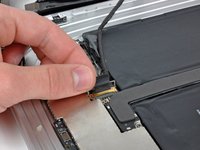
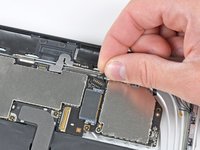
    • Use the edge of an iPod opening tool to flip up the GPS ribbon cable retaining flap attached to the GPS cable's socket on the logic board.

    • Be sure you pry up on the retaining flap, not the socket itself.

  17. iPad 3G Logic Board Replacement: 17 단계, 이미지 1/1
    • Pull the GPS antenna ribbon cable out of its socket.

  18. iPad 3G Logic Board Replacement: 18 단계, 이미지 1/2 iPad 3G Logic Board Replacement: 18 단계, 이미지 2/2
    • Use the edge of an iPod opening tool to pry up the retaining flap on the headphone jack/microphone socket.

    • Be sure you pry up on the retaining flap, not the socket itself.

    • Pull the headphone jack/microphone ribbon cable out of its socket.

    • Pull the cable toward the left side of the iPad.

  19. iPad 3G Logic Board Replacement: 19 단계, 이미지 1/1
    • Use an iPod opening tool to pry the SIM board connector up off its socket on the logic board.

    • This connector might be covered with black tape. Use tweezers to remove the tape before prying.

  20. iPad 3G Logic Board Replacement: 20 단계, 이미지 1/1
    • Fold the SIM cable toward the bottom of the iPad to access the speaker connector.

    • Use the edge of an iPod opening tool to pry the speaker connector up and out of its socket on the logic board.

    • Pry up from beneath the wires.

  21. iPad 3G Logic Board Replacement: 21 단계, 이미지 1/1
    • Remove the following screws securing the logic board to the rear panel assembly.

    • Two 4.56 mm T5 Torx screws.

    • Two 3.76 mm T5 Torx screws.

  22. iPad 3G Logic Board Replacement: 22 단계, 이미지 1/1
    • Use the edge of an iPod opening tool to carefully pry the dock cable connector straight up off the logic board.

  23. iPad 3G Logic Board Replacement: 23 단계, 이미지 1/1
    • Lift the logic board out of the rear panel assembly.

결론

To reassemble your device, follow these instructions in reverse order.

다른 10명이 해당 안내서를 완성하였습니다.

Andrew Bookholt

585,500 평판

안내서 619개 작성하였습니다

댓글 한 개

Did this and everything worked great, but I forgot to re-attach the 3G antenna so I went back in to do that, closed it back up again and now my wifi isn't working. Any thoughts on what I likely messed up?

The first repair didn't require a software/firmware restore, but the second one did. I've restored twice now and reset network settings... all the suggestions Apple makes for troubleshooting a software issue, so I do think I messed something up inside. wobble man 3d

Aro Artis - 답글

댓글 쓰기

조회 통계:

24 시간 전: 0

7일 전: 6

30일 전: 13

전체 시간: 24,947