주요 콘텐츠로 건너뛰기

이 안내서에는 최근 변경 사항이 더 있습니다. 최신 비검증 버전으로 전환하십시오.

iPad Pro 12.9" Display Assembly Replacement

필요한 것

  1. iPad Pro 12.9" Display Assembly Replacement, iOpener Heating: 1 단계, 이미지 1/2 iPad Pro 12.9" Display Assembly Replacement, iOpener Heating: 1 단계, 이미지 2/2
    • We recommend that you clean your microwave before proceeding, as any nasty gunk on the bottom may end up stuck to the iOpener.

    • Place the iOpener in the center of the microwave.

    • For carousel microwaves: Make sure the plate spins freely. If your iOpener gets stuck, it may overheat and burn.

  2. iPad Pro 12.9" Display Assembly Replacement: 2 단계, 이미지 1/1
    • Heat the iOpener for thirty seconds.

    • Throughout the repair procedure, as the iOpener cools, reheat it in the microwave for an additional thirty seconds at a time.

    • Be careful not to overheat the iOpener during the repair. Overheating may cause the iOpener to burst. Do not attempt to heat over 100˚C (212˚F).

    • Never touch the iOpener if it appears swollen.

    • If the iOpener is still too hot in the middle to touch, continue using it while waiting for it to cool down some more before reheating. A properly heated iOpener should stay warm for up to 10 minutes.

  3. iPad Pro 12.9" Display Assembly Replacement: 3 단계, 이미지 1/1
    • Remove the iOpener from the microwave, holding it by one of the two flat ends to avoid the hot center.

    • The iOpener will be very hot, so be careful when handling it. Use an oven mitt if necessary.

  4. iPad Pro 12.9" Display Assembly Replacement, Alternate iOpener heating method: 4 단계, 이미지 1/2 iPad Pro 12.9" Display Assembly Replacement, Alternate iOpener heating method: 4 단계, 이미지 2/2
    • If you don't have a microwave, follow this step to heat your iOpener in boiling water.

    • Fill a pot or pan with enough water to fully submerge an iOpener.

    • Heat the water to a boil. Turn off the heat.

    • Place an iOpener into the hot water for 2-3 minutes. Make sure the iOpener is fully submerged in the water.

    • Use tongs to extract the heated iOpener from the hot water.

    • Thoroughly dry the iOpener with a towel.

    • The iOpener will be very hot, so be careful to hold it only by the end tabs.

    • Your iOpener is ready for use! If you need to reheat the iOpener, heat the water to a boil, turn off the heat, and place the iOpener in the water for 2-3 minutes.

  5. iPad Pro 12.9" Display Assembly Replacement, Display Assembly: 5 단계, 이미지 1/3 iPad Pro 12.9" Display Assembly Replacement, Display Assembly: 5 단계, 이미지 2/3 iPad Pro 12.9" Display Assembly Replacement, Display Assembly: 5 단계, 이미지 3/3
    • If your display glass is cracked, keep further breakage contained and prevent bodily harm during your repair by taping the glass.

    • Lay overlapping strips of clear packing tape over the iPad's display until the whole face is covered.

    • This will keep glass shards contained and provide structural integrity when prying and lifting the display.

    • Do your best to follow the rest of the guide as described. However, once the glass is broken, it will likely continue to crack as you work, and you may need to use a metal prying tool to scoop the glass out.

    • Wear safety glasses to protect your eyes, and be careful not to damage the LCD screen.

  6. iPad Pro 12.9" Display Assembly Replacement: 6 단계, 이미지 1/3 iPad Pro 12.9" Display Assembly Replacement: 6 단계, 이미지 2/3 iPad Pro 12.9" Display Assembly Replacement: 6 단계, 이미지 3/3
    • Removing the display assembly involves using a halberd spudger or opening pick to separate the adhesive securing the display to the rear case.

    • Use the photos in this step to know the locations of the adhesive and where it is the thickest.

    • Refer to these images while following the guide to see where the adhesive is thickest and where to cut the deepest with your opening tool.

  7. iPad Pro 12.9" Display Assembly Replacement: 7 단계, 이미지 1/1
    • Lay the hot iOpener over the left edge of the iPad to soften the adhesive holding it in place.

    • Alternatively, use a heat gun, hair dryer, or heat pad to heat the perimeter of your iPad.

    • Wait about two minutes for the adhesive to soften before proceeding to the next step.

  8. iPad Pro 12.9" Display Assembly Replacement: 8 단계, 이미지 1/1
    • Attach a suction handle to the left edge of the iPad's display, equidistant from the top and bottom corners.

  9. iPad Pro 12.9" Display Assembly Replacement: 9 단계, 이미지 1/3 iPad Pro 12.9" Display Assembly Replacement: 9 단계, 이미지 2/3 iPad Pro 12.9" Display Assembly Replacement: 9 단계, 이미지 3/3
    • While holding down the corners of the device, repeatedly pull up on the display then ease it back down to weaken the adhesive.

    • Once you've opened a small gap between the front panel and the rear case, insert the blade of a halberd spudger or an opening pick in the gap you've created.

    • Do not insert the pick more than 2 millimeters. Going any farther will permanently damage the display assembly. If using a halberd spudger, slice with the shortest part of the blade.

  10. iPad Pro 12.9" Display Assembly Replacement: 10 단계, 이미지 1/3 iPad Pro 12.9" Display Assembly Replacement: 10 단계, 이미지 2/3 iPad Pro 12.9" Display Assembly Replacement: 10 단계, 이미지 3/3
    • Lay a hot iOpener along the bottom left corner of the iPad, spanning from the opening pick to the home button.

    • After letting the adhesive soften, insert a halberd spudger into the iPad next to the opening pick.

    • An opening pick can be used in place of the halberd spudger. Use caution if using an opening pick, as inserting the pick too far can damage the display assembly.

    • Cut the adhesive along the bottom left side of the iPad using the halberd spudger. This may require reheating the edge of the iPad.

    • Continue to slide the halberd spudger back and forth to ensure most of the adhesive is separated.

  11. iPad Pro 12.9" Display Assembly Replacement: 11 단계, 이미지 1/2 iPad Pro 12.9" Display Assembly Replacement: 11 단계, 이미지 2/2
    • Insert a pick in the bottom left corner of the iPad to ensure that the adhesive doesn't completely reset.

    • Remove the halberd spudger.

  12. iPad Pro 12.9" Display Assembly Replacement: 12 단계, 이미지 1/3 iPad Pro 12.9" Display Assembly Replacement: 12 단계, 이미지 2/3 iPad Pro 12.9" Display Assembly Replacement: 12 단계, 이미지 3/3
    • Lay a hot iOpener along the upper left corner of the iPad, spanning from the opening pick to the front-facing camera.

    • After letting the adhesive soften, insert the blade of your halberd spudger into the iPad above the opening pick.

    • Cut the adhesive along the upper left side of the iPad towards the front-facing camera using the halberd spudger. This may require reheating the edge of the iPad.

  13. iPad Pro 12.9" Display Assembly Replacement: 13 단계, 이미지 1/3 iPad Pro 12.9" Display Assembly Replacement: 13 단계, 이미지 2/3 iPad Pro 12.9" Display Assembly Replacement: 13 단계, 이미지 3/3
    • Insert a pick in the upper left corner of the iPad.

    • Remove the halberd spudger.

  14. iPad Pro 12.9" Display Assembly Replacement: 14 단계, 이미지 1/3 iPad Pro 12.9" Display Assembly Replacement: 14 단계, 이미지 2/3 iPad Pro 12.9" Display Assembly Replacement: 14 단계, 이미지 3/3
    • Reheat your iOpener and lay it over the top edge of the device. Wait a couple minutes for the adhesive to soften.

    • Once the front panel is adequately heated, insert the blade of a halberd spudger next to the opening pick from the previous step.

    • Slide the blade along the top edge of the iPad, stopping before reaching the front-facing camera.

  15. iPad Pro 12.9" Display Assembly Replacement: 15 단계, 이미지 1/2 iPad Pro 12.9" Display Assembly Replacement: 15 단계, 이미지 2/2
    • Insert an opening pick just before the front-facing camera.

  16. iPad Pro 12.9" Display Assembly Replacement: 16 단계, 이미지 1/3 iPad Pro 12.9" Display Assembly Replacement: 16 단계, 이미지 2/3 iPad Pro 12.9" Display Assembly Replacement: 16 단계, 이미지 3/3
    • If necessary, reheat your iOpener and lay it over the top edge of the device. Wait a couple minutes for the adhesive to soften before reinserting the blade of the halberd spudger.

    • Insert the blade of the halberd spudger just past the front-facing camera, on the opposite side of the opening pick.

    • Continue to slide the blade of the halberd spudger to the upper right corner of the iPad.

  17. iPad Pro 12.9" Display Assembly Replacement: 17 단계, 이미지 1/2 iPad Pro 12.9" Display Assembly Replacement: 17 단계, 이미지 2/2
    • Bring the halberd spudger around the corner of the iPad and insert an opening pick in the upper right corner to prevent the adhesive from resettling.

  18. iPad Pro 12.9" Display Assembly Replacement: 18 단계, 이미지 1/2 iPad Pro 12.9" Display Assembly Replacement: 18 단계, 이미지 2/2
    • Soften the adhesive by heating the right edge of the iPad using an iOpener.

    • Continue using the halberd spudger to cut away the adhesive holding the display assembly in place, stopping at the middle of the right edge.

  19. iPad Pro 12.9" Display Assembly Replacement: 19 단계, 이미지 1/3 iPad Pro 12.9" Display Assembly Replacement: 19 단계, 이미지 2/3 iPad Pro 12.9" Display Assembly Replacement: 19 단계, 이미지 3/3
    • Remove the pick that was placed in the middle of the top edge of the iPad, next to the front-facing camera.

    • If you have extra opening picks or similar tools you do not need to remove this one.

    • Insert that pick in the middle of the right edge of the iPad.

  20. iPad Pro 12.9" Display Assembly Replacement: 20 단계, 이미지 1/2 iPad Pro 12.9" Display Assembly Replacement: 20 단계, 이미지 2/2
    • Insert the halberd spudger between the display and rear case, along the right edge of the device.

    • Slide the halberd spudger down the side of the iPad to separate the adhesive.

  21. iPad Pro 12.9" Display Assembly Replacement: 21 단계, 이미지 1/2 iPad Pro 12.9" Display Assembly Replacement: 21 단계, 이미지 2/2
    • Bring the blade of your opening tool around the lower right corner of the device.

    • Insert a pick in the lower right corner of the iPad where you slid the blade through.

    • Remove the halberd spudger.

  22. iPad Pro 12.9" Display Assembly Replacement: 22 단계, 이미지 1/3 iPad Pro 12.9" Display Assembly Replacement: 22 단계, 이미지 2/3 iPad Pro 12.9" Display Assembly Replacement: 22 단계, 이미지 3/3
    • Use an iOpener to heat the bottom of the iPad.

    • Insert the blade of a halberd spudger to the left of the opening pick on the bottom right corner of the iPad.

    • Slide the halberd spudger along the lower edge of the iPad stopping short about 1 centimeter before reaching the home button.

  23. iPad Pro 12.9" Display Assembly Replacement: 23 단계, 이미지 1/3 iPad Pro 12.9" Display Assembly Replacement: 23 단계, 이미지 2/3 iPad Pro 12.9" Display Assembly Replacement: 23 단계, 이미지 3/3
    • Remove the pick in the middle of the left side of the iPad.

    • If you have extra opening picks or similar tools you do not need to remove this one.

    • Insert the pick to the right of home button.

  24. iPad Pro 12.9" Display Assembly Replacement: 24 단계, 이미지 1/2 iPad Pro 12.9" Display Assembly Replacement: 24 단계, 이미지 2/2
    • Pivot the halberd spudger so that you are slicing with the shortest portion of the blade.

    • Slide the halberd spudger to cut the adhesive below the home button.

  25. iPad Pro 12.9" Display Assembly Replacement: 25 단계, 이미지 1/2 iPad Pro 12.9" Display Assembly Replacement: 25 단계, 이미지 2/2
    • Reinsert the blade of the halberd spudger as deep as it will go.

    • Continue sliding the blade along the edge until you reach the first opening pick you inserted.

  26. iPad Pro 12.9" Display Assembly Replacement: 26 단계, 이미지 1/2 iPad Pro 12.9" Display Assembly Replacement: 26 단계, 이미지 2/2
    • Return to step 5 of this guide and ensure the thick portions of adhesive are adequately separated from the display assembly. If they are, continue with this step. Otherwise, slice the adhesive to break it up until the display assembly is freed.

    • The display cables in this iPad are shorter than some users may be comfortable with. Read the following warnings before proceeding:

    • Do not pivot the display about the lower edge. The display cables do not have enough slack to allow for this and will tear if you do not slide the display towards the front-facing camera as you lift.

    • The display cables will tear if you raise the display more than 80º.

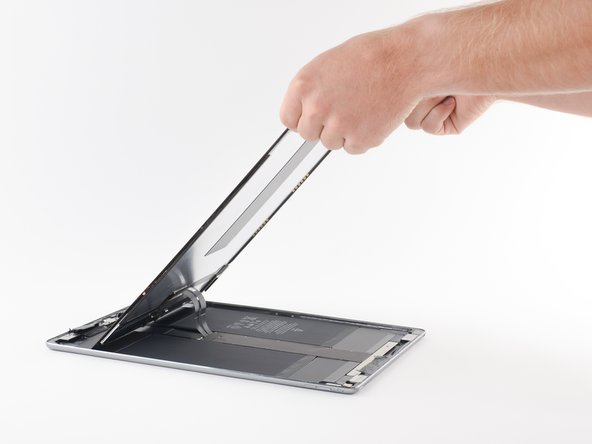
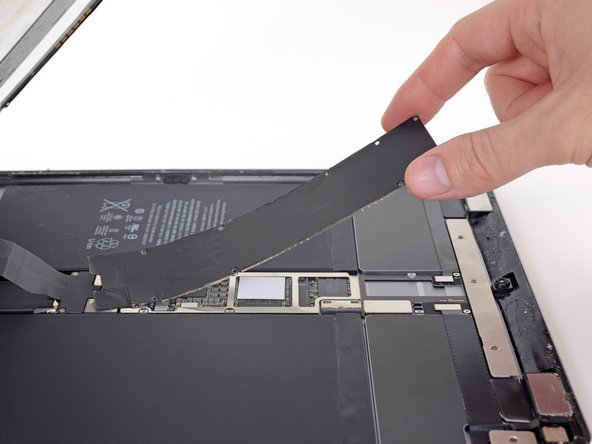
    • Lift up the upper edge of the display and slide it towards the front-facing camera to access the iPads internal components.

  27. iPad Pro 12.9" Display Assembly Replacement: 27 단계, 이미지 1/1
    • It's important to disconnect the battery before you proceed further. Detaching or connecting the display cables with the battery plugged in can cause a short that will destroy touchscreen functionality.

    • To disconnect the battery:

    • First, securely prop up the display so that it won't fall or strain the display cables while you work.

    • Then, remove the nine Phillips screws securing the logic board EMI shield:

    • Eight 1.2 mm screws

    • One 2.4 mm screw

  28. iPad Pro 12.9" Display Assembly Replacement: 28 단계, 이미지 1/3 iPad Pro 12.9" Display Assembly Replacement: 28 단계, 이미지 2/3 iPad Pro 12.9" Display Assembly Replacement: 28 단계, 이미지 3/3
    • Lift the logic board EMI shield from the edge nearest the top of the iPad.

    • Peel the EMI shield up from the logic board.

    • This takes a bit of force due to the many tiny clips securing the shield, and the shield may deform slightly. That's okay—try to keep the deformation to a minimum, and it will lay flat when reinstalled and screwed down.

    • Remove the logic board EMI shield.

  29. iPad Pro 12.9" Display Assembly Replacement: 29 단계, 이미지 1/1
    • Remove the 1.8 mm Phillips screw securing the battery connector.

  30. iPad Pro 12.9" Display Assembly Replacement, Battery connector information: 30 단계, 이미지 1/3 iPad Pro 12.9" Display Assembly Replacement, Battery connector information: 30 단계, 이미지 2/3 iPad Pro 12.9" Display Assembly Replacement, Battery connector information: 30 단계, 이미지 3/3
    • These photos show what the battery connector looks like underneath the logic board. Use these photos as a reference while you safely disconnect the battery.

    • Notice that the battery connector has springs on the logic board that press against the battery contact pads. Since both the logic board and battery are glued down, you'll need to slide something thin and flexible between the contact points to disconnect the battery.

  31. iPad Pro 12.9" Display Assembly Replacement: 31 단계, 이미지 1/3 iPad Pro 12.9" Display Assembly Replacement: 31 단계, 이미지 2/3 iPad Pro 12.9" Display Assembly Replacement: 31 단계, 이미지 3/3
    • Insert a battery blocker or other insulator underneath the logic board to separate it from the battery connector.

    • Be very careful when you isolate the battery using a battery blocker. The battery contacts are easily damaged, resulting in irreversible damage.

    • Don't push the battery blocker underneath the connector with excessive force. If you're having trouble fitting the battery blocker underneath the logic board, you can try using a playing card to disconnect the battery instead.

    • Leave it there to prevent the battery connector leads from making contact until you have completed your repairs.

    • The rest of the images in this guide show the logic board EMI shield reinstalled, which is incorrect. Follow the instructions, but keep the battery disconnected and do not reinstall the EMI shield until your repairs are complete.

  32. iPad Pro 12.9" Display Assembly Replacement: 32 단계, 이미지 1/3 iPad Pro 12.9" Display Assembly Replacement: 32 단계, 이미지 2/3 iPad Pro 12.9" Display Assembly Replacement: 32 단계, 이미지 3/3
    • While supporting the display assembly, remove the following three Phillips screws over the display cable bracket.

    • 2.4 mm Phillips screw

    • 1.2 mm Phillips screw

    • Remove the display cable bracket.

  33. iPad Pro 12.9" Display Assembly Replacement: 33 단계, 이미지 1/3 iPad Pro 12.9" Display Assembly Replacement: 33 단계, 이미지 2/3 iPad Pro 12.9" Display Assembly Replacement: 33 단계, 이미지 3/3
    • Use the flat end of a spudger to disconnect the two display data and digitizer cables from their respective sockets on the motherboard.

  34. iPad Pro 12.9" Display Assembly Replacement: 34 단계, 이미지 1/1
결론

To reassemble your device, follow these instructions in reverse order.

다른 88명이 해당 안내서를 완성하였습니다.

Evan Noronha

회원 가입일: 02/05/15

223,418 평판

안내서 168개 작성하였습니다

댓글 21개

Hello there OK so I have 2 screens with 2 different connectors one L shaped (which is on the new screen) and the old cracked screen has a rectangular type? I’m not sure rather it’s a 1gen/2nd gen type of problem? I’m about to grab my hot air gun to completely disassemble the cracked screen, as maybe I’m missing something? Any assistance is welcome… well actually please help me with this before I get a headache since this has totally frustrated me and i’ve had this sitting for nearly 2 1/2 months now but it’s about that time that I readdress this in attempt to fix it.

Matthew Newton - 답글

Hi, does your replacement screen have the home button assembly included? Otherwise there's need of soldering the assembly to it before it can be installed.

Dreetn -

hi

does anyone knows why there is a foam adhesive in thr back of the screen ? do i need to put back when i replaxe screen ?

thanks

screensguy - 답글

I suppose the foam adhesive is similar to the one on the back of the 6s screens. I guess it has more of a heat dissipation function or is meant to absorb any pointy pressure points from inside that may develop (loose screw, sand, dirt...)

Dreetn -

hi

hope someone can help . i tested couple of screens before fitting them in they were working but once tech close it there no touch or black lcd (backlight on but no image )

NB : they disconnect battery before connecting Screen

screensguy - 답글

If you don't have this problem while the assembly is still loose, my best guess is that you have an unwanted contact somewhere, causing a short circuit or malfunction. Perhaps in the bending of the flex?

Dreetn -

Removing the screen takes a great degree of patience. You apply heat, and pull on the suction cup, and for a long time nothing seems to happen. Do not try to replace time with force at this point keep heating and pulling on various areas, you will get separation. It took 5 or 6 heating/pulling cycles to start to see results. Then you can work your way around.

oclark - 답글

MAKE SURE YOU DO NOT INSERT ANY CARDS/PICKS/SPUDGERS MORE THAN 1/4 inch tops!! YOU WILL DAMAGE THE SCREEN. Just replaced the battery in my iPad Pro 12.9 (A1652). Unfortunately I did not read this until completed. I now have several areas on my $1000 iPad where the white screen has orange burn looking marks around the edges. Looks like it was a $200 oops. Live and Learn. I’m now a member and will utilize this website for future endeavors…

Dave Ryberg - 답글

You know any workshop who does a repair for my three iPad Pro 12.9 front glasses with the digitizer,

Sometimes the process is called OCA refurbishment oder LCD refurbishment.

NOT the display-unit as a whole. I have two models from 2015 and one from 2017. The model numbers are a 1584 and  a 1670.

 In Germany there are a few companies who are able to do it, but not affordable. The prices are nearly as high as a complete swap of the display unit.

giuseppe naniscola - 답글

Just wondering, I work in a repair shop, and am replacing the front panel entirely but unfortunately screwed up soldering the daughterboard. Is this a part they MUST be transferred or am I safe to just replace it?

Zane Clark - 답글

Hello.

Is it possible to change only the “Glas” and not the Display? My display works fine but the Protecting Glas is broken.

sim sem - 답글

Hi, that’s possible for very, very experienced technicians. Not only do you need to heat up the screen quite a lot to soften up the LOCA glue, but furthermore you need to cut it with a cutting wire while making sure not to damage the LCD underneath. I also fear the iPad pro will probably require some micro-soldering to be able to (dis)connect the glass from all the rest (but perhaps I’m confusing things with the first screen modules in mind that came out but still needed some micro-soldering to finish them of at that time). In short, if you haven’t separated touchscreens/glass plates several times before … don’t even think about it. The above is only half the trouble to go through as the new touchscreen/glass needs to be attached to the LCD again with new LOCA glue afterwards. Again a job which requires a lot of expertise.

Dreetn -

I used this guide to replace a screen for my iPad Pro. The device powers on but now gets stuck in a boot loop. I took it to a local phone repair shop and they said they don’t do repairs on iPad Pros because they always get stuck in boot loops. I wish there was a warning on this guide telling people this so they don’t go to all the effort and spend money on a new screen just to get their iPad stuck in a boot loop.

Brandon der Blatter - 답글

Brandon, I don’t know of any specific ‘sensitivity’ that iPad Pro’s have towards repairing that would result in bootloops.

I think it is more likely that either

- The repair shop isn’t keen on repairing your device because parts are expensive and/or difficult to find (for instance motherboard parts). They just tell you a believable story to avoid having to say ‘Too risky’ or ‘Not worth our effort/time’.

- Something got damaged during the repair.

Another possibility, which you can easily put aside yourself, is software damage. Try a full restore (without data retention) with tools such as 3uTools. It’s free software. I advise using the iTunes restore method. You can first try a restore with ‘retain user’s data’ but success ratio is minimal there. Best is to go for a clean flash/restore.

Good luck!

Dreetn -

No matter how many times I have tried to apply the iOpener, or to use a dryer for 10 mins (iPad was super hot), I’m simply unable to lift the screen with the suction cup, even for a micron. Anything I could have missed ?

Laurent Crivello - 답글

Hi Laurent, it sounds like you’re on the right track—continue gradually applying more heat until the adhesive softens a little. Unfortunately these screens are super hard to remove. Just be careful about applying too much heat at once in a small area as that could damage the screen.

Adam O'Camb -

hi all, I'm part-way through this (amazing instructions as always), while I was removing the EMI shield the sticky fabric underneath came away and rolled up on itself, do I need to make a new one or can I replace the shield without it? Many thanks

johnegrey - 답글

While removing the screen I accidentally pulled the soldering from the daughterboard to the display cable. is their a way to fix this or is it an issue?

jacob myers - 답글

This was an awesome guide! It was really fun, but a lot of really careful work!! How could anybody do this repair and charge a reasonable rate for the labor? It took me soooo long.

trevorsklar - 답글

Hey there! It will be great if you create a guide to replace the digitalizer, as the LCD could be reusable.

Thank you!

Jose - 답글

FYI - on the 12.9" iPad it's practically impossible to detach the screen without damaging it. Not an issue if you're fixing a screen that's already broken, but if you're trying to repair an internal component, be prepared to buy a replacement screen as well.

hhtec - 답글

댓글 쓰기

조회 통계:

24 시간 전: 25

7일 전: 199

30일 전: 1,093

전체 시간: 150,436