주요 콘텐츠로 건너뛰기

iPad mini 4 LTE Battery Replacement

필요한 것

  1. iPad mini 4 LTE Battery Replacement, Taping a Cracked Front Panel: 1 단계, 이미지 1/3 iPad mini 4 LTE Battery Replacement, Taping a Cracked Front Panel: 1 단계, 이미지 2/3 iPad mini 4 LTE Battery Replacement, Taping a Cracked Front Panel: 1 단계, 이미지 3/3
    이 단계에 사용된 도구:
    Safety Glasses
    $3.19
    구매
    • If your display glass is cracked, keep further breakage contained and prevent bodily harm during your repair by taping the glass.

    • Lay overlapping strips of clear packing tape over the iPad's display until the whole face is covered. For particularly bad breaks, you may need to lay down two layers.

    • This will keep glass shards contained and provide structural integrity when prying and lifting the display.

    • Do your best to follow the rest of the guide as described. However, once the glass is broken, it will likely continue to crack as you work, and you may need to use a metal prying tool to scoop the glass out.

    • Protect your eyes! This procedure will cause small pieces of glass to fly directly toward your face. Do not attempt without safety glasses.

  2. iPad mini 4 LTE Battery Replacement, Opening Procedure: 2 단계, 이미지 1/1
  3. iPad mini 4 LTE Battery Replacement: 3 단계, 이미지 1/3 iPad mini 4 LTE Battery Replacement: 3 단계, 이미지 2/3 iPad mini 4 LTE Battery Replacement: 3 단계, 이미지 3/3
    • Apply a suction cup halfway up the heated side.

    • Be sure the cup is completely flat on the screen to get a tight seal.

    • While holding the iPad down with one hand, pull up on the suction cup with strong, steady force to create a gap.

    • Depending on the age of your device, this may be difficult. If you have trouble, apply more heat and try again.

    • Be careful to only lift the glass enough to insert an opening pick—any more and you risk cracking the glass.

  4. iPad mini 4 LTE Battery Replacement: 4 단계, 이미지 1/2 iPad mini 4 LTE Battery Replacement: 4 단계, 이미지 2/2
    • While holding the glass up with the suction cup, insert the point of an opening pick into the gap between the glass and body of the iPad.

    • Don't insert the opening pick any deeper than 2 mm into the side of the display. Inserting the pick deeper than 2 mm could damage the backlight assembly, LCD display, or touchscreen.

  5. iPad mini 4 LTE Battery Replacement: 5 단계, 이미지 1/1
    • Reheat and reapply the iOpener to the left edge for a few minutes.

    • Be careful not to overheat the iOpener during the repair procedure. Always wait at least ten minutes before reheating the iOpener.

  6. iPad mini 4 LTE Battery Replacement: 6 단계, 이미지 1/3 iPad mini 4 LTE Battery Replacement: 6 단계, 이미지 2/3 iPad mini 4 LTE Battery Replacement: 6 단계, 이미지 3/3
    • Insert a second opening pick alongside the first and slide the pick down along the edge of the iPad, releasing the adhesive as you go.

    • Throughout the rest of the procedure, if you encounter significant resistance while sliding the pick, stop and reheat the section you're working on. Applying too much pressure with the pick can crack the glass.

  7. iPad mini 4 LTE Battery Replacement: 7 단계, 이미지 1/3 iPad mini 4 LTE Battery Replacement: 7 단계, 이미지 2/3 iPad mini 4 LTE Battery Replacement: 7 단계, 이미지 3/3
    • Continue moving the opening pick down the side of the display to release the adhesive.

    • If the opening pick gets stuck in the adhesive, "roll" the pick along the side of the iPad, continuing to release the adhesive.

  8. iPad mini 4 LTE Battery Replacement: 8 단계, 이미지 1/2 iPad mini 4 LTE Battery Replacement: 8 단계, 이미지 2/2
    • Take the first pick you inserted and slide it up toward the top corner of the iPad.

  9. iPad mini 4 LTE Battery Replacement: 9 단계, 이미지 1/1
    • Reheat the iOpener and place it on the top edge of the iPad, over the front-facing camera.

    • Be careful not to overheat the iOpener during the repair procedure. Wait at least ten minutes before reheating the iOpener.

    • If you have a flexible iOpener, you can bend it to heat both the upper left corner and the upper edge at the same time.

  10. iPad mini 4 LTE Battery Replacement: 10 단계, 이미지 1/3 iPad mini 4 LTE Battery Replacement: 10 단계, 이미지 2/3 iPad mini 4 LTE Battery Replacement: 10 단계, 이미지 3/3
    • Slide the opening pick around the top left corner of the iPad to separate the adhesive.

  11. iPad mini 4 LTE Battery Replacement: 11 단계, 이미지 1/3 iPad mini 4 LTE Battery Replacement: 11 단계, 이미지 2/3 iPad mini 4 LTE Battery Replacement: 11 단계, 이미지 3/3
    • Slide the opening pick along the top edge of the iPad, stopping just before you reach the camera.

    • As you reach the front-facing camera, pull the pick out slightly and continue sliding it across the top edge.

    • Avoid sliding the opening pick over the front-facing camera, as you may smear adhesive onto the lens or damage the camera. The following steps will detail how to best avoid disturbing the front-facing camera.

  12. iPad mini 4 LTE Battery Replacement: 12 단계, 이미지 1/3 iPad mini 4 LTE Battery Replacement: 12 단계, 이미지 2/3 iPad mini 4 LTE Battery Replacement: 12 단계, 이미지 3/3
    • Leave the opening pick in the iPad slightly past the front-facing camera.

    • Take a second pick and insert it to the left of the camera, where the first pick just was. Slide it back to the corner to completely cut any remaining adhesive.

    • Leave the second pick in place to prevent the corner adhesive from re-sealing as it cools.

  13. iPad mini 4 LTE Battery Replacement: 13 단계, 이미지 1/2 iPad mini 4 LTE Battery Replacement: 13 단계, 이미지 2/2
    • Insert the previous pick deeper into the iPad and slide it away from the camera toward the corner.

  14. iPad mini 4 LTE Battery Replacement: 14 단계, 이미지 1/1
    • Leave the three picks in the corners of the iPad to prevent re-adhering of the front panel adhesive.

    • Reheat the iOpener and place it on the remaining long side of the iPad—along the volume and lock buttons.

  15. iPad mini 4 LTE Battery Replacement: 15 단계, 이미지 1/3 iPad mini 4 LTE Battery Replacement: 15 단계, 이미지 2/3 iPad mini 4 LTE Battery Replacement: 15 단계, 이미지 3/3
    • Insert a new opening pick and slide it down the right edge of the iPad, releasing the adhesive as you go.

  16. iPad mini 4 LTE Battery Replacement: 16 단계, 이미지 1/3 iPad mini 4 LTE Battery Replacement: 16 단계, 이미지 2/3 iPad mini 4 LTE Battery Replacement: 16 단계, 이미지 3/3
    • Continue sliding the opening pick down the right edge of the iPad, reheating the edge using an iOpener if necessary.

    • Be careful not to slice too deep near the bottom right corner, or you risk damaging the display cable.

  17. iPad mini 4 LTE Battery Replacement: 17 단계, 이미지 1/1
    • Leave the opening picks in place and reheat the iOpener.

    • Remember not to overheat the iOpener—no more than once every ten minutes.

    • Set the reheated iOpener on the home button end of the iPad and let it rest for a few minutes to soften the adhesive beneath the glass.

  18. iPad mini 4 LTE Battery Replacement: 18 단계, 이미지 1/3 iPad mini 4 LTE Battery Replacement: 18 단계, 이미지 2/3 iPad mini 4 LTE Battery Replacement: 18 단계, 이미지 3/3
    • Insert a new opening pick at the bottom right corner of the display, below the last opening pick you used to slice down the right edge.

    • Rotate the new pick around the lower right corner of the device.

  19. iPad mini 4 LTE Battery Replacement: 19 단계, 이미지 1/2 iPad mini 4 LTE Battery Replacement: 19 단계, 이미지 2/2
    • Slide the pick from the bottom right corner along the lower edge of the device. Stop about half an inch shy of the home button.

  20. iPad mini 4 LTE Battery Replacement: 20 단계, 이미지 1/2 iPad mini 4 LTE Battery Replacement: 20 단계, 이미지 2/2
    • Insert a final opening pick at the lower left corner of the iPad, directly below the existing one.

  21. iPad mini 4 LTE Battery Replacement: 21 단계, 이미지 1/2 iPad mini 4 LTE Battery Replacement: 21 단계, 이미지 2/2
    • Slide the pick around the lower left edge of the iPad.

  22. iPad mini 4 LTE Battery Replacement: 22 단계, 이미지 1/3 iPad mini 4 LTE Battery Replacement: 22 단계, 이미지 2/3 iPad mini 4 LTE Battery Replacement: 22 단계, 이미지 3/3
    • Continue sliding the pick at the lower left edge of the display toward the center of the iPad, until it is roughly half an inch from the home button.

  23. iPad mini 4 LTE Battery Replacement: 23 단계, 이미지 1/3 iPad mini 4 LTE Battery Replacement: 23 단계, 이미지 2/3 iPad mini 4 LTE Battery Replacement: 23 단계, 이미지 3/3
    • Twist the two picks at the top edge of the iPad to break up the last of the adhesive holding the display assembly in place.

    • Lift the display from the top edge to open the device.

  24. iPad mini 4 LTE Battery Replacement, Battery Connector: 24 단계, 이미지 1/1
    • To avoid stressing any cables, hold the display assembly perpendicular to the body of the iPad until it is disconnected.

    • Remove the four 1.2 mm Phillips screws over the battery/display connector bracket.

  25. iPad mini 4 LTE Battery Replacement: 25 단계, 이미지 1/1
    • Remove the battery/display cable bracket.

  26. iPad mini 4 LTE Battery Replacement: 26 단계, 이미지 1/2 iPad mini 4 LTE Battery Replacement: 26 단계, 이미지 2/2
    • When disconnecting any press connectors from the logic board, be sure to lift the connector straight up to avoid ripping the socket off the board.

    • Use the flat tip of a spudger to disconnect the battery connector from its socket on the logic board.

    • Bend the battery connector ribbon cable up slightly to prevent it from making contact and powering on the iPad.

  27. iPad mini 4 LTE Battery Replacement, Display Assembly: 27 단계, 이미지 1/3 iPad mini 4 LTE Battery Replacement, Display Assembly: 27 단계, 이미지 2/3 iPad mini 4 LTE Battery Replacement, Display Assembly: 27 단계, 이미지 3/3
    • Use the pointed end of a spudger to disconnect the display data connector from its socket on the logic board.

    • Use the pointed end of a spudger to disconnect the digitizer cable connector from its socket on the logic board.

    • When reconnecting these, press down from one end of the connector to the other. If you press in the middle of the connector, you may bend it, causing damage or a poor connection.

  28. iPad mini 4 LTE Battery Replacement: 28 단계, 이미지 1/1
    • Remove the display assembly.

    • To reinstall your display assembly, you will need to replace the display adhesive. Use our display adhesive application guide to reapply your display adhesive and reseal your device.

  29. iPad mini 4 LTE Battery Replacement, Battery: 29 단계, 이미지 1/1
    • Reheat your iOpener.

    • Lay the iPad face down on your work surface and place the iOpener on the rear case, where the lower edge of the battery is.

    • Wait about two minutes before moving on to the next step to ensure the adhesive holding the battery to the rear case is adequately softened.

  30. iPad mini 4 LTE Battery Replacement: 30 단계, 이미지 1/1
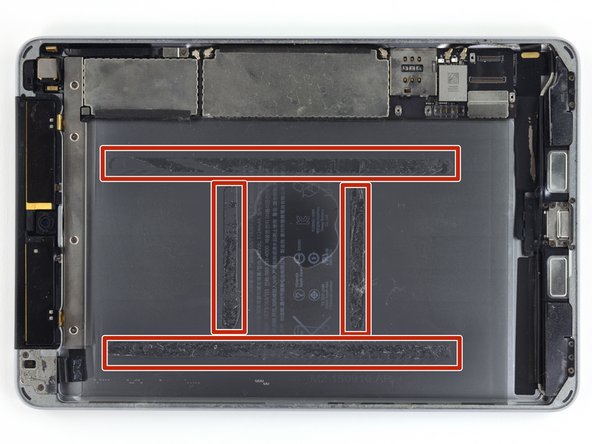
    • In the following steps you will be cutting the adhesive under the battery, and prying it off of the rear case.

    • The adhesive is laid out as shown in this image: two strips along the long edges, and two shorter strips perpendicular in the center.

    • To avoid damaging the battery, use plastic tools, heat, and patience. Do not puncture, bend, or overheat the battery.

    • Do not pry near the logic board, you could damage your iPad.

    • If you are performing this procedure on the Wi-Fi version, it is safe to insert pry tools from the upper, lower, and left edges of the battery. For the LTE version, only pry from the lower and left edges to avoid damaging other components.

  31. iPad mini 4 LTE Battery Replacement: 31 단계, 이미지 1/2 iPad mini 4 LTE Battery Replacement: 31 단계, 이미지 2/2
    이 단계에 사용된 도구:
    Plastic Cards
    $2.99
    구매
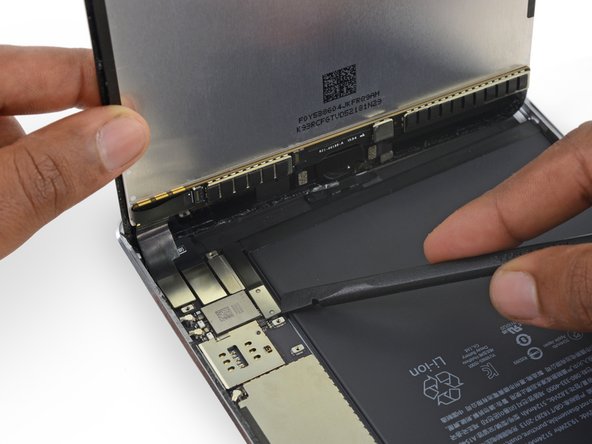
    • Insert the corner of a plastic card between the lower end of the battery and the rear case.

    • Press the card until approximately an inch and a half is underneath the battery.

  32. iPad mini 4 LTE Battery Replacement: 32 단계, 이미지 1/2 iPad mini 4 LTE Battery Replacement: 32 단계, 이미지 2/2
    • Insert a second plastic card between the battery and first card, this time with the card edge parallel to the battery.

    • Again, press the card in until about an inch and a half is underneath the battery.

  33. iPad mini 4 LTE Battery Replacement: 33 단계, 이미지 1/3 iPad mini 4 LTE Battery Replacement: 33 단계, 이미지 2/3 iPad mini 4 LTE Battery Replacement: 33 단계, 이미지 3/3
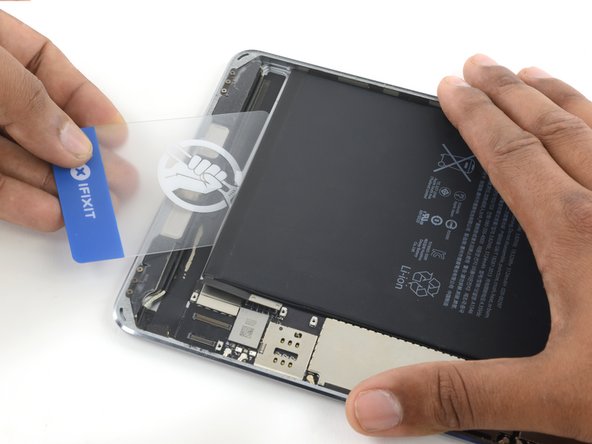
    • Insert a third plastic card between the first and second ones, this time aligned with the left edge of the battery.

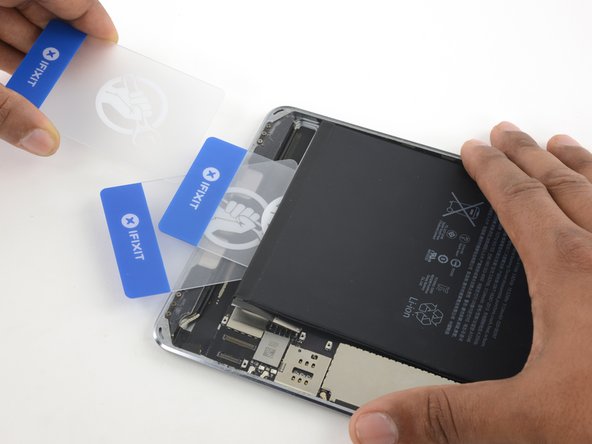
    • Continue to cut the adhesive under the battery until the battery is freed.

    • Reheat and reapply your iOpener when prying becomes difficult. Be sure to wait for the iOpener to cool between sessions.

  34. iPad mini 4 LTE Battery Replacement: 34 단계, 이미지 1/1
    • Remove the battery.

    • When you install a replacement battery, be sure to check that the battery connector can reach the logic board before you glue the battery in place.

결론

To reassemble your device, follow these instructions in reverse order.

다른 32명이 해당 안내서를 완성하였습니다.

Evan Noronha

회원 가입일: 02/05/15

223,163 평판

안내서 168개 작성하였습니다

댓글 7개

This guide doesn’t specify cleaning or technique of adding the new adhesive strips. Disappointing…

Alec - 답글

This guide is incomplete and needs to have the remaining steps explained out… For one, put the adhesive strips on the back of the screen, not into the chassis…

Alec - 답글

This guide says ABSOLUTELY NOTHING about where the display and digitizer cables are connected. NO warning to be extremely careful in the bottom right corner where the display is connected. I was under the impression that I could stick a pick in to every corner of the iPad which is NOT the case. I’m just disappointed that because of this error in explanation I now have to buy a replacement screen. I hope the author and others performing this repair see this and let me be the person to screw up my screen not you! Again, disappointed!

Karl Schmidt - 답글

Hi Karl,

I’m really sorry to hear that! I will add warnings to the appropriate steps to hopefully help mitigate this issue. If you purchased the screen from iFixit, please contact our support team at help.ifixit.com!

Arthur Shi -

Exactly same happen to me! Replaced the battery, the iPad mini cannot be started. Just showing stripes on the display. I’ve read this instructions a few times but seems to missed the cables as well.. Too bad it was my kids’ iPad.

Andreas Ropel -

댓글 쓰기

조회 통계:

24 시간 전: 13

7일 전: 89

30일 전: 324

전체 시간: 21,566