소개
수리를 마친 다음 이 안내서를 사용하여 iPhone 디스플레이 아래의 교체용 접착제를 올바르게 부착하세요. 접착제를 교체하면 iPhone의 방수 기능이 보수 유지됩니다. 미리 잘라져 있는 접착 스트립은 매우 연약하며 올바르게 부착하지 않을 경우 쉽게 손상되므로 이 안내서를 처음 사용하는 경우 예비 부품을 준비하는 것이 좋습니다.
휴대폰의 원래 모습을 유지하려면 디스플레이와 같은 색상의 접착제를 구입하세요.
이 절차는 모든 iPhone 6s 및 이후*** 모델에 적용됩니다 (이전 모델들은 접착제를 사용하지 않습니다).
시작하기 전에 iPhone 디스플레이 어셈블리를 미리 분리하여 한 쪽에 잘 보관하세요. 그렇지 않은 경우 특정 iPhone 수리 안내서로 돌아가서 디스플레이 어셈블리를 다시 설치할 준비가 될 때까지 해당 안내서의 절차를 따르세요.
필요한 것
동영상 개요
-
-
Spudger/스퍼저 끝으로 남아있는 작은 접착제 조각을 제거하세요.
-
-
-
기존 디스플레이를 새 디스플레이로 교체하지 않고 다시 사용하는 경우 디스플레이 뒷면에 남아있는 접착제를 모두 제거하세요.
This is important. About half of my old adhesive stuck to the display. Be sure to look under the clips at the top that hold the screen in place. Adhesive there may make it difficult to properly align the screen.
-
-
-
보풀이 없는 천과 (또는 커피 필터) 약간의 이소프로필 알코올을 사용하여 이전 접착제를 제거한 케이스 및 후면 디스플레이를 청소하세요.
-
최상의 결과를 위하여 청소용 천을 왔다 갔다 하지 말고 한 방향으로 닦으세요.
I used an Isopropyl alcohol patch from a first aid kit.
The video shows using a Q-tip with Isopropyl. Don’t use a Q-tip, the cotton will just stick to the remaining adhesive and make it hairy. An eyeglasses cleaning cloth moistened with acetone did the trick for me. Don’t get it drippy wet with the acetone, it may attack some plastics.
not only hairy, it will spread isopropyl everywhere. i ruined my display because the iso got under the glas of the display and attacked the screen adhesive between glas and lcd. now i got 2-3 spots where you can see that. it still works but it’s not perfect anymore.
I guess everybody’s situation is a little different, but I’ve always kept some in the medicine cabinet. You can get a bottle at any drugstore for a buck or two; also many/most hardware stores. Look for the highest concentration you can get—anything over 90% works great!
My wife handed me some of her Nail Prep & Polish Wipe = Isopropyl Alcohol :-D
careful with the isopropyl alcohol, some went under the screen and now the LCD looks weird
For this finishing step I tried iFixit’s Adhesive Cleanup Kit. The first pad of the kit, the Adhesive Tape Remover Pad, is soaked with a slippery solution that did an incredible job of cleaning residuals of glue and dirt. May I have to redo this repair, I would put less effort at the previous steps, relying on this pad instead, hopefully saving a lot of time.
This slippery solution doesn’t seem to evaporate. Obviously it needed to be cleaned if the new adhesive was intended to stick. That’s the role of the second pad, saturated with 70% IPA. Caution with the fluff that detaches from this pad, however.
-
-
-
하단 가장자리부터 교체용 접착제에서 큰 뒷면 보호필름을 벗겨내기 시작합니다.
-
보통 하단 가장자리에서 커다란 탭을 찾을 수 있습니다.
Saw in a different persons YouTube video the battery connector was causing a problem with the film because its disconnected and up, they cut a small slit in the film, Might test laying the film hold the adhesive on the phone before starting and see if thats a problem depending on phone and adhesive. Never hurt to check
+1 Great tip. Thanks
Critter -
Great tip. Had this issue.
Great hint, thank you
-
-
-
드러난 접착 스트립 하단 가장자리를 iPhone 케이스의 하단 가장자리와 조심히 맞추세요.
-
접착제가 올바르게 맞춰졌으면 드러난 접착 스트립 하단을 살살 눌러 제자리에 고정하세요.
The three pictures show him peeling the adhesive backing away as he lays the adhisive in the phone. I found it easier to peel the whole backing away and then very carefully align the whole adhesive before gently pressing any of it in place. This way, you can be sure it will line up perfectly and avoid having to redo it.
Props to Dwayn Draper for his above comment above. I see no way to do this step without either pressing the battery connector down (which would energize the logic board and perhaps be bad), or cutting a hole in the adhesive backing to accommodate the battery connector while it sticks up. I laid the whole blue thing over the phone and used a sharpie to mark where the connector stuck up. Then I used a sharp pair of scissors to cut out the marked part of the backing. This allowed the adhesive to line up nicely around the edges of the phone.
I tried peeling off the whole backing like the comment above suggested and I completely messed up this part. thinking about this next time i would align it first with the backing on, then carefully peel it back, similar to how this ifixit article directs.
i destroyed the seal immediately cause of my thumbs not being in the right spot as i tried to peel the protector back a bit… more of a personal error, everything else in my build was easy peasy… i wish it was a bit clearer on the seal where to start from, the picture shown and the protective backing on my seal was slightly different so i wasnt sure if i was starting from the correct side to start peeling away and think that may have led to my error as well…. hopefully i can remember mine isnt waterproof anymore and ill try to replace it again next time something goes wrong on this phone
This step needs to be done before you mount the battery, if this is the reason why you open your iPhone. The battery connector points up and makes the blue film to curve up and not align properly with the edges of the phone. I know, small details, but this is making the job even harder than already is. Maybe a cut out in the blue film, for that area, would have been useful.
Booth strips i had with batteries was just top edge too short :(
Peeled off the first sheet, aligned, and then placed. I used one of the existing holes to make a cutout for the battery connector (since I had already inserted the battery when the other guide indicated the adhesive should be placed). Used two sets of tweezers gripping inside the holes to carefully align and place.
It was OK to re-connect the battery temporarily rather than slicing holes in the plastic. Just be sure to disconnect it again before reconnecting the display.
Also, I lined up what I thought was the bottom correctly, only to have the top fall short. Looking back, I should have put the plastic sheet entirely within the phone, and not have it overlapping the edge. With an extra pair of hands, we were able to fix the top edge somewhat, but I had placed the plastic about 1mm too low.
Instead of peeling off the backing progressively, I found it safer to cut the bottom part of it with scissors, so that about 1 cm height of adhesive was exposed. This way, the sheet laid FLAT over the iPhone frame and could be centered accurately. Once precisely centered, I held the sheet in place with one hand, and with the other hand took the spudger and pressed down the bottom part of the sheet, to actually stick the adhesive to the frame. Then peeled off the rest of the backing as the pictures show.
Great tip from Aubin. Cut 1-2 cm of the first or big tape (foil), on the Bottom of the phone. Then without pressing: first go to the Top of the phone and align and hold. Then check the Bottom for correct alignment, and start pressing the Bottom of the adhesive, and then peeling the big foil towards the Top, and then pressing the rest of the adhesive.
I removed the obvious bits of old seal with the spudger then just used a microfibre cloth and lighter fluid to remove the rest. I have used lighter fluid for any adhesive residue type job for 30+ years and never had a problem. It doesn’t attack any kind of plastic EVER plus, it hangs around for longer than IPA which is also a bonus. With regard to the battery connector, not sure if the problem is common in models other than the 7? The connector on mine was well under the level of where the backing sheet would span the width of the phone as I applied the seal?
Also, when applying the seal, make sure you pull the backing away straight, not at an angle like you see in the pics below. I tried that way and it started to ‘steer’ the seal sideways and over the edge of the relief. Pull the backing away keeping it parallel with the phone and the seal should follow it. After a few attempts at positioning the very bottom edge of the seal to start with I managed to apply the whole thing perfectly first attempt. Careful with that initial positioning though as the seal is so sticky it almost feels magnetic!
I’ve done multiple iphone repairs and I ALWAYS find this the hardest part of the whole process. In fact, I awlays buy an extra adhsive pice for each repair because I mess this up and have to redo it about half the time.
The adhesive comes sandwiched between two sheets of blue release liner, one slightly larger than the other. When you peel them apart, the adhesive is meant to stick to the small sheet, which you then apply to your iPhone. In my case, when I peeled the two sheets apart, the adhesive stuck to the large sheet, making it impossible to apply. I don't think it was anything I did wrong - probably just a fault in the manufacturing process. I will try reassembling it without the adhesive, or possibly using a liquid adhesive like B-7000.
Peter Gray - 답글
I completely missed how this was done first time. The big blue backing sheet is pulled out from underneath. I was in too much of a hurry to study the instructions carefully. I paid the price. Somehow it worked how in the end, but would have been so much easier with a clear idea.
garyrclark - 답글
-
-
-
접착제 뒷면을 벗기면서 접착제를 iPhone 하단에서 상단으로 밀어 올리며 제자리에 살살 눌러 주세요.
Please take your time with this and slowly get done right. I almost messed up on this step because I was rushing.
-
-
-
접착제 뒷면은 분리를 마치고 버리면 됩니다.
What about the blue backing? How do you connect the screen connectors? How do you disconnect the battery before putting the screen back on? I decided to cut away openings with small scissors and razor to access them.
PMFSentrie - 답글
-
-
-
-
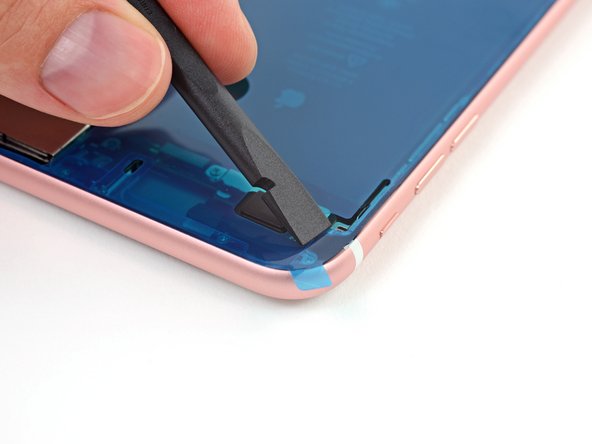
Spudger/스퍼저의 끝을 사용하여 iPhone 전체를 두르는 접착제를 제자리에 누르세요.
Press hard. Some of the adhesive came off the phone as I was peeling the backing away in the step 11. You want to make sure it stuck on the phone so it doesn’t stay attached to the backing.
I’d recommend resting the tip of your spudger against the vertical notch of the edge and press down rather with the side of the tip, just so your hand doesn’t slip inwards causing the nearest bit of glue to unstick.
-
-
-
Spudger/스퍼저의 평평한 가장자리를 사용하여 접착제를 iPhone의 네 구석에 눌러 넣으세요.
Using the spudger to hold the tape down for a few seconds helps the tape adhere to the phone rather than sticking to the liner when you pull it off
-
-
-
(모서리 중 하나에 위치한) 작은 당김 탭을 잡아당겨 접착제의 큰 전면 라이너를 벗겨냅니다.
Make sure you pull the tab as close to the phone as possible, parallel to the phone. This should lower the probability of the adhesive in the corner separating from the frame. Do NOT pull up and away from the frame!
If it does separate, just put it back and press it firmly in with the spudger and try again.
-
-
-
전면 접착 라이너는 완전히 분리하고 버리면 됩니다.
My iPhone 6s Plus kit did not have the thin strip of release liners but worked fine.
sputterer1 - 답글
The release liners either stuck to the main backing as I pulled it off, or it pulled the adhesive itself away from the phone! Be very careful, or you’ll have a sticky mess trying to get the adhesive back in place.
The iphone 6s does not have this thin film so when I was attaching the screen I ruined my adhesive. Not sure why this one is different but it definitely makes things more challenging.
La même chose pour moi, le kit pour changement de batterie 6S n’avait pas la fine pellicule à enlever juste avant l’assemblage final.
Ainsi comme montrer dans la vidéo, il est important de tester son écran avant l’assemblage final : il n’était donc pas très simple sans cette pellicule de ne pas toucher l’adhésif en reliant les nappes et en faisant le test.
Mais tant mieux tout s’est bien déroulé ! Merci pour vos tutos !!
This instruction contradicts itself - It says to completely separate the adhesive liners and discard them then, in the next step, it says to leave in place some of the liner. It should be clear that there are two layers of adhesive liners, the top layer may be in several pieces and the bottom layer should be left in place. Maybe it should read "The adhesive liner has 2 layers. The top layer (the one you can see) is the size of the phone and is used to help position the adhesive. While it looks like one piece, it may come off in several pieces (it may have small cuts in it to make removal easier). Under this top layer, there is a second very thin liner that covers the very edge of the phone where the adhesive is. Remove only the top layer front adhesive liner and discard it. Leave the the second very thin liner in place to protect the adhesive while you complete the next few steps."
-
-
-
다음 작업들은 iPhone 디스플레이 교체 안내서를 참조하세요:
-
모든 디스플레이 케이블 다시 연결하기
-
배터리 다시 연결하기
-
케이블 커넥터 커버 브래킷을 다시 설치하고 나사를 조이세요.
We were initially disappointed when the test power-on failed. I tried reconnecting the battery, but it felt no different than the first time. Luckily, one of us thought of recharging the new battery, which proved to be the problem.
After a 10 minute charge, the phone powered up normally. We tested the screen and audio, and were happy to see it working. There’s a chance that your new battery might be out of power also.
I think I can’t find the answer to my issue, my iPhone 6S has a weird problem with the display, where in my phone, where the screen connects to the base of the phone, the part you're putting into the phone in this step, is split into 2 from adhesive degradation and my phone is a ticking timebomb to the end of its life.
Hallo bis zu diesem Zeitpunkt hat alles super funktioniert. Wenn ich das Iphone jetzt allerdings anschalte um die Funktionen zu testen, funktioniert alles außer der Homebutton. Woran kann das liegen?
Wenn ich das wüßte, wäre vielen Menschen geholfen. Ich habe bei meinem iPhone 7 den Akku gewechselt, alles läuft, außer, daß der Homebutton nun tot ist.
Indes geht es vielen Menschen gleichermaßen, haben alle das gleiche Problem - Home tot - ferner interessant ist, daß von “ifixit” nicht einmal eine Hilfestellung dazu kommt.
Just replaced , put on charge, only an apple symbol is showing on screen?
-
-
-
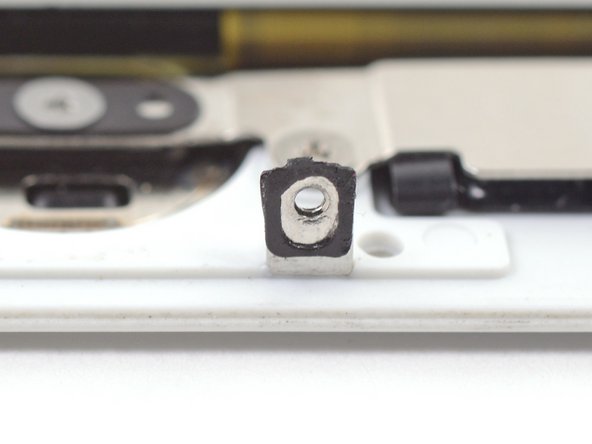
iPhone 7 / 7 Plus 전용: 디스플레이를 설치하기 전에 홈 버튼 근처 디스플레이 하단의 작은 나사 보스 두 개 에서 검정색 개스킷 상태를 점검하세요.
-
개스킷이 어긋난 경우 핀셋을 사용하여 조심히 중앙에 맞추세요.
The gaskets on my iPhone 7 are actually sleeves that slide onto the screw bosses, covering both sides. Be sure both gaskets are fully in place, not only pressed on one side of the boss. This is not shown in the pictures here.
zachcramer - 답글
My iPhone 7+ didn’t have gaskets or sleeves, bought directly from Apple, SIM free/unlocked. I’m the 1st to open it.
same case for my iPhone 7+ Model A1784 , it didn’t have gaskets or sleeves, bought directly from Apple, SIM free/unlocked. I’m the 1st to open it also.
-
-
-
디스플레이를 지탱하면서 핀셋을 사용하여 마지막 릴리스 라이너를 벗겨 접착제를 드러내세요.
The iPhone 8 replacement screen I bought came with an adhesive set and didn’t have final release liners.
-
-
-
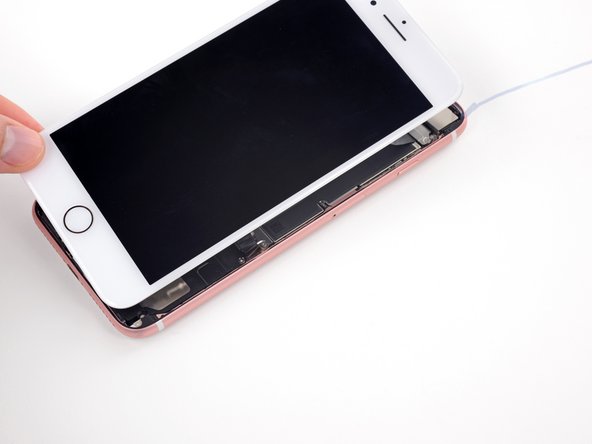
디스플레이 상단을 휴대폰 본체 상단에 조심히 맞추세요.
-
디스플레이 상단 가장자리 탭들이 iPhone 케이스 상단 가장자리 바로 아래에 맞춰지도록 배치하세요.
Make sure to not push the screen upwards too hard, mine ended up sticking up a bit at the top.
-
-
-
디스플레이를 제자리에 내려놓을 때, 디스플레이 하단 가장자리에 살짝 힘을 가하여 디스플레이 상단 가장자리가 iPhone 상단 가장자리와 수평을 이루도록 하세요.
-
iPhone 상단 근처 디스플레이 측면을 누르고 하단으로 내려가며 디스플레이를 제자리에 고정하세요.
My new LCD screen part didn’t come with gaskets! And I forgot about the ones on the old cracked screen until too late.
Oddly enough, my iPhone 7+ never had these foam gaskets from the factory.
I bought it new online, SIM free/unlocked from Apple and I’m the 1st to open it up.
-
-
-
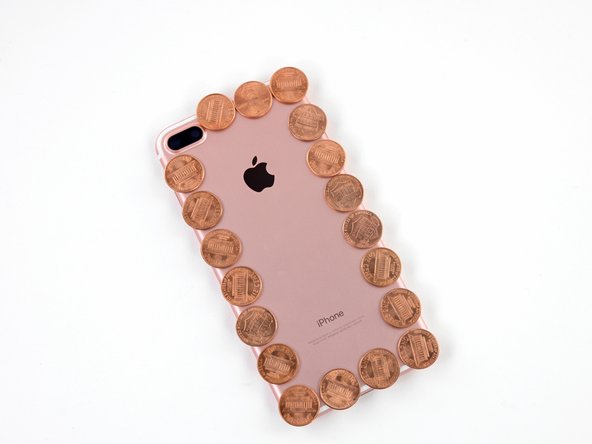
카메라의 튀어나온 부분보다 두꺼운 모든 단위의 동전을 사용할 수 있습니다.
-
iPhone의 각 모서리에 동전을 놓고 카메라의 튀어나온 부분 양쪽에 동전 두 개를 놓으세요.
-
iPhone 전체 둘레에 동전을 추가로 놓으세요.
-
헤어 드라이어나 히트 건을 사용하여 iPhone 둘레 측면 가장자리를 만지기에 약간 뜨거워질 때까지 골고루 가열하세요. 열은 접착제가 완전히 접착하도록 도움을 줍니다. iPhone을 과열하지 마세요 아니면 배터리에 불이 나거나 디스플레이처럼 열에 민감한 다른 부품이 손상될 수 있습니다.
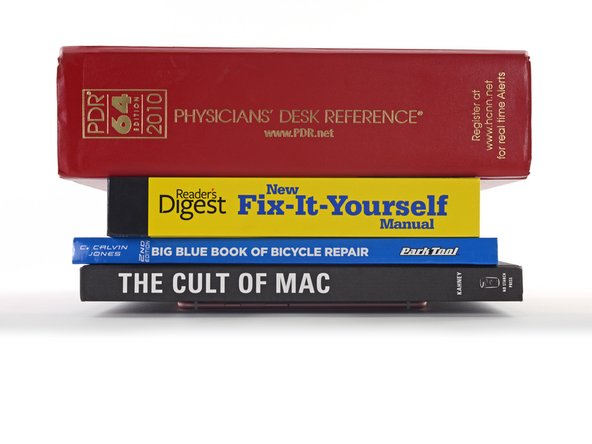
What happens if I skip this step of heating the phone and just placing some heavy books on my iPhone 6s? I have this question because I don’t own neither a heat gun nor a hair dryer. Pls help
Your phone will work fine. This step is more about getting the adhesive to bond securely to help create a waterproof seal. If you don’t have any way to heat it, using more weight and leaving it there for a longer period of time may help.
With the potential of electronics, I would like to have seen an quantitative temperate referenced as well as the qualitative (subjective).
Also, an actual spacer would helped - coins kept sliding off as I was heating them.
I just put a soft cover book on the bottom and stacked other books on it. Worked just fine for me :)
Pennies are light enough that my hair dryer just blew them off. I just heated the phone and then put the coins and books on as quickly as I could. Still worked just as well.
I just used the box the iPhone came in which has a perfect cradle for the phone. Glad I saved it!
Thank you so much for the advice on this and the suggestion of heating coins and using books. I did as suggested and three weeks later my phone was knocked into a bath of water. It had a mophie case around it which helped bit I immediately fished out the phone, turned it off and dried it. Tapped out water in ports, removed the SIM card and then placed in front of a fan to dry put for 24 hours. I wanted to wait longer but I needed my phone for a long trip so prayed and turned it on. It was fine. Nothing wrong with it abs I can only thank you foe your suggestions to improve the seal that made the difference.
Instead of using a heat gun/hair dryer (I do not have one) — I used the coins trick, and put a kettle on top that I filled with hot water. I used water at around 80ºC. The weight of the kettle also provides additional pressure, making sure you get a good seal. To cool it down, simply add some additional cold water to the kettle.
Cut a piece of styrofoam to roughly the shape of your phone. Place it on the phone, and press down over the camera bump to mark its location. Then shave out a bit from this spot so the styrofoam will sit more or less flat on the phone. You can now heat the phone and then quickly toss the styrofoam and weights on top. SO much easier than juggling all those coins.
-
-
-
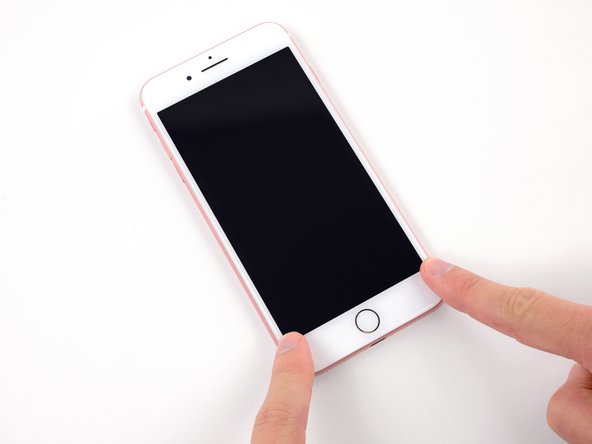
책을 치우고 손가락으로 디스플레이 네 모서리를 모두 단단히 누르세요.
-
약 3초 간 눌렀다가 떼세요.
Very good tutorial but why this last step ?
Step 25: Pray that it all works and your phone turns on :p
Two problems:
1) The adhesive for the bottom of the phone has a tiny extra lip. My first attempt was to line up the corners rather than the middle. This resulted in the adhesive being be a bit short at the top.
2) During the final assembly, I could not get the phone to close. Double bad. I tried to peel up the screen to realign and tore one of the screen’s ribbon cables! I just received my second screen and adhesive today.
I believe these two areas could be easily added to the above instructions. Everything else went fine.
Arthur Yeh - 답글
Ifixit please sell and release the adhesive for samsung s9+ to restore my water resistance after battery replacement.
They couldn’t care less about Samsung phones, they are like most apple biased company ever.
Thank you very much ifixit for this guide!. I replaced the adhesive on an used iphone 8 i bought, followed every step very carefully and now the screen seals perfectly with the frame.
Jáchym, yes you can use iPhone 12 without the adhesive. The adhesive is protection against water entering the phone, and does not have any impact on function of the phone.
Daniel Tan - 답글
I just used this guide for an 8.
I failed to remove the adhesive on the back half, but realized it in time, so all went well.
thanks for the guide
-


다른 1010명이 해당 안내서를 완성하였습니다.
다음 번역가들에게 특별히 감사 드립니다:
100%


이 번역자 분들은 저희가 세상을 수리하는데 동참해 주시는 분입니다! 기여하시겠습니까?
번역 시작하기 ›


댓글 45개
I just bought few iPhone 7 adhesives from my supplier, and I noticed that the adhesive is not really fitting on the frame.
The iFixit shop pictures show us the iPhone 7 Plus adhesive for black color and the iPhone 7 adhesive for white color.
The iPhone 7 Plus seems to be more precise and correct than the iPhone 7 one : the iPhone 7 Plus one respect the screw hole at upper left corner for example, but the iPhone 7 one doesn’t, it has extra curves (same as iPhone 6s lower left corner) and it doesn’t take up the full width of the frame edge.
Can anyone show us the shape of an original adhesive from a brand new iPhone 7 to compare ?
This was the trickiest part of my screen replacement. Slim double sided adhesives always intimidate me because you only get one chance to line it up. I succeeded on my first attempt by following this guide and taking my time to line up the first edge as best as I could. The sides are the hardest part as they are very thin and I almost failed getting them lined up. Luckily I hadn’t pressed them down and was able to correct my alignment. Good preperation of the phone by removing the old adhesive completely and cleaning the area is my number one recommendation.
Adhesive makes everything harder. I chose to replace the adheasive on my 6s plus during a battery replacement, and it was easily the hardest part. No fault of Ifixit or this guide… the instructions above are spot on. But the cleaning of the adheasive takes forever, easily tripled my total repair time. And its really, really nerve racking to place the new adheasive. I do stuff like that all the time, but this was nuts. The strips are so tiny and delicate! Be really, really careful and take your time. This earns its “moderate” difficulty and then some.
wow that was hard to get in place. clean the edges well and use isopropyl alcohol. also practice a lot before removing the cover protection.
ericrose62 - 답글
am working on this now
After doing this step, is it still waterproof?
As long as the adhesive is not damaged at ANY point during installation then yes it will be waterproof.
Thank you! Went better than expected on my 6s.
Used a tooth pick and soft tooth brush to clean around the edges and then Is-propyl alcohol to finish before the seal. Ready :)
I totally failed this haha, had to remove some of the new adhesive to be able to put my screen back on the iphone. It holds now but %#*@ that was the longest part...
Hi there,
I was wondering, is it okay to replace the screen without replacing the adhesive, will the screen fall off in and places or anything.
Basically i’m asking is it a requirement to replace the adhesive when replacing the screen?
Thank you~
@thymother Not required at all; screws and brackets secure the display, and it’s in no danger of falling out regardless of whether the adhesive is there or not. The adhesive seems to be more for a little extra cushioning during hard-presses and as a dust/water seal.
Took me two attempts, luckily I did both screen and battery at the same time, had two screen adhesives and the second one I nailed. 10/10 guide, just take your time.
First iPhone screen replacement a breeze just had to be very attentive. Adhesive install you have to take it nice and easy.
It was better for me to start with one of sides less control issues. deltakilo
Used this as a guide to replace the LCD and digitizer in Motorola Droid Mini (XT1030). Main difference is that the screen is not held in by screws, only adhesives. Sat the phone face down on a paper towel with books on it, while on a 3d printer bed heated to 80 degrees C, for total of about 20 minutes (IR thermometer measured screen/frame at around 65C). Will see how well this holds up…
I would pay extra for a kit that includes an alignment jig for each specific phone type. You only get ONE shot to get the alignment of the adhesive correct, and I’ve never managed to do it.
Either that, or sell the replacement displays with the adhesive already attached to the back of the display assembly so all I have to do is swap over the home button, attach my cables, peel off the protective cover over the adhesive, and just lay it down.
Rocky Carr - 답글
You should add a note that getting isopropyl in the screen will permanently ruin it. Don’t ask me how I know.
Even a brand new phone, sides tend to unstick causing slightly raised bezels. I used a hairdryer and a lot of pressure to reseat the edge. Seems flush and uniform without any lifting
I had to open my iPhone 7 up just to replace a loose screw (I could hear it vibrating next to the taptic engine), and this was the trickiest part. Working with double sided adhesives like this isn’t easy. Best tips would be to clean the old adhesive off really really well, use isopropyl alcohol, and take your time practicing before you remove the cover protection.
Also, don’t remove the last layer of cover protection until after you’ve reconnected the display and verified it’s working. Don’t want to accidentally touch the adhesive while you’re reconnecting the display.
Happy fixing
Everything went very well in replacing the screen on my Apple 8plus…except now the phone won’t accept a charge. I was very careful in all the tasks. I did accidentally let the battery connector make contact while installing the display. What might be the reason the phone is not taking a charge and is there a fix for it? TIA
This helped me to replace my waterproof seal when I replaced my iphone XR screen. Thank you for posting this.
I had troubles removing leftover adhesive (this took me about an hour) - isopropyl alcohol didn’t work well, so I used rubbing alcohol (Benzinum medicinale) which is also being used to remove band aid glue from skin, etc.. It worked, but I cannot recommend it, as I don’t know whether it will attack the surfaces or do some other damage. YOLO
La benzine médicale est un dérivé d’hydrocarbure (alkanes) il est donc possible qu’il attaque les caoutchoucs et surfaces similaires. La concentration de l’alcool joue grandement sur son efficacité comme solvant, et il est donc conseillé d’utilisé un alcool à 90° (l’alcool isopropylique est courament à 70° dans le commerce)
Cajuteq -
Translation to English of Cajuteq's comment
"Medical gasoline is a derivative of hydrocarbons (alkanes) so it may attack rubbers and similar surfaces. The concentration of alcohol greatly affects its effectiveness as a solvent, and it is therefore advisable to use 90° alcohol (isopropyl alcohol is commonly 70° on the market)"
I'm wondering if this contributor means what in English we call "Benzene" That has been used in the past to remove sticking plaster residue. Benzene is indeed a hydrocarbon but it is an aromatic hydrocarbon(the simplest, most basic, and basis of the aromatic hydrocarbons) and not an alkane
Je me demande si ce contributeur veut dire ce que nous appelons en anglais "Benzene" qui a été utilisé dans le passé pour éliminer les résidus de plâtre collant. Le benzène est bien un hydrocarbure mais c'est un hydrocarbure aromatique (le plus simple, le plus basique et la base des hydrocarbures aromatiques) et non un alcane
Cleaning off the old adhesive is important to allow new one to be seated properly. Done it twice now. Heat and alcohol is the answer.
this process is always the hardest and least forgiving part of every repair I do. I would estimate that I waste the adhesive and need to get a new one about 50% of the time. Seriously—can’t we come up with a better procees?
Thank you,
very helpful guide, followed step by step battery and waterproof seal replacement for my iphone7. Not one issue during or after the process... My recommendation is go slow, take your time..
Full kit purchased from ifixit.
so far very satisfied.
I didn't feel the video instructions were clear due to the reliance on colour coding to determine which cover to remove before positioning the adhesive, so I ruined the adhesive. I was going to buy a replacement part but the shipping cost was almost double of the part price ($15 to ship this?!? Come on!!) so bought two that look exactly like the one on the ifixit website from amazon (got 2 adhesives and free shipping for less than the ifixit price).
Hi, does this guide also apply to iPhone 15 Pro? Can’t find it listed among the adhesives at the top of the page. Thanks
When you do not really want to get rid of the glue, but you do not have it, you can tie the glue off and pick it up with tweezers! You can remove it.
yejin jun - 답글
Are we really sure this glue uses an alcohol solvent? By the way it rolls away and taunts me, I suspect it is rubber solvent-based. I owned a Macintosh used/refurbished computers and peripherals business for many years (refurbmadness.com) and have cleaned literally everything from old equipment. Alcohol doesn't seem to be doing the trick. there are five solvents and glue is usually rubber-based or turpentine-based unless it's Gorilla Glue Ultimate, which is alcohol-based. I'm going to check....YEP! Rubber cement solvent: brand name "Bestine." Please change this.
Janie Wilson-Cook - 답글
What I found to work best is to use a pair of angled tweezers, scrape off part of the adhesive so you can grab onto it, and pull up vertically instead of horizontally. It will come off as one long piece which is much more efficient compared to horizontally where the glue may snap off in smaller pieces.
Afiq - 답글