소개
당신의 배터리가 예전만큼 오래 지속되지 않나요? 그러면 그것을 새 것으로 바꾸는 것은 간단합니다.
필요한 것
동영상 개요
-
-
디스플레이 유리에 금이 간 경우, 수리하는 동안 유리에 테이프를 붙여서 추가 파손을 방지하고 신체적 상해를 에방하세요.
-
투명 포장용 테이프를 iPhone 디스플레이 위에 겹쳐서 붙여서 전체가 덮이도록 하세요.
-
-
-
흡착 컵에 있는 금속 손잡이를 분리하세요. 금속 손잡이 대신 흡착 컵 바닥을 잡는 것이 더 쉽고 안전합니다.
-
홈 버튼 근처에 있는 작은 흡착 컵을 사용하여 iPhone 디스플레이의 아랫부분을 살살 위로 잡아당기세요.
-
-
-
한 손으로 디스플레이를 계속 잡고 다른 손과 스퍼저를 사용하여 "1"이라고 표시된 검은색 리본 케이블을 연결 해제하세요. (케이블 1은 디스플레이용입니다)
-
-
-
디스플레이를 대략 수직이 될 때까지 위로 돌리세요. 그러면 나머지 케이블을 열결 해제할 때 더 쉽게 접근할 수 있습니다.
-
스퍼저를 사용하여 "2"로 표시된 검은색 리본 케이블을 연결 해제하세요. (케이블 2는 정전식 터치 패널용입니다)
-
-
-
-
스퍼저를 사용하여 3번케이블을 고정하는 흰색 플라스틱 탭을 위로 젖혀 올리세요. 흰색 탭이 90도 회전하면서 리본 케이블이 해제됩니다.
-
검은색 리본 케이블을 커넥터에서 빼내고 iPhone에서 디스플레이를 분리하세요.
-
-
-
헤드폰 옆에 있는 구멍에 SIM 꺼내기 도구나 종이 클립을 끼우세요.
-
SIM 카드 트레이가 튀어나올 때까지 도구를 누르세요.
-
SIM 카드 트레이를 잡고 iPhone에서 꺼내세요.
-
-
-
다음 나사 8개 풀기:
-
로직 보드를 후면 케이스에 고정하는 부분 나사산이 있는 2.3 mm 필립스 #00 나사 다섯 개.
-
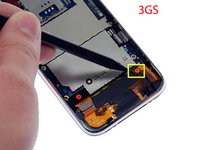
로직 보드와 카메라를 고정하는 전체 나사산이 있는 2.3 mm 필립스 #00 나사 두 개.
-
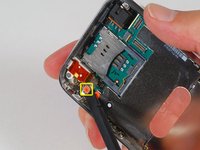
"Do not remove/떼지 마시오" 스티커 아래에 있는 2.9 mm 필립스 #00 나사 한 개.
-
재조립 시 참고 사항:
-
카메라 옆에 있는 나사(오른쪽 하단 주황색으로 강조 표시된 나사)에도 카메라를 고정하는 금속 스트립이 있습니다.
-


기기를 재조립하려면 다음 지침을 역순으로 따르세요.
기기를 재조립하려면 다음 지침을 역순으로 따르세요.
다른 934명이 해당 안내서를 완성하였습니다.
다음 번역가들에게 특별히 감사 드립니다:
100%


이 번역인들은 저희가 세상을 수리하는 데 도움을 주고 있어요! 기여하시겠습니까?
번역 시작하기 ›

댓글 35개
I replaced the battery in both my iPhone and my wife's in the same session. Using the slideshow and directions I was able to successfully do the replacement. Of course my iPhone was the first one done so as to gain some experience before tackling my wife's iPhone. I had two minor issues in reassembling mine. Firstly, I completely missed re-installing the number 3 cable. It wasn't till I was reassembling my wife's iPhone that I realized I'd missed it. Not sure what it supports as I had my phone up and running, checked the GPS, etc while it wasn't connected. Secondly, my camera wasn't seated properly and I got the strangest imagery when I launched it. All green and black, looking like one of those ghost buster reality shows using night vision. Fortunately, both issues were easy to correct. Outstanding directions and slides! Oh yeah finally, the kits for the battery comes with both a #00 Phillips screwdriver and a spudge, however, I ordered the extra spudge and got one that is better suited for prying the battery up.
Hey,
first of all - BIG UPS AND THX for everything.
That means FAST shipping to germany and the great tutorials, manuals etc.
I did change the battery in less than 15 minutes whit ur manual this was easy as.... dunno :).
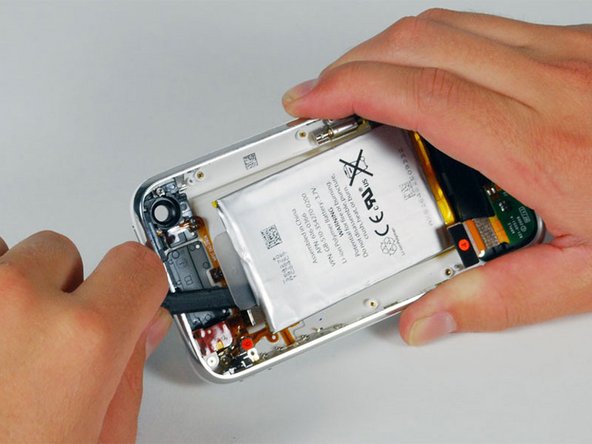
the "hardest part" was to remove the battery from the cover - but with a bit of tact it works fine.
So thx :)
Incredibly easy to make the swap. Thanks for the great writeup. I was able to complete the battery replacement within about 20 minutes. I've swapped an iPod battery before and although this was a bit more complex it really wasn't that tough. Anyone who's a bit handy should be able to complete it with no trouble at all. Thanks.
Great instructions, very clear. A couple points:
1) The screwdriver I had wasn't working that well, so I had to use a different one. I found that a 0# worked fine (although I suspect a 00# would work better.0
2) When I reassembled the phone, the home button didn't work. You really need to press down on the bottom of the screen when you screw the bottom screws (by the dock connector) back in. Otherwise, the contacts for the home button won't reliably hit.
dlinsalata - 답글