주요 콘텐츠로 건너뛰기

iPhone 3GS Volume Button Replacement

필요한 것

  1. iPhone 3GS Volume Button Replacement, Broken Glass: 1 단계, 이미지 1/3 iPhone 3GS Volume Button Replacement, Broken Glass: 1 단계, 이미지 2/3 iPhone 3GS Volume Button Replacement, Broken Glass: 1 단계, 이미지 3/3
    • If your display glass is cracked, keep further breakage contained and prevent bodily harm during your repair by taping the glass.

    • Lay overlapping strips of clear packing tape over the iPhone's display until the whole face is covered.

    • This will keep glass shards contained and provide structural integrity when prying and lifting the display.

    • Wear safety glasses to protect your eyes from any glass shaken free during the repair.

  2. iPhone 3GS Volume Button Replacement, Remove the bottom screws: 2 단계, 이미지 1/1
    • Remove the two 3.7mm Phillips #00 screws from the dock-connector end of the iPhone.

  3. iPhone 3GS Volume Button Replacement, Loosen the display: 3 단계, 이미지 1/1
    • Remove the metal handle from the suction cup. It's easier and safer to grip the suction cup's base instead of the metal handle.

    • Be very careful when opening the iPhone so that the cables under the display are not severed.

    • There is a rubber gasket between the silver front bezel and black display assembly. A bit of force is required in this step to separate the iPhone's display assembly. It may help to rock the suction cup back and forth to remove the display assembly.

    • Use a small suction cup near the Home button to gently pull up the bottom portion of the iPhone's display assembly.

    • If the display assembly is too damaged to allow the suction cup to adhere, tape with a strong adhesive such as duct tape or packing tape may be used.

  4. iPhone 3GS Volume Button Replacement, Pull up the display: 4 단계, 이미지 1/1
    • The display assembly is still connected to the iPhone by several cables, so don't try to remove it entirely just yet.

    • Rotate the display assembly up until it is at an angle of approximately 45 degrees.

  5. iPhone 3GS Volume Button Replacement, Disconnect cable 1: 5 단계, 이미지 1/1
    • Continue to hold the display assembly with one hand, and use your other hand and a spudger to disconnect the black ribbon cable labeled "1". (Cable 1 is for the display)

    • Be careful to insert the spudger from the left, as shown in the picture (UNDER THE RIBBON). If you try to pry up the ribbon from the right, you could damage the ribbon connector and need to replace the display!

    • All connectors except the ribbon connector "3" mentioned in step 7 release upwards.

  6. iPhone 3GS Volume Button Replacement, Disconnect cable 2: 6 단계, 이미지 1/1
    • Rotate the display assembly up until it is roughly vertical. This will allow easier access for disconnecting the remaining cables.

    • Use a spudger to disconnect the black ribbon cable labeled "2". (Cable 2 is for the capacitative touch panel)

  7. iPhone 3GS Volume Button Replacement, Disconnect cable 3: 7 단계, 이미지 1/1
    • Please note: You may find on some non-American (Chinese, European) versions of the 3G that the flip up plastic tab does not exist. In this case you would slide the ribbon cable towards the screen until it is removed. When you assemble it, you would apply pressure to the ribbon to insert it back into the ribbon "socket."

    • Some iPhones may have the connector colors reversed (black plastic tab, white connector) for connector "3". Make sure you're flipping up the tab properly, otherwise you may damage the connector.

    • Use a spudger to flip up the white plastic tab holding the ribbon cable "3" in place. The white tab will rotate up 90 degrees, releasing the ribbon cable.

    • Slide the black ribbon cable out of its connector, and remove the display assembly from the iPhone.

  8. iPhone 3GS Volume Button Replacement, Remove the SIM card tray: 8 단계, 이미지 1/1
    • Insert your SIM eject tool or a paper clip into the hole next to the headphone jack.

    • Press down on the tool until the SIM card tray pops out.

    • Grasp the SIM card tray and slide it out of the iPhone.

  9. iPhone 3GS Volume Button Replacement, Disconnect cable 4: 9 단계, 이미지 1/1
    • Use a spudger to disconnect the ribbon cable labeled "4."

  10. iPhone 3GS Volume Button Replacement, Disconnect cable 5: 10 단계, 이미지 1/1
    • Use a spudger to disconnect the ribbon cable labeled "5."

  11. iPhone 3GS Volume Button Replacement, Disconnect cables 6 and 7: 11 단계, 이미지 1/2 iPhone 3GS Volume Button Replacement, Disconnect cables 6 and 7: 11 단계, 이미지 2/2
    • Use a spudger to disconnect the ribbon cable labeled "6."

    • If you have an iPhone 3GS, refer to the second picture and use a spudger to disconnect the ribbon cable labeled "7."

    • Be certain that the connectors on the ribbon cables are perfectly aligned with the sockets on the mother board before applying pressure. This may require a magnifying glass or jewelers' loupe.

  12. iPhone 3GS Volume Button Replacement, Remove the logic board screws: 12 단계, 이미지 1/1
    • Remove the following 8 screws:

    • Five 2.3 mm Phillips #00 screws with partial threads securing the logic board to the rear case.

    • Two 2.3 mm Phillips #00 screws with full threads securing the logic board and camera.

    • One 2.9 mm Phillips #00 screw from beneath the "Do not remove" sticker.

    • Note for re-assembly:

    • The screw that goes next to the camera (bottom right orange highlighted screw) also has a metal strip that holds the camera in place.

    • Remember to put this strip back in place before you insert the 2.3 mm Phillips #00 screw with full thread next to the camera

  13. iPhone 3GS Volume Button Replacement, Loosen the camera: 13 단계, 이미지 1/1
    • Use a spudger to gently pry the camera up and out of its housing in the rear case.

    • The camera cannot be removed entirely yet because it's connected to the bottom of the logic board.

  14. iPhone 3GS Volume Button Replacement, Remove the logic board: 14 단계, 이미지 1/1
    • Use a spudger to gently pry up the end of the logic board closest to the dock connector.

    • There is a small golden grounding tab on logic board adjacent to the 'do not remove sticker'. Be VERY careful this does not snag on the side of the case when prying up the logic board; it breaks easily. If you have signal problems after removing the logic board, check this ground tab.

    • If the board won't lift up, double check to make sure all the screws securing the logic board have been removed.

  15. iPhone 3GS Volume Button Replacement: 15 단계, 이미지 1/1
    • Slide the logic board towards the dock connector and out of the iPhone.

    • When replacing the logic board after installing battery, connect the camera to the logic board before inserting it into the case. Then make sure to set the top section of the logic board (where the SIM tray is) in place before settling the rest of the board in place. This is important, as sometimes the SIM card slot will not align into place. Once the top section is in place, the bottom section can be maneuvered into place. You will know the logic board is correctly installed when the SIM tray is aligned with the opening in the iPhone case and the camera module seats neatly into its place.

  16. iPhone 3GS Volume Button Replacement, Loosen the battery: 16 단계, 이미지 1/1
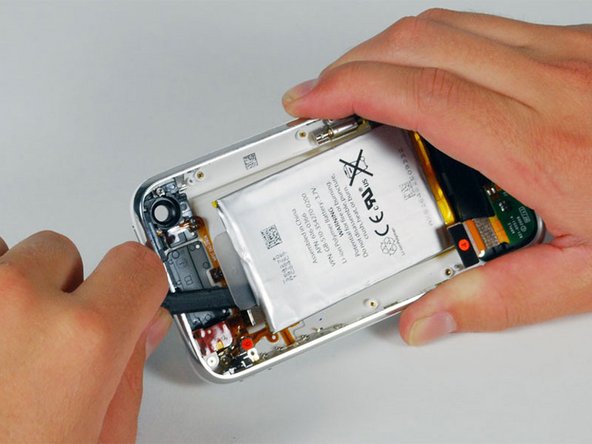
    • Use a spudger to pry the battery up from the rear case. The battery is attached with an adhesive strip around the perimeter of the battery.

    • To prevent the battery from bending during the removal process, we recommend against using just the plastic pull-tab.

    • Removing the battery is NOT necessary for replacing the GPS antenna. It merely gives you more space for removing the headphone assembly (which is also unnecessary to completely remove).

    • The iPhone's battery is attached to the rear case with a mild adhesive. This adhesive usually comes out attached to the battery. If your replacement battery already includes an adhesive backing, you're all set. If your replacement battery doesn't have an adhesive backing, you'll want to transfer the adhesive from your old battery to the new one.

    • If the battery isn't detaching from the rear case, apply a few drops of high concentration (over 90%) isopropyl alcohol under the edge of the battery. Wait about one minute for the alcohol solution to weaken the adhesive. Use the flat end of a spudger to gently lift the battery. Allow the alcohol to air dry before installing your new battery.

    • Don't try to forcefully lever the battery out. If needed, apply a few more drops of alcohol to further weaken the adhesive. Never deform or puncture the battery with your pry tool.

    • You can use a hair dryer or heat gun on its lowest setting to heat the back of the case. This will help loosen the adhesive bond before using the spudger to separate the battery from the case back.

    • Caution: Overheating the iPhone may ignite the battery.

  17. iPhone 3GS Volume Button Replacement, Headphone Jack: 17 단계, 이미지 1/1
    • Remove the two Phillips #00 screws securing the on/off switch to the front bezel.

    • When replacing, check the protrusion of the switch. There is a small plastic spacer adhered to the inside of button which may come off with cleaning. Without a spacer, the button may not protrude enough to be depressed. If lost, it can be replaced with a suitable thickness of stiff plastic (eg shirt box lid).

  18. iPhone 3GS Volume Button Replacement: 18 단계, 이미지 1/1
    • Carefully peel up the orange ribbon cable from the rear case.

    • The ribbon cable is easily damaged - be very gentle.

  19. iPhone 3GS Volume Button Replacement: 19 단계, 이미지 1/1
    • Remove the following 4 screws:

    • Three 1.8 mm Phillips #00 screws securing the headphone jack and GPS antenna to the rear case. Note the order in which you remove the screws, as the left one has a slightly larger head.

    • One 3.8 mm Phillips #00 screw in the plastic loop near the headphone jack.

  20. iPhone 3GS Volume Button Replacement: 20 단계, 이미지 1/1
    • Remove the four Phillips #00 screws securing the volume and mute switch.

    • The volume switch assembly sits on top of the mute switch. Make sure that the small soft pad on the mute switch is not lost, otherwise the mute switch will sit very loosely after reassembly.

    • The mute switch assembly screws should be tightened with the switch in the off position. Check the protrusion of the switch when turned on, since it may not stick out far enough to operate if the switch assembly is incorrectly positioned. (Check the gap between the switch frame and the bezel (white gap showing between the two screws near the 6). The screw on the far right is slightly longer than the other 3 screws. When reassembling the phone, keep this in mind.

  21. iPhone 3GS Volume Button Replacement: 21 단계, 이미지 1/1
    • Lift the volume button circuitry away from the side of the iPhone, and carefully peel up the orange ribbon cable from the rear case. The cable is thin and easily damaged.

  22. iPhone 3GS Volume Button Replacement: 22 단계, 이미지 1/1
    • Carefully lift the headphone jack assembly out of the iPhone.

    • Switch the green mute switch down (towards the back side of the iPhone) into mute position. This will make it much easier to insert it, once the new mute button is in place.

  23. iPhone 3GS Volume Button Replacement, Volume Button: 23 단계, 이미지 1/2 iPhone 3GS Volume Button Replacement, Volume Button: 23 단계, 이미지 2/2
    • If they have not already fallen out of the rear case, remove the mute button and the power button.

  24. iPhone 3GS Volume Button Replacement: 24 단계, 이미지 1/2 iPhone 3GS Volume Button Replacement: 24 단계, 이미지 2/2
    • Remove the two Phillips #00 screws securing the vibrator to the rear panel.

    • Remove the vibrator from the rear panel.

  25. iPhone 3GS Volume Button Replacement: 25 단계, 이미지 1/2 iPhone 3GS Volume Button Replacement: 25 단계, 이미지 2/2
    • Remove the following 3 screws:

    • Two 1.5 mm Phillips #00 screws, one on either side of the dock connector.

    • One 2.4 mm Phillips #00 screw near the ribbon cable labeled "4."

    • Lift the dock connector assembly up and out of the iPhone.

    • When inserting the new assembly, ensure the screw holes of the assembly rest ABOVE the bezel's holes.

  26. iPhone 3GS Volume Button Replacement: 26 단계, 이미지 1/3 iPhone 3GS Volume Button Replacement: 26 단계, 이미지 2/3 iPhone 3GS Volume Button Replacement: 26 단계, 이미지 3/3
    • In the following steps, you will partially remove the silver bezel attached to the rear panel. If the residual adhesive is not enough to hold it together during reassembly, it may be necessary to apply a light layer of glue around the inner edge of the bezel to keep it secured against the rear panel.

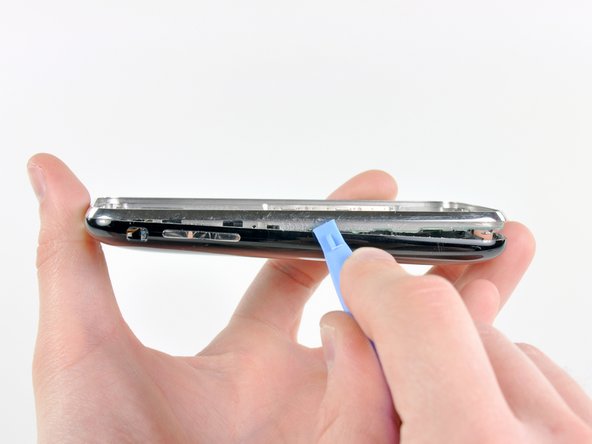
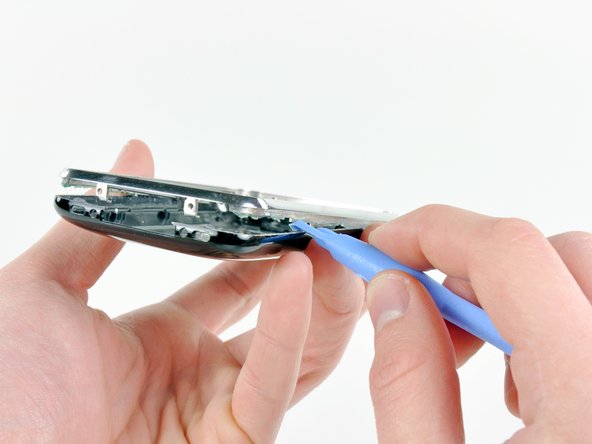
    • Insert the edge of an iPod opening tool into the gap between the silver bezel and the front panel on the volume button side of the phone.

    • Run the edge of the opening tool along the seam to separate the two components. The goal is to lift the silver bezel enough to push the volume button into the rear case.

  27. iPhone 3GS Volume Button Replacement: 27 단계, 이미지 1/2 iPhone 3GS Volume Button Replacement: 27 단계, 이미지 2/2
    • Once you have lifted the silver bezel enough to clear the volume button, use the edge of your opening tool to push the volume button toward the inside of the rear panel.

    • Remove the volume button.

결론

To reassemble your device, follow these instructions in reverse order.

다른 76명이 해당 안내서를 완성하였습니다.

Andrew Bookholt

585,500 평판

안내서 619개 작성하였습니다

댓글 한 개

Hi there, I am trying to replace the entire volume button+mute button+headphone jack+power button on my iPhone 3GS. The critical part where I am stuck is at Step 22 above. I am *unable* to figure out how to remove the entire metal assembly onto which the switch is mounted, and put it back onto the new flex cable. If you could help me out here, I would be *really, really* thankful…

Thanks in advance!

iPhone_Fixer

iPhone Fixer - 답글

댓글 쓰기

조회 통계:

24 시간 전: 3

7일 전: 15

30일 전: 35

전체 시간: 89,086