이 버전에는 잘못된 편집 사항이 있을 수 있습니다. 최신 확인된 스냅샷으로 전환하십시오.
필요한 것
-
이 단계는 번역되지 않았습니다. 번역을 도와주십시오
-
Power off your iPhone before beginning disassembly.
-
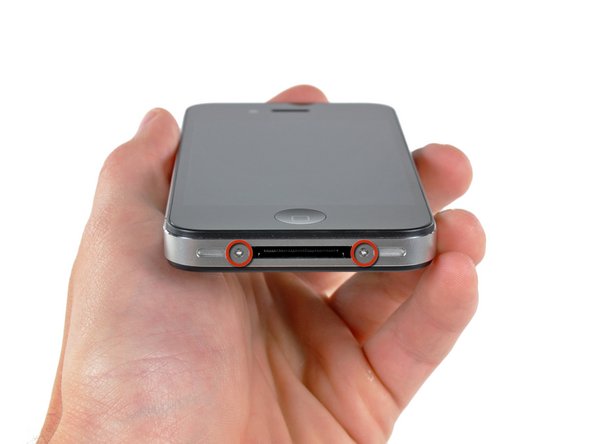
Your iPhone 4 rear cover may have either two #000 Phillips screws or Apple's 5-Point "Pentalobe" screws (second image). Check which screws you have, and ensure you also have the correct screwdriver in order to remove them.
-
Remove the two 3.6 mm Pentalobe or Phillips #000 screws next to the dock connector.
-
-
-
이 단계는 번역되지 않았습니다. 번역을 도와주십시오
-
Pinch the rear panel with your fingers and lift it away from the iPhone. Alternatively, use a Small Suction Cup .
-
다른 806명이 해당 안내서를 완성하였습니다.
첨부 문서
댓글 9개
The replacement part for the iPhone 4 rear panel has two thin, clear overlays on the inside surface--a larger one that runs the full length, and a small one that only covers the lens. These should be removed prior to installation. Also, the first rear panel replacement I got from iFixit was not an exact fit and would not easily "click" into place. They replaced it for free and the second one clicked right in.
rudisill49 - 답글
On step 3 when replacing the back panel with a new one, they aren't kidding about removing ALL the protective slips. There's THREE of them.
1), the obvious back slip that protects the new back.
2). the one inside the back protecting the side with the camera lens
3). the little square one OVER the lens itself.
First time I tried to reinstall my back, that tiny little square over the lens prohibited my ability to actually get the back on completely. My husband jammed it for me, but the screws still wouldn't take. It's amazing that these things are so precise that the tiny little film on the lens would make it that much tighter.
Anyways, hope that helps somebody. :)
Easiest repair I've ever done. Thanks y'all!


