주요 콘텐츠로 건너뛰기

iPhone 4 Verizon Speaker Enclosure Assembly Replacement

단지 전제 조건
이 안내서는 다른 가이드의 선행 작업으로 사용하기 위한 것입니다. 그 자체로는 불완전합니다.

필요한 것

  1. iPhone 4 Verizon Speaker Enclosure Assembly Replacement, Speaker Enclosure Assembly: 1 단계, 이미지 1/2 iPhone 4 Verizon Speaker Enclosure Assembly Replacement, Speaker Enclosure Assembly: 1 단계, 이미지 2/2
    • Remove the two 1.8 mm Phillips screws securing the dock connector cable cover to the logic board.

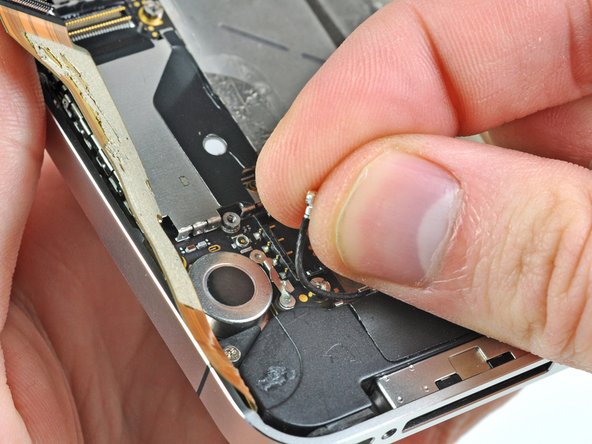
    • Remove the metal dock connector cable cover.

  2. iPhone 4 Verizon Speaker Enclosure Assembly Replacement: 2 단계, 이미지 1/1
    • Use the edge of a plastic opening tool to pry the dock cable up from its socket on the logic board.

  3. iPhone 4 Verizon Speaker Enclosure Assembly Replacement: 3 단계, 이미지 1/1
    • Peel the dock connector cable off the adhesive securing it to the logic board and the side of the speaker enclosure.

  4. iPhone 4 Verizon Speaker Enclosure Assembly Replacement: 4 단계, 이미지 1/2 iPhone 4 Verizon Speaker Enclosure Assembly Replacement: 4 단계, 이미지 2/2
    • Remove the 1.6 mm Phillips screw securing the pressure contact to the logic board near the vibrator.

    • Remove the pressure contact.

    • When reinstalling the pressure contact, be sure to clean it with a degreaser such as windex or isopropyl alcohol. The oils on your fingers have the potential to create wireless interference.

  5. iPhone 4 Verizon Speaker Enclosure Assembly Replacement: 5 단계, 이미지 1/2 iPhone 4 Verizon Speaker Enclosure Assembly Replacement: 5 단계, 이미지 2/2
    • Use the edge of a plastic opening tool to pry the Wi-Fi antenna cable up from its socket on the logic board.

    • De-route the Wi-Fi antenna cable out from under the metal fingers attached to the logic board.

  6. iPhone 4 Verizon Speaker Enclosure Assembly Replacement: 6 단계, 이미지 1/1
    • Remove the two 2.4 mm Phillips screws securing the speaker enclosure assembly to the outer case.

  7. iPhone 4 Verizon Speaker Enclosure Assembly Replacement: 7 단계, 이미지 1/1
    • Remove the small black spacer that was under the Phillips screw near the vibrator.

  8. iPhone 4 Verizon Speaker Enclosure Assembly Replacement: 8 단계, 이미지 1/3 iPhone 4 Verizon Speaker Enclosure Assembly Replacement: 8 단계, 이미지 2/3 iPhone 4 Verizon Speaker Enclosure Assembly Replacement: 8 단계, 이미지 3/3
    • Use a plastic opening tool to lift the speaker enclosure assembly out of the case, being sure not to damage the EMI fingers on the attached Wi-Fi antenna.

    • Remove the speaker enclosure assembly.

    • Before reinstalling the speaker enclosure assembly's screws, be sure the Wi-Fi grounding fingers are installed below the lip in the iPhone's metal case as seen in the third picture.

    • Before reassembly, be sure to clean all metal-to-metal contact points between the grounding fingers of the Wi-Fi antenna and the case of the iPhone with a de-greaser such as windex or isopropyl alcohol. The oils on your fingers have the potential to cause wireless interference issues.

결론

To reassemble your device, follow these instructions in reverse order.

Andrew Bookholt

586,109 평판

안내서 619개 작성하였습니다

댓글 0개

댓글 쓰기

조회 통계:

24 시간 전: 0

7일 전: 0

30일 전: 0

전체 시간: 686