주요 콘텐츠로 건너뛰기

이 버전에는 잘못된 편집 사항이 있을 수 있습니다. 최신 확인된 스냅샷으로 전환하십시오.

필요한 것

  1. , Pentalobe/펜타로브/별나사: 1 단계, 이미지 1/1
    • iPhone을 분해하기 전에 iPhone 배터리를 25% 이하로 방전하세요. 충전된 리튬-이온 배터리에 실수로 구멍이 생기면 화재를 일으키거나 폭발할 수 있습니다.

    • 분해를 시작하기 전에 iPhone 전원을 끄세요.

    • Lightning 커넥터 옆에 위치한 3.6mm-길이 Pentalobe/펜타로브/별나사 두 개를 풀어주세요.

  2. , Anti-Clamp/안티 클램프 사용 지침: 2 단계, 이미지 1/3 , Anti-Clamp/안티 클램프 사용 지침: 2 단계, 이미지 2/3 , Anti-Clamp/안티 클램프 사용 지침: 2 단계, 이미지 3/3
    이 단계에 사용된 도구:
    Anti-Clamp
    $24.95
    구매
    • 다음 두 단계는, 우리가 여는 절차를 쉽게 하기위해 고안한, 안티-클램프에 대해 설명합니다. Anti-Clamp를 사용하지 않는 경우 세 단계를 건너뛰고 대안을 사용하세요.

    • Anti-Clamp 사용 방법에 대한 전체 지침은 이 안내서를 참조하세요.

    • 파란색 핸들을 뒤로 당겨 Anti-Clamp의 팔을 풀어 주세요 .

    • Anti-Clamp의 팔을 iPhone의 왼편 또는 오른편 가장자리로 밀어 주세요.

    • 흡입 컵을 iPhone의 홈 버튼 바로 위 하단 가장자리 근처에 배치하세요—전면에 하나, 후면에 하나.

    • 흡입 컵을 함께 눌러서 원하는 부위에 흡입하세요.

    • Anti-Clamp를 흡착할 수 없을 정도로 iPhone 표면이 미끄러운 경우 테이프를 사용하여 그립감있는 표면을 만들 수 있습니다.

  3. : 3 단계, 이미지 1/3 : 3 단계, 이미지 2/3 : 3 단계, 이미지 3/3
    • 파란색 손잡이를 앞으로 당겨 팔을 잠그세요.

    • 손잡이를 시계 방향으로 360도 돌리거나 컵이 늘어나기 시작할 때까지 돌리세요.

    • 흡입 컵이 서로 정렬되어 있는지 확인하세요. 정렬에서 벗어나기 시작하면 흡입 컵을 약간 풀고 팔을 다시 정렬하세요.

    • Anti-Clamp가 충분히 큰 틈을 만들면 스크린 아래에 여는 픽을 끼우세요.

    • Anti-Clamp가 충분한 틈을 만들지 못하면 핸들을 1/4 바퀴 돌리세요.

    • 한 번에 1/4바퀴 이상 돌리지 말고 돌릴 때마다 몇 초간 기다리세요. Anti-Clamp와 시간이 일을 하도록 하세요.

    • 다음 세 단계는 건너뛰세요.

  4. , 수동 여는 절차: 4 단계, 이미지 1/1
    • iSclack이 없는 경우 흡입 컵 하나를 사용하여 전면 패널을 들어올리세요:

    • 홈 버튼 바로 위에 흡입 컵을 화면에 누르세요.

    • 단단히 밀폐하기 위해서 컵을 스크린에 꽉 누르세요.

    • 디스플레이에 심하게 금이 간 경우, 투명 포장 테이프로 덮으면 흡입 컵이 붙을 수 있습니다. 대안으로, 흡입 컵 대신에 강한 테이프를 사용할 수도 있습니다. 모든 방법이 실패했다면, 초강력 접착제로 흡입 컵을 깨진 스크린에 붙이세요.

  5. : 5 단계, 이미지 1/1
    • 전면 패널과 후면 케이스 사이에 약간의 틈을 만들기 위해 일정한 힘으로 흡입 컵을 위로 당기세요.

    • 서두르지 말고 확실하고 일정하게 힘을 가하세요. 디스플레이 어셈블리는 대부분의 기기보다 꽉 끼워져 있습니다.

    • 흡입 컵을 계속 당기며 플라스틱 여는 도구를 사용하여 디스플레이 어셈블리에서 후면 케이스를 살짝 들어 올리세요.

    • 전면 패널 어셈블리를 후면 케이스에 고정하는 여러 클립이 있으므로 흡입 컵과 플라스틱 여는 도구를 함께 사용하여 전면 패널 어셈블리를 분리해야 합니다.

  6. : 6 단계, 이미지 1/2 : 6 단계, 이미지 2/2
    • 플라스틱 너브를 당겨 흡입 컵의 진공 씰을 해제하세요.

    • 디스플레이 어셈블리에서 흡입 컵을 분리하세요.

  7. , 휴대폰 열기: 7 단계, 이미지 1/3 , 휴대폰 열기: 7 단계, 이미지 2/3 , 휴대폰 열기: 7 단계, 이미지 3/3
    • 휴대폰 상단을 hinge/힌지로 사용하여 전면 패널 어셈블리 홈 버튼 쪽을 후면 케이스에서 분리하여 iPhone을 여세요.

    • 전면 패널 상단 가장자리를 따라 위치한 여러 클립들이 부분 hinge/힌지를 형성합니다.

    • 재조립하는 동안 후면 케이스 상단 가장자리 바로 아래에 클립들을 정렬하세요. 그런 다음 상단 가장자리가 후면 케이스와 같은 높이가 될 때까지 전면 패널을 위로 미세요.

  8. : 8 단계, 이미지 1/3 : 8 단계, 이미지 2/3 : 8 단계, 이미지 3/3
    • 디스플레이를 약 90º 각도로 열고 휴대폰에 작업하는 동안 무언가에 기대어 놓으세요.

    • 유사시에는, 열지 않은 음료수 캔을 사용할 수 있습니다.

    • 작업하는 동안 고무 밴드를 추가하여 디스플레이를 안전하게 고정하세요. 이렇게 하면 디스플레이 케이블에 과도한 무리가 가는 것을 막습니다.

  9. , 배터리 커넥터 분리: 9 단계, 이미지 1/1
    이 단계에 사용된 도구:
    Magnetic Project Mat
    $19.95
    구매
    • 배터리 커넥터 브래킷을 고정하는 다음 Phillips/십자 나사들을 분리하세요:

    • 2.2mm 나사 한 개

    • 3.2mm 나사 한 개

    • 휴대폰 손상을 피하기 위하여 수리하는 내내 빼놓은 각각의 나사를 기억하여 원래 자리로 정확히 돌려놓으세요.

  10. : 10 단계, 이미지 1/1
    • iPhone 금속 배터리 커넥터 브래킷을 분리하세요.

  11. , 배터리 커넥터 분리: 11 단계, 이미지 1/1
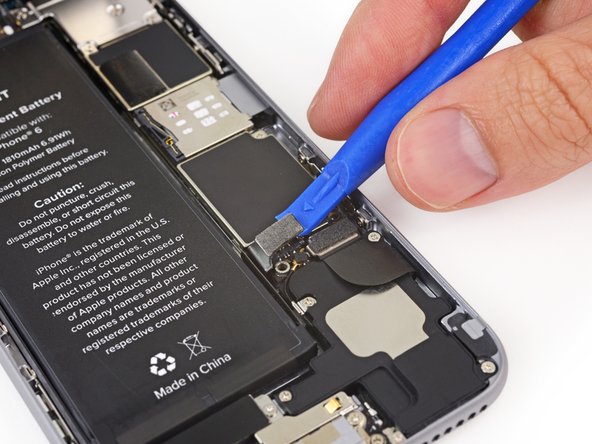
    • 플라스틱 여는 도구를 사용하여 배터리 커넥터를 로직 보드 소켓에서 조심히 들어 올리세요.

    • 로직 보드 소켓 말고 커넥터 만 조심히 들어 올리세요. 로직 보드 소켓을 들어 올리면 커넥터가 완전히 끊어질 수 있습니다.

  12. , 전면 패널 어셈블리 케이블 분리: 12 단계, 이미지 1/1
    • 전면 패널 어셈블리 케이블 브래킷을 고정하는 Phillips/십자 나사 다섯 개를 분리하세요:

    • 1.2mm 나사 세 개

    • 1.7mm 나사 한 개

    • 3.1mm 나사 한 개

    • 재조립할 때 이 나사들을 잘못 끼우면 iPhone 로직 보드를 영구 손상할 수 있습니다.

  13. : 13 단계, 이미지 1/1
    • 전면 패널 어셈블리 케이블 브래킷을 로직 보드에서 분리하세요.

  14. : 14 단계, 이미지 1/2 : 14 단계, 이미지 2/2
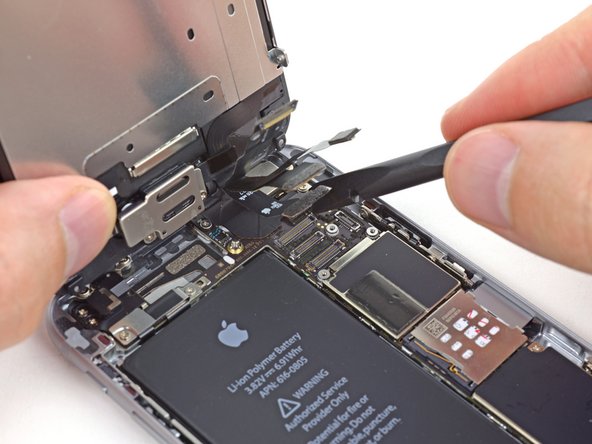
    • 다음 네 단계에서 케이블 커넥터 들어 올리고 로직 보드 소켓은 들어 올리지 않도록 주의하세요.

    • Spudger/스퍼저 또는 손톱을 사용하여 전면 카메라 및 센서 케이블 커넥터를 분리하세요.

  15. : 15 단계, 이미지 1/2 : 15 단계, 이미지 2/2
    • Spudger/스퍼저 또는 손톱을 사용하여 홈 버튼 커넥터를 분리하세요.

  16. : 16 단계, 이미지 1/2 : 16 단계, 이미지 2/2
    • 이 단계에서 케이블을 분리하거나 다시 연결하기 전에 배터리가 분리되어 있는지 확인하세요.

    • Spudger/스퍼저 또는 손톱을 사용하여 디스플레이 데이터 커넥터를 분리하세요.

    • 휴대폰을 재조립할 때 디스플레이 데이터 케이블이 커넥터에서 빠져나올 수 있습니다. 이는 휴대폰을 다시 켤 때 흰색 선이나 빈 화면이 나타날 수 있습니다. 이런 경우 케이블을 다시 연결하고 전화기의 전원을 껐다 켜세요. 휴대폰의 전원을 껐다 켜는 가장 좋은 방법은 배터리 커넥터를 분리했다가 다시 연결하는 것입니다.

  17. : 17 단계, 이미지 1/2 : 17 단계, 이미지 2/2
    • Spudger/스퍼저의 평평한 끝을 사용하여 디지타이저 케이블 커넥터를 분리하세요.

    • 디지타이저 케이블을 다시 연결할 때, 커넥터의 중앙 부분은 누르지 마세요. 커넥터의 한편 끝을 누른 다음 반대편 끝을 눌러주세요. 커넥터 중앙 부분을 누르면 부품이 구부러져 디지타이저를 손상할 수 있습니다.

  18. , 전면 패널 어셈블리: 18 단계, 이미지 1/1
    • 전면 패널 어셈블리를 후면 케이스에서 분리하세요.

  19. 이 단계는 번역되지 않았습니다. 번역을 도와주십시오

    : 19 단계, 이미지 1/2 : 19 단계, 이미지 2/2
    • Insert a SIM card eject tool or a paperclip into the small hole in the SIM card tray.

    • Press to eject the tray.

    • This may require a significant amount of force.

  20. 이 단계는 번역되지 않았습니다. 번역을 도와주십시오

    : 20 단계, 이미지 1/1
    • Remove the SIM card tray assembly from the iPhone.

    • When reinserting the SIM card, ensure that it is in the proper orientation relative to the tray.

  21. 이 단계는 번역되지 않았습니다. 번역을 도와주십시오

    : 21 단계, 이미지 1/2 : 21 단계, 이미지 2/2
    • Use the flat end of a spudger to disconnect the Lightning connector assembly cable and fold it out of the way of the speaker.

  22. 이 단계는 번역되지 않았습니다. 번역을 도와주십시오

    : 22 단계, 이미지 1/2 : 22 단계, 이미지 2/2
    • Use the point of a spudger to lift the antenna cable connector up off of its socket on the logic board.

  23. 이 단계는 번역되지 않았습니다. 번역을 도와주십시오

    : 23 단계, 이미지 1/1
    • Remove the following Phillips screws from the upper cable bracket:

    • One 2.9 mm screw

    • One 2.2 mm screw

  24. 이 단계는 번역되지 않았습니다. 번역을 도와주십시오

    : 24 단계, 이미지 1/2 : 24 단계, 이미지 2/2
    • Remove the upper cable bracket from the iPhone.

  25. 이 단계는 번역되지 않았습니다. 번역을 도와주십시오

    : 25 단계, 이미지 1/3 : 25 단계, 이미지 2/3 : 25 단계, 이미지 3/3
    • When disconnecting the following connectors, only pry up on the connector, not the socket on the logic board or you risk permanent damage.

    • Use the flat end of a spudger to lift the power button and flash assembly cable connector up off of its socket.

    • Lift the volume control cable connector up out of its socket on the logic board.

  26. 이 단계는 번역되지 않았습니다. 번역을 도와주십시오

    : 26 단계, 이미지 1/1
    • Remove the following four Phillips screws from the Wi-Fi antenna:

    • One 1.5 mm screw

    • One 1.4 mm screw

    • Two 2.1 mm screws

  27. 이 단계는 번역되지 않았습니다. 번역을 도와주십시오

    : 27 단계, 이미지 1/2 : 27 단계, 이미지 2/2
    • Remove the Wi-Fi antenna from the iPhone.

    • Be careful not to touch any metal to metal contact points with your bare fingers—use tweezers or gloves. Finger oils may disrupt conductivity. If you do touch any of these components, clean them with a degreaser like windex or isopropyl alcohol before reassembly.

  28. 이 단계는 번역되지 않았습니다. 번역을 도와주십시오

    : 28 단계, 이미지 1/1
    • Remove the two 1.6 mm Phillips screws from the grounding bracket.

  29. 이 단계는 번역되지 않았습니다. 번역을 도와주십시오

    : 29 단계, 이미지 1/2 : 29 단계, 이미지 2/2
    • Remove the grounding bracket from the iPhone.

  30. 이 단계는 번역되지 않았습니다. 번역을 도와주십시오

    : 30 단계, 이미지 1/2 : 30 단계, 이미지 2/2
    • Remove the following Phillips screws securing the angled logic board bracket.

    • One 2.6 mm screw

    • One 1.3 mm screw, located horizontally in the upper sidewall of the iPhone.

  31. 이 단계는 번역되지 않았습니다. 번역을 도와주십시오

    : 31 단계, 이미지 1/2 : 31 단계, 이미지 2/2
    • Remove the angled logic board bracket.

  32. 이 단계는 번역되지 않았습니다. 번역을 도와주십시오

    : 32 단계, 이미지 1/1
    • Remove the single 1.2 mm Phillips screw securing the antenna interconnect cable to the logic board.

  33. 이 단계는 번역되지 않았습니다. 번역을 도와주십시오

    : 33 단계, 이미지 1/2 : 33 단계, 이미지 2/2
    • Use the point of a spudger to fold the antenna interconnect cable up out of the way of the logic board.

  34. 이 단계는 번역되지 않았습니다. 번역을 도와주십시오

    : 34 단계, 이미지 1/3 : 34 단계, 이미지 2/3 : 34 단계, 이미지 3/3
    • Use the flat end of a spudger to lift the camera cable connector straight up out of its socket on the logic board.

    • Be sure to only pry on the connector not the socket itself or you can cause permanent damage to the logic board.

    • Fold the camera cable up out of the way of the logic board.

  35. 이 단계는 번역되지 않았습니다. 번역을 도와주십시오

    : 35 단계, 이미지 1/1
    이 단계에 사용된 도구:
    Standoff Screwdriver for iPhones
    $5.49
    구매
    • Remove the following screws securing the logic board to the rear case:

    • Two 1.9 mm Phillips screws

    • One 2.3 mm standoff screw

    • Standoff screws are best removed using a standoff screwdriver or bit.

    • In a pinch, a small flathead screwdriver will do the job—but use extra caution to ensure it doesn't slip and damage surrounding components.

  36. 이 단계는 번역되지 않았습니다. 번역을 도와주십시오

    : 36 단계, 이미지 1/2 : 36 단계, 이미지 2/2
    • Use the flat end of a spudger to lift the battery connector end of the logic board up slightly, just enough to grab with your fingers.

    • Insert the spudger near the metal shields below the SIM card tray to avoid damaging any chips or sockets.

  37. 이 단계는 번역되지 않았습니다. 번역을 도와주십시오

    : 37 단계, 이미지 1/3 : 37 단계, 이미지 2/3 : 37 단계, 이미지 3/3
    • Lift the battery connector end of the logic board and pull it up and out of the rear case.

    • Be careful not to snag the logic board on any cables.

  38. 이 단계는 번역되지 않았습니다. 번역을 도와주십시오

    : 38 단계, 이미지 1/1
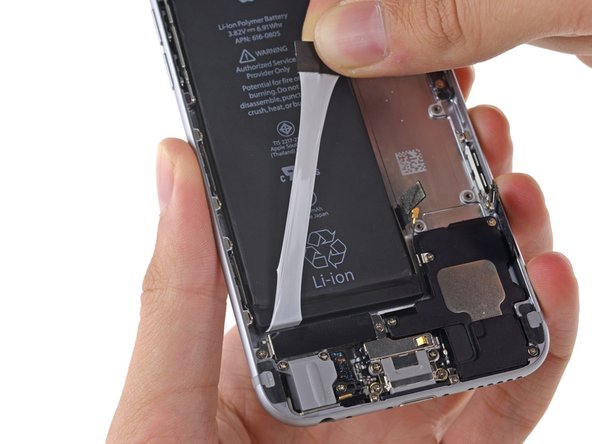
    • Peel back the first battery adhesive tab from the bottom right edge of the battery.

    • Use your fingers or blunt tweezers, and be extra careful when working near the battery—puncturing a lithium-ion battery can release dangerous chemicals and cause a fire.

  39. 이 단계는 번역되지 않았습니다. 번역을 도와주십시오

    : 39 단계, 이미지 1/3 : 39 단계, 이미지 2/3 : 39 단계, 이미지 3/3
    • Gently pull the battery adhesive tab away from the battery, toward the bottom of the iPhone.

    • Try not to pull against the battery or the lower components, or you may rip the adhesive strip.

    • Continue pulling, allowing the strip to slowly slip out from between the battery and the rear case. When you feel increased resistance from the strip, stop pulling and continue with the next step.

    • If the battery adhesive tabs break off at any point during the removal process, use your fingers or blunt tweezers to retrieve the remaining length of adhesive, and continue pulling.

    • If one of the adhesive strips breaks under the battery during this procedure, and cannot be retrieved, remove the remaining strip, and then proceed to Step 44.

  40. 이 단계는 번역되지 않았습니다. 번역을 도와주십시오

    : 40 단계, 이미지 1/3 : 40 단계, 이미지 2/3 : 40 단계, 이미지 3/3
    • When you feel increased resistance from the adhesive strip, pull it gently around the lower right corner of the battery.

    • Continue pulling the adhesive tab upward and away from the right edge of the battery, allowing it to slowly slide out from between the battery and the rear case, until the strip comes free from the iPhone.

    • Don't allow the adhesive strip to snag on the battery connector, or it may tear or break off.

  41. 이 단계는 번역되지 않았습니다. 번역을 도와주십시오

    : 41 단계, 이미지 1/2 : 41 단계, 이미지 2/2
    • Peel back the second battery adhesive tab from the bottom left edge of the battery.

    • Again, gently pull the battery adhesive tab upward and away from the battery, allowing the adhesive strip to slowly slide out from between the battery and the rear case.

    • Continue pulling the adhesive tab until you feel increased resistance, and then stop.

  42. 이 단계는 번역되지 않았습니다. 번역을 도와주십시오

    : 42 단계, 이미지 1/1
    • When you feel increased resistance from the adhesive strip, pull it gently around the lower left corner of the battery.

    • Don't allow the adhesive strip to snag on the corner of the battery, or it may tear or break off.

    • Continue pulling the adhesive tab upward and away from the left edge of the battery, allowing it to slowly slide out from between the battery and the rear case, until the strip comes free from the iPhone.

    • If you removed both adhesive strips successfully, skip the next two steps and continue on Step 46.

    • If either of the adhesive strips broke off underneath the battery and could not be retrieved, continue with the next step below.

  43. 이 단계는 번역되지 않았습니다. 번역을 도와주십시오

    : 43 단계, 이미지 1/1
    • If any of the adhesive strips broke off and the battery remains stuck to the rear case, prepare an iOpener or use a hair dryer to heat the rear case directly behind the battery.

  44. 이 단계는 번역되지 않았습니다. 번역을 도와주십시오

    : 44 단계, 이미지 1/1
    이 단계에 사용된 도구:
    Plastic Cards
    $2.99
    구매
    • Insert a plastic card under the logic board edge of the battery.

    • Be careful to keep the card as flat as possible to avoid bending the battery, which may damage it and cause it to release dangerous chemicals.

    • Press the card in at several points if necessary to break up the adhesive behind the battery.

  45. 이 단계는 번역되지 않았습니다. 번역을 도와주십시오

    : 45 단계, 이미지 1/1
    • After peeling or prying out all adhesive, remove the battery from the iPhone.

    • When reinstalling the battery, refer to this guide to replace your battery's adhesive strips.

  46. 이 단계는 번역되지 않았습니다. 번역을 도와주십시오

    : 46 단계, 이미지 1/2 : 46 단계, 이미지 2/2
    • Remove any tape covering the upper left rear-facing camera screw.

  47. 이 단계는 번역되지 않았습니다. 번역을 도와주십시오

    : 47 단계, 이미지 1/1
    • Remove the following Phillips #00 screws from the rear-facing camera bracket:

    • One 1.5 mm screw

    • One 2.1 mm screw

  48. 이 단계는 번역되지 않았습니다. 번역을 도와주십시오

    : 48 단계, 이미지 1/2 : 48 단계, 이미지 2/2
    • Remove the rear-facing camera bracket.

  49. 이 단계는 번역되지 않았습니다. 번역을 도와주십시오

    : 49 단계, 이미지 1/2 : 49 단계, 이미지 2/2
    • Carefully remove the antenna interconnect cable from the rear case.

  50. 이 단계는 번역되지 않았습니다. 번역을 도와주십시오

    : 50 단계, 이미지 1/2 : 50 단계, 이미지 2/2
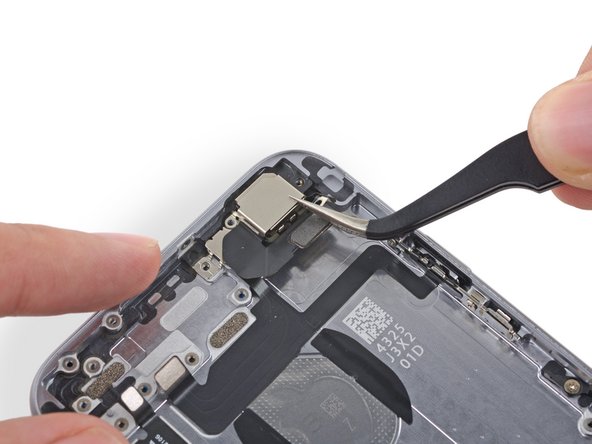
    • Remove the rear-facing camera from the iPhone.

  51. 이 단계는 번역되지 않았습니다. 번역을 도와주십시오

    : 51 단계, 이미지 1/1
    • Remove the single 1.2 mm Phillips #00 screw securing the flash bracket.

  52. 이 단계는 번역되지 않았습니다. 번역을 도와주십시오

    : 52 단계, 이미지 1/2 : 52 단계, 이미지 2/2
    • Remove the flash bracket from the rear case.

  53. 이 단계는 번역되지 않았습니다. 번역을 도와주십시오

    : 53 단계, 이미지 1/1
    • Remove the two 2.2 mm Phillips #00 screws from the power button bracket.

  54. 이 단계는 번역되지 않았습니다. 번역을 도와주십시오

    : 54 단계, 이미지 1/3 : 54 단계, 이미지 2/3 : 54 단계, 이미지 3/3
    • Use the point of a spudger to gently push the flash and microphone modules up out of their respective holes in the rear case.

    • If you encounter significant adhesive, use tweezers to peel the components up from the rear case.

  55. 이 단계는 번역되지 않았습니다. 번역을 도와주십시오

    : 55 단계, 이미지 1/3 : 55 단계, 이미지 2/3 : 55 단계, 이미지 3/3
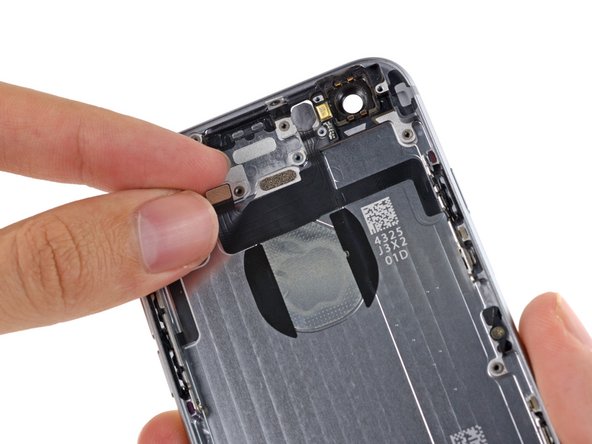
    • Begin to peel the flash/microphone/power button assembly cable up from the rear case starting from the connector end.

    • Continue to peel the cable up, being particularly careful of the narrow component ends of the cable.

    • Remove the flash/microphone/power button assembly cable from the phone.

결승점

다른 84명이 해당 안내서를 완성하였습니다.

Sam Goldheart

회원 가입일: 10/18/12

465,762 평판

안내서 538개 작성하였습니다

iFixit iFixit 회원

Staff

135 회원들

안내서 16,817개 작성하였습니다

댓글 11개

Thanks! This is helpful!

Luke L - 답글

This helped out a lot, couldn't find a good enough photo on how the power button was put back on its mount.

alexkasper16 - 답글

Took me 2.5 hours to complete this. Had a hard time getting the factory cable connector off the power button. Used some 3M Double Sided Adhesive tape- 2mm width, Black color to hold the new replacement cable connector in place on the power button. An IFIXIT video showing how to install the connector onto the power switch would be a big help. Had to use a You-Tube video to complete that step. Also, a good reminder to ensure all your connector cables are clear when reinstalling the logic board. You definitely don't want to pinch any of them. Follow the directions carefully and patience is a must! Wasn't that hard for my first time replacing this flex cable.

ronjon40 - 답글

PRO TIP Order a part that already has the metal bracket attached for a few cents more and save yourself the hassle. I buy all my parts on eBay because of their awesome buyer protection and sellers always want to keep a good rating.

ForumHermit - 답글

I think I got a broken cable. Can someone help me with that?

It looks like this: https://drive.google.com/drive/folders/1...

Is it broken and can I fix it? Or is this normal and what to do?

Katrin - 답글

댓글 쓰기

조회 통계:

24 시간 전: 1

7일 전: 17

30일 전: 76

전체 시간: 78,560