이 버전에는 잘못된 편집 사항이 있을 수 있습니다. 최신 확인된 스냅샷으로 전환하십시오.
필요한 것
-
-
분해를 시작하기 전에 iPhone 전원을 끄세요.
-
iPhone 하단 가장자리에 위치한 3.4mm pentalobe/펜타로브/별나사 두 개를 빼세요.
-
-
-
파란색 손잡이를 뒤로 당겨 안티-클램프의 팔을 잠금 해제하세요.
-
팔을 휴대폰의 왼편 또는 오른편 가장자리 위로 밀어 주세요.
-
흡입 컵을 휴대폰의 하단 가장자리 홈 버튼 근처에 배치하세요—전면에 하나, 후면에 하나.
-
적절한 위치에 컵을 함께 꽉 쥐고 흡착하세요.
-
-
-
iOpener를 가열하여 안티-클램프의 팔에 끼워 넣습니다.
-
iPhone 하단 가장자리에 놓이도록 iOpener를 접으세요.
-
접착제가 풀려서 틈이 생길 때까지 1분 정도 기다리세요.
-
틈에 여는 픽을 끼우세요.
-
다음 세 단계는 건너뛰세요.
-
-
-
iPhone 하단 가장자리를 가열하면 디스플레이를 고정하고 있는 접착제가 부드러워져서 보다 쉽게 열 수 있습니다.
-
헤어 드라이어 또는 iOpener를 준비하여 iPhone 하단 가장자리를 약 90초 동안 가열하여 밑에 있는 접착제를 부드럽게 합니다.
-
-
-
하단 디스플레이 케이블 브래킷을 로직 보드에 고정하는 다음 삼-점 Y000 나사 네 개를 분리하세요:
-
1.2mm 나사 세 개
-
2.6mm 나사 한 개
-
-
-
이 단계는 번역되지 않았습니다. 번역을 도와주십시오
-
Remove three Phillips screws securing the antenna component:
-
Two 1.3 mm screws
-
One 1.2 mm screw
-
-
이 단계는 번역되지 않았습니다. 번역을 도와주십시오
-
Remove the 1.3 mm Phillips screw securing the antenna component to the top edge of the rear case.
-
-
이 단계는 번역되지 않았습니다. 번역을 도와주십시오
-
Tilt the antenna component up towards the top of the phone.
-
Slide the screw boss down and out of its recess.
-
-
이 단계는 번역되지 않았습니다. 번역을 도와주십시오
-
Insert a SIM card eject tool or a paperclip into the small hole in the SIM card tray.
-
Press firmly to eject the tray.
-
-
이 단계는 번역되지 않았습니다. 번역을 도와주십시오
-
Use an iFixit opening tool or a fingernail to disconnect the dual camera cable connectors by prying them straight up from their sockets.
-
-
이 단계는 번역되지 않았습니다. 번역을 도와주십시오
-
Remove the two screws securing the rear-facing camera bracket:
-
One 1.6 mm Phillips screw
-
One 2.2 mm standoff screw
-
-
이 단계는 번역되지 않았습니다. 번역을 도와주십시오
-
Remove the two 1.3 mm Phillips screws securing the upper cable bracket.
-
-
이 단계는 번역되지 않았습니다. 번역을 도와주십시오
-
Remove the two 1.3 mm Phillips screws securing the grounding clip at the top left edge of the logic board.
-
-
이 단계는 번역되지 않았습니다. 번역을 도와주십시오
-
Remove the 1.3 mm Phillips screw securing the antenna flex cable to the top edge of the iPhone's rear case.
-
Remove the remaining Phillips screw from the antenna flex cable.
-
-
이 단계는 번역되지 않았습니다. 번역을 도와주십시오
-
Use a fingernail or the sharp end of an iFixit opening tool to pry up and disconnect the antenna flex cable connector from the logic board.
-
-
이 단계는 번역되지 않았습니다. 번역을 도와주십시오
-
Slide the flat edge of a spudger underneath the antenna flex cable to separate the adhesive holding it in place.
-
-
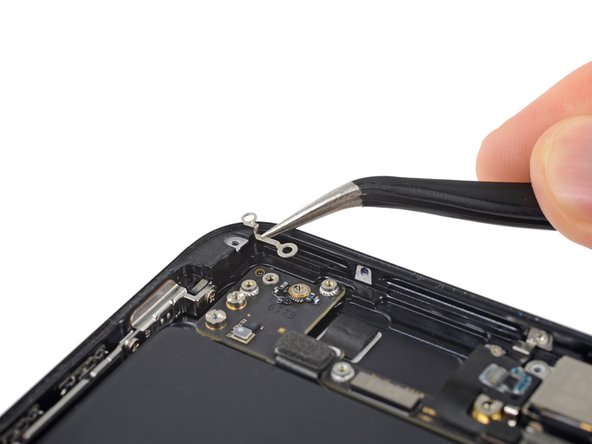
이 단계는 번역되지 않았습니다. 번역을 도와주십시오
-
Tilt the antenna flex cable up toward the top of the iPhone.
-
Slide the screw boss down and out of its recess.
-
Remove the antenna flex cable.
-
-
이 단계는 번역되지 않았습니다. 번역을 도와주십시오
-
Use a thin pry tool or tweezers to carefully pry up and disconnect the two coaxial cable connectors from the logic board.
-
-
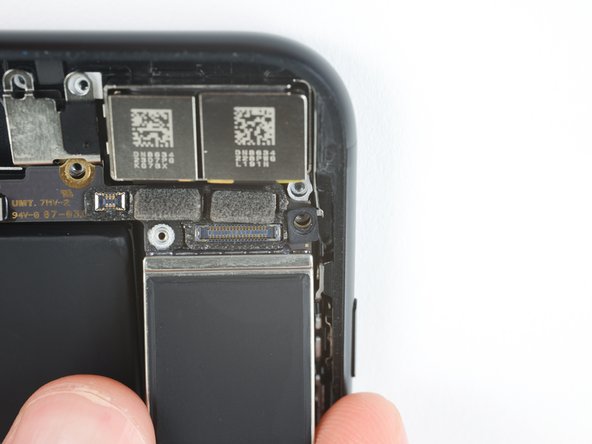
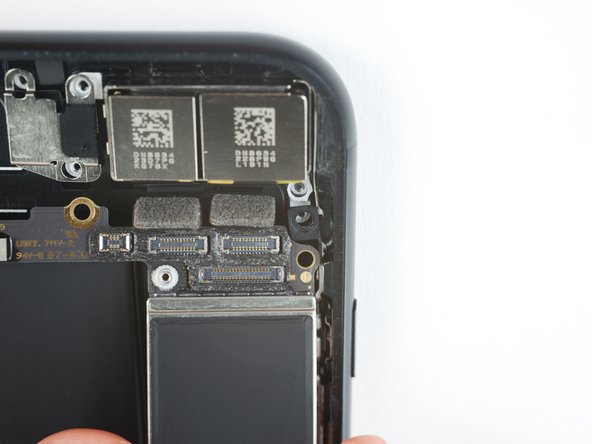
이 단계는 번역되지 않았습니다. 번역을 도와주십시오
-
Disconnect the two remaining ribbon cables from the logic board:
-
Disconnect the upper cable connector by prying from the top
-
Disconnect the Lightning port connector by prying along the outer edge
-
-
이 단계는 번역되지 않았습니다. 번역을 도와주십시오
-
Remove the seven screws securing the logic board:
-
One 1.3 mm Phillips screw
-
Two 2.1 mm standoff screws
-
One 2.0 mm standoff screw with a large head
-
One 2.0 mm standoff screw with a small head
-
Two 2.2 mm standoff screws
-
-
이 단계는 번역되지 않았습니다. 번역을 도와주십시오
-
Use the point of a spudger to push the SIM card eject plunger out of the logic board's way.
-
-
이 단계는 번역되지 않았습니다. 번역을 도와주십시오
-
Use the point of a spudger to carefully de-route the two coaxial cables from the small metal clip holding them to the logic board.
-
-
이 단계는 번역되지 않았습니다. 번역을 도와주십시오
-
Lift the logic board from the bottom edges and slide it toward the bottom of the iPhone to remove it.
-
-
이 단계는 번역되지 않았습니다. 번역을 도와주십시오
-
Remove the three 1.5 mm Phillips screws securing the Taptic Engine to the rear case.
-
-
이 단계는 번역되지 않았습니다. 번역을 도와주십시오
-
Carefully de-route the two coaxial cables from the metal bracket holding them to the side of the speaker.
-
-
이 단계는 번역되지 않았습니다. 번역을 도와주십시오
-
Remove the five Phillips screws securing the speaker:
-
Three 1.3 mm screws
-
One 2.3 mm screw
-
One 3.3 mm screw
-
-
이 단계는 번역되지 않았습니다. 번역을 도와주십시오
-
Remove the 2.9 mm Phillips screw at the top left of the Lightning port.
-
-
이 단계는 번역되지 않았습니다. 번역을 도와주십시오
-
Remove the following three Phillips screws securing the Lightning connector:
-
Two 1.7 mm screws
-
One 2.8 mm screw
-
-
이 단계는 번역되지 않았습니다. 번역을 도와주십시오
-
Remove the two 1.2 mm Phillips screws securing the Lightning port to the bottom edge of the iPhone.
-
-
이 단계는 번역되지 않았습니다. 번역을 도와주십시오
-
Use the sharp edge of an iFixit Opening Tool to pry the two microphones free from the adhesive securing them in place.
-
-
이 단계는 번역되지 않았습니다. 번역을 도와주십시오
-
Slide an opening pick or thin pry tool underneath the top portion of the Lightning connector assembly flex cable, and begin separating it from the rear case.
-
-
이 단계는 번역되지 않았습니다. 번역을 도와주십시오
-
Continue separating the upper portion of the flex cable, being careful not to damage any other components along the way.
-
-
이 단계는 번역되지 않았습니다. 번역을 도와주십시오
-
Carefully slide your pick from the corner of the battery to the corner of the iPhone to separate the portion of the flex cable adhered to the outer frame.
-
-
이 단계는 번역되지 않았습니다. 번역을 도와주십시오
-
Slide your pick across the width of the iPhone to separate all the remaining strands of the flex cable from the rear case.
-
-
이 단계는 번역되지 않았습니다. 번역을 도와주십시오
-
Remove the Lightning connector assembly.
-
Use a plastic tool to scour any bits of adhesive residue from the rear case.
-
You can clean any remaining residue from the surface with isopropyl alcohol (90% concentration or greater) and a lint-free cloth. Wipe in one direction only, not back and forth.
-
Make sure the Lightning connector assembly is correctly positioned so that the two white dots on the iPhone's rear case show through the two circular cutouts in the Lightning flex cable. If they don't, the flex cable will remain misaligned and you won't be able to reconnect it to its socket on the logic board.
-


다른 193명이 해당 안내서를 완성하였습니다.


댓글 41개
NOTE TO ALL: When you put the port back in, LINE UP THE HOLES ON THE FRAME. If you don’t line up the holes perfectly on the cable (even if it’s off by a millimeter), the cable will NOT extend and plug into the logic board. It has to be perfect. You’re welcome :)
I have this issue but cant seem to get it to set properly? any ideas the po seems like it's in fine but wont connect to logic board
I feel like this is the most important piece of information on this entire guide. I drove myself mad disassembling and reassembling multiple iPhone 7/8 Plus devices with this exact issue.
Conrad -
So i did this and now my home button does not work. Any suggestions?
So far as I can tell, the only part of this procedure that affects the home button is when it’s disconnected from the board in step 14. I’d probably double-check those connectors to make sure they’re seated properly for a start. Check the sockets for dust/debris or pin damage. Inspect the cables for damage. While you’re troubleshooting, remember to always disconnect the battery first and reconnect it last. Good luck!