이 버전에는 잘못된 편집 사항이 있을 수 있습니다. 최신 확인된 스냅샷으로 전환하십시오.
필요한 것
동영상 개요
-
이 단계는 번역되지 않았습니다. 번역을 도와주십시오
-
Use the Pentaloble screwdriver to remove the charging port screws. Heating the phone with a heat gun will allow the phone to be opened more easily.
-
-
이 단계는 번역되지 않았습니다. 번역을 도와주십시오
-
Undo 5 screws shown in the picture below with a tripoint #Y000 screwdriver
-
These screws are all different sized so keep track of where they go
-
Release the battery/LCD screen/digitizer/ear speaker connectors with a spudger.
-
-
이 단계는 번역되지 않았습니다. 번역을 도와주십시오
-
Undo 3 Y000 screws and heating the flex cable with a heat gun, we can remove the ear speaker easily
-
-
-
이 단계는 번역되지 않았습니다. 번역을 도와주십시오
-
Remove the 2 Phillips #PH00 screws and remove the metal plate, release the rear cameras connectors.
-
These screws are also different sizes
-
-
이 단계는 번역되지 않았습니다. 번역을 도와주십시오
-
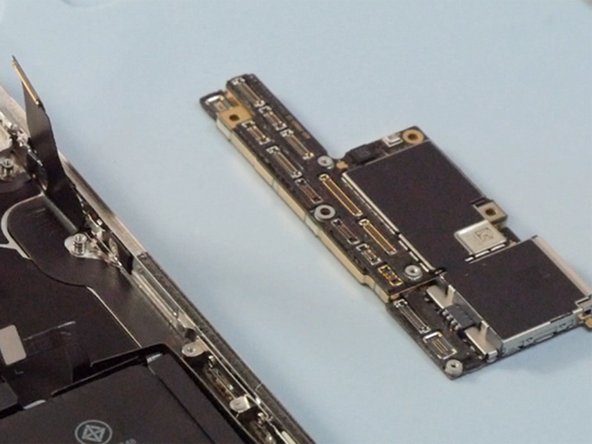
Release all connectors on the motherboard with a spudger
-
Undo 3 Phillips #PH00 screws on the mother board then we can take out the mother board.
-
-
이 단계는 번역되지 않았습니다. 번역을 도와주십시오
-
Undo 8 screws on the retaining plate then remove the plate taking care to not break the small connector on the plate that connects just under the taptic engine
-
Remove the loud speaker and the taptic engine.
-
-
이 단계는 번역되지 않았습니다. 번역을 도와주십시오
-
Pulling out 4 battery adhesives with a tweezers then we can remove the battery.
-
-
이 단계는 번역되지 않았습니다. 번역을 도와주십시오
-
Heating the front facing camera with a heat gun will make it easily to be removed
-
-
이 단계는 번역되지 않았습니다. 번역을 도와주십시오
-
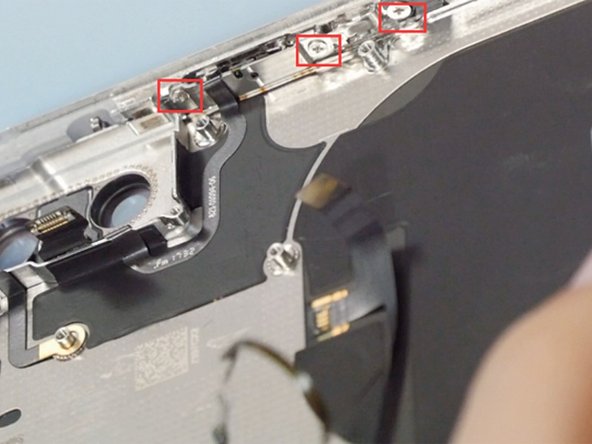
Release 4 screws on the frame shown in the picture
-
Heating the charging port flex cable then we can remove it easily
-
-
이 단계는 번역되지 않았습니다. 번역을 도와주십시오
-
Release 7 screws on the Wi-Fi flex cable
-
Heating the flex cable with a heat gun make it easier to be removed
-
-
이 단계는 번역되지 않았습니다. 번역을 도와주십시오
-
Release 3 screws on the power button
-
Heating the flex cable with a heat gun then it can be removed easily
-


다른 129명이 해당 안내서를 완성하였습니다.

댓글 25개
It's good
The iPhone X assemble video: https://youtu.be/E5jyuxgpE_g
What About the backside ? I heard that when the backside is shattered, it’s almost impossible to repair, because of the glue that holds the backside and parts together ?
Hi avdk, we don’t tear down the back glass but we will pay attention to this question. If there is a definite answer, I will reply to you .Thank you.
Mandy -