이 버전에는 잘못된 편집 사항이 있을 수 있습니다. 최신 확인된 스냅샷으로 전환하십시오.
필요한 것
-
이 단계는 번역되지 않았습니다. 번역을 도와주십시오
-
Insert a plastic opening tool into the seam between the front and back of the iPod.
-
-
이 단계는 번역되지 않았습니다. 번역을 도와주십시오
-
Insert another plastic opening tool into the seam between the front and back of the iPod, leaving at least 1.5 inches of space between the two tools.
-
-
이 단계는 번역되지 않았습니다. 번역을 도와주십시오
-
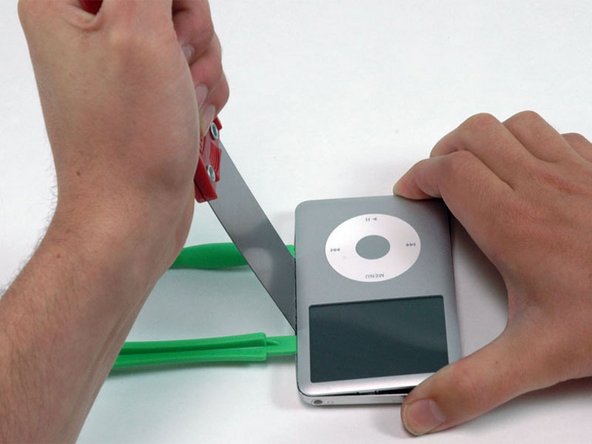
At an angle, carefully insert a putty knife about 1/8 inch into the seam between the two opening tools.
-
Once the putty knife has cleared the lip of the rear panel, pivot the putty knife so that it is vertical, and carefully (but firmly) wiggle it straight down into the gap between the opening tools.
-
-
이 단계는 번역되지 않았습니다. 번역을 도와주십시오
-
Push with your fingers on the rear panel behind the putty knife to minimize bending. Slowly flex the putty knife, as shown in the picture, to ensure that most of the metal tabs on this side of the iPod are disengaged.
-
-
이 단계는 번역되지 않았습니다. 번역을 도와주십시오
-
Remove the putty knife from the iPod and reinsert it closer to the corner of the iPod, using the same wiggle method as before.
-
-
이 단계는 번역되지 않았습니다. 번역을 도와주십시오
-
Near the headphone jack, insert a plastic opening tool into the seam between the front and back of the iPod.
-
-
이 단계는 번역되지 않았습니다. 번역을 도와주십시오
-
Near the center of the display, carefully insert a metal spudger into the gap created by the plastic opening tool.
-
Using the metal spudger, disengage the single clip on the top of the iPod.
-
-
이 단계는 번역되지 않았습니다. 번역을 도와주십시오
-
Near the other top corner, insert a plastic opening tool into the seam between the front and back of the iPod
-
-
이 단계는 번역되지 않았습니다. 번역을 도와주십시오
-
On the other side, insert a plastic opening tool into the seam between the front and back of the iPod.
-
-
-
이 단계는 번역되지 않았습니다. 번역을 도와주십시오
-
Remove the opening tool from the top corner and insert it into the seam between the front and back of the iPod, leaving at least 1.5 inches of space between the two tools (as done on the other side).
-
-
이 단계는 번역되지 않았습니다. 번역을 도와주십시오
-
At an angle, carefully insert a putty knife about 1/8 inch into the seam between the two opening tools.
-
Once the putty knife has cleared the lip of the rear panel, angle the putty knife so that it is vertical, and carefully (but firmly) wiggle it straight down into the iPod via the gap between the plastic opening tools.
-
Push with your fingers on the rear panel behind the putty knife to minimize bending. Ever so slightly flex the putty knife to ensure that most of the metal tabs on this side of the iPod are disengaged.
-
-
이 단계는 번역되지 않았습니다. 번역을 도와주십시오
-
Carefully insert a metal spudger into the area near the stubborn metal clip.
-
-
이 단계는 번역되지 않았습니다. 번역을 도와주십시오
-
Gently wiggle the metal spudger down so that it is all the way in the rear panel.
-
-
이 단계는 번역되지 않았습니다. 번역을 도와주십시오
-
Continue to push up on the front panel with the metal spudger until the metal clip releases.
-
-
이 단계는 번역되지 않았습니다. 번역을 도와주십시오
-
Grasp the front panel assembly with one hand and the rear panel with the other.
-
Gently (GENTLY) disengage the remaining clips on the rear panel by pulling the tops of the front and rear panels away from each other (think of the bottom of the iPod as a hinge), taking great care not to damage the ribbon cables holding the two halves together.
-
-
이 단계는 번역되지 않았습니다. 번역을 도와주십시오
-
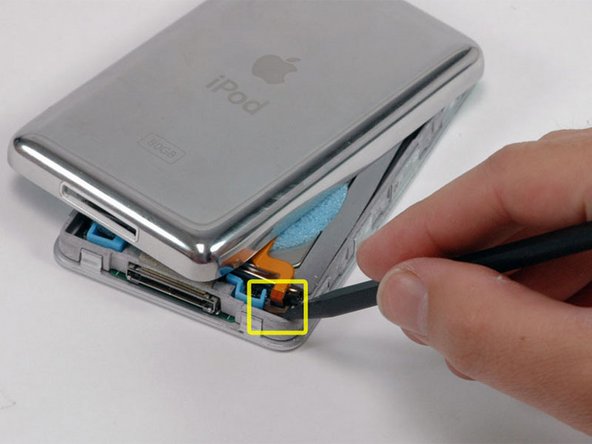
Use a spudger to slide up the connector holding the orange battery ribbon in place. You only need to lift the locking bar up about 2 mm to free the cable.
-
Slide the orange battery ribbon out of its connector.
-
-
이 단계는 번역되지 않았습니다. 번역을 도와주십시오
-
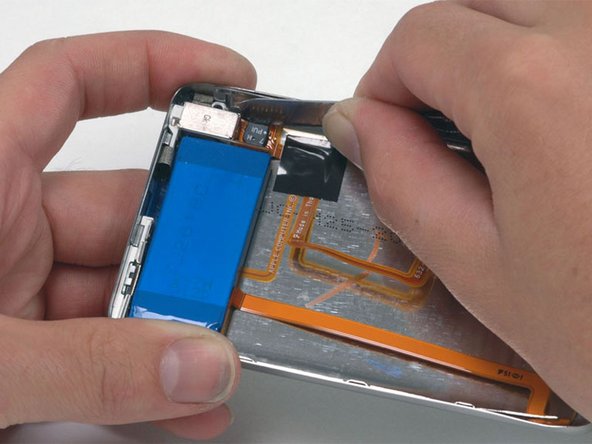
Place the rear panel next to the iPod, being careful not to strain the orange headphone jack cable.
-
-
이 단계는 번역되지 않았습니다. 번역을 도와주십시오
-
Lift the hard drive up with one hand so you can access the headphone jack ribbon beneath.
-
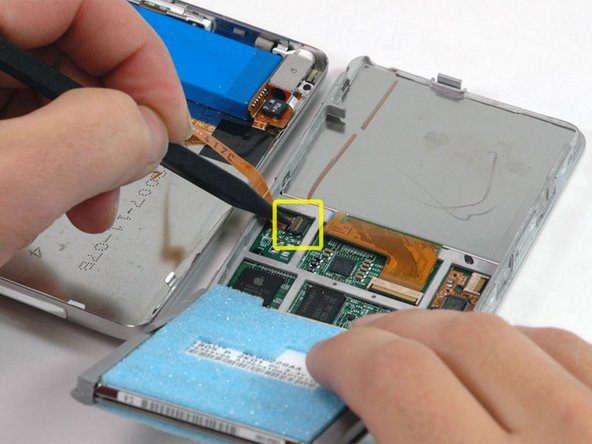
Use a spudger to flip up the plastic tab holding the headphone jack ribbon in place. The tab will rotate up 90 degrees, releasing the ribbon cable.
-
Slide the orange headphone jack ribbon out of its connector.
-
The rear panel is now free from the iPod.
-
-
이 단계는 번역되지 않았습니다. 번역을 도와주십시오
-
Now to repair the damage caused by liberating the internal parts of the iPod Classic! It is highly likely that at least one of the metal clips in the lower case has been bent upward. These clips must all be pointing downward in order to reinstall the rear panel.
-
-
이 단계는 번역되지 않았습니다. 번역을 도와주십시오
-
Take the broad, flat side of the metal spudger and push the clip down, taking care not to tear the thin metal rail from the rear panel.
-
-
이 단계는 번역되지 않았습니다. 번역을 도와주십시오
-
On a clean, hard surface, lay the rear panel on its side. Carefully but firmly push down on it, rolling the entire lip side back into its proper spot.
-
-
이 단계는 번역되지 않았습니다. 번역을 도와주십시오
-
Rotate the hard drive out of the framework and place it so that the connector is facing up.
-
Use a spudger to flip up the small black locking tab holding the orange hard drive ribbon in place. The tab will rotate up 90 degrees, releasing the ribbon cable.
-
-
이 단계는 번역되지 않았습니다. 번역을 도와주십시오
-
Slide the orange hard drive ribbon cable directly out of its connector.
-
If you are replacing the hard drive in your iPod and it did not come with the rubber mounting brackets and foam padding, transfer these items from your old drive to the replacement drive.
-
-
이 단계는 번역되지 않았습니다. 번역을 도와주십시오
-
Remove the three Phillips screws securing the front panel to the metal framework.
-
-
이 단계는 번역되지 않았습니다. 번역을 도와주십시오
-
Rotate the iPod 180 degrees and remove the three Phillips screws securing the front panel to the metal framework on the other side.
-
-
이 단계는 번역되지 않았습니다. 번역을 도와주십시오
-
Carefully work around the edges of the iPod to separate the front panel from the gray metal framework.
-
-
이 단계는 번역되지 않았습니다. 번역을 도와주십시오
-
Lift the framework (including the attached screen, logic board, and click wheel) away from the front panel.
-


다른 47명이 해당 안내서를 완성하였습니다.
