주요 콘텐츠로 건너뛰기

iPod Nano 3rd Generation Battery Replacement

단지 전제 조건
이 안내서는 다른 가이드의 선행 작업으로 사용하기 위한 것입니다. 그 자체로는 불완전합니다.

필요한 것

  1. iPod Nano 3rd Generation Battery Replacement, Rear Panel: 1 단계, 이미지 1/1
    • Please be aware that removing the rear panel from the back of the iPod will cause considerable damage to the rear panel. We highly recommend purchasing an additional rear panel to properly reassemble the iPod.

    • Before opening your iPod, ensure that the hold switch is in the locked position.

  2. iPod Nano 3rd Generation Battery Replacement: 2 단계, 이미지 1/1
    • The rear panel is secured to the front case by eight clips permanently attached to the rear panel. These clips lock onto small tabs machined into the front case.

    • To free the tabs, they must be pushed toward the center of the Nano. Note the location of all tabs on the rear panel. When using an iPod opening tool to free the rear panel, be sure to work the tool at the location of these clips.

    • To aid in visualization, the two clips boxed in red are located closest to the headphone jack.

  3. iPod Nano 3rd Generation Battery Replacement: 3 단계, 이미지 1/2 iPod Nano 3rd Generation Battery Replacement: 3 단계, 이미지 2/2
    • Opening the iPod can be challenging. Don't get discouraged if it takes you a few tries before the iPod is opened.

    • Insert the large iPod opening tool into the seam between the front case and rear panel of the iPod, above the dock connector. The tool's edge should point toward the rear panel to prevent any accidental scratching of the anodized aluminum front case.

  4. iPod Nano 3rd Generation Battery Replacement: 4 단계, 이미지 1/1
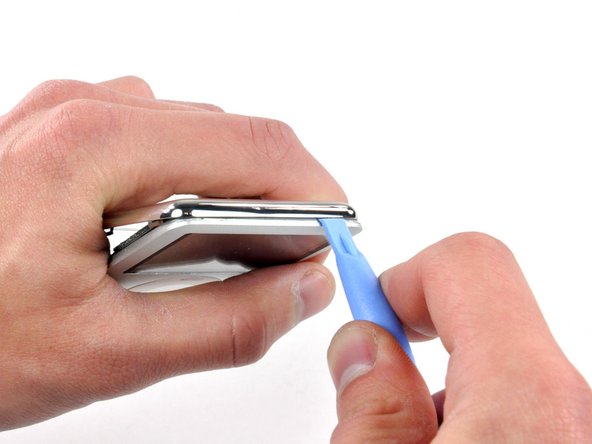
    • Insert a small iPod opening tool into the seam on the headphone jack side of the Nano, with the edge of the tool pointing toward the rear panel.

    • Gently enlarge the existing gap by pressing/wiggling the small iPod opening tool into the gap near each of the the two tabs attached to the rear case, pushing the clips toward the center of the Nano until both have been freed.

  5. iPod Nano 3rd Generation Battery Replacement: 5 단계, 이미지 1/2 iPod Nano 3rd Generation Battery Replacement: 5 단계, 이미지 2/2
    • The large iPod opening tool is no longer needed to gain access to the left side of the iPod.

    • Repeat the same procedure listed in the previous step to free the three clips along the hold switch side of the Nano.

  6. iPod Nano 3rd Generation Battery Replacement: 6 단계, 이미지 1/1
    • Insert an iPod opening tool into the gap near the top left corner of the Nano and work to free the three clips along the top edge of the rear panel.

    • After ensuring all tabs are free, separate the two halves of the iPod.

    • The rear panel is now free from the iPod.

  7. iPod Nano 3rd Generation Battery Replacement, Logic Board: 7 단계, 이미지 1/1
    • With the rear case removed, the back side of your Nano should now look like this.

  8. iPod Nano 3rd Generation Battery Replacement: 8 단계, 이미지 1/1
    • Remove the following six screws:

    • One 1.8 mm Phillips.

    • Three 1.9 mm Phillips.

    • One 2.4 mm Phillips.

    • One 2.6 mm Phillips.

  9. iPod Nano 3rd Generation Battery Replacement: 9 단계, 이미지 1/2 iPod Nano 3rd Generation Battery Replacement: 9 단계, 이미지 2/2
    • Using a spudger, flip up the brown click wheel ribbon cable retaining clip.

    • The clip is hinged at the end nearest the edge of the case.

  10. iPod Nano 3rd Generation Battery Replacement: 10 단계, 이미지 1/1
    • Use the tip of a spudger to slide the click wheel ribbon cable out of its socket.

    • The logic board is still connected to the iPod by the display ribbon cable.

  11. iPod Nano 3rd Generation Battery Replacement: 11 단계, 이미지 1/2 iPod Nano 3rd Generation Battery Replacement: 11 단계, 이미지 2/2
    • The logic board is still connected to the front case by the display ribbon cable, located on the headphone jack side of the logic board.

    • Lift the logic board assembly out of the front case from the click wheel connector side (the cable you just disconnected). Rotate the logic board assembly about the display ribbon cable and lay it next to the front case.

  12. iPod Nano 3rd Generation Battery Replacement: 12 단계, 이미지 1/1
    • Use a spudger to flip up the display ribbon cable retaining clip.

    • The retaining clip is hinged about the end nearest the battery.

  13. iPod Nano 3rd Generation Battery Replacement: 13 단계, 이미지 1/1
    • Slide the display ribbon cable out of its socket.

    • The logic board is now completely disconnected from the front case.

  14. iPod Nano 3rd Generation Battery Replacement, Battery: 14 단계, 이미지 1/2 iPod Nano 3rd Generation Battery Replacement, Battery: 14 단계, 이미지 2/2
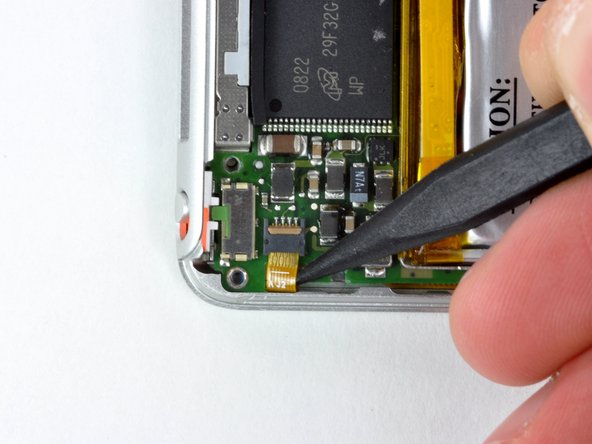
    • Before proceeding, remove the metal EMI finger shown by pulling it away from the adhesive on the logic board.

    • Do not forget to reinstall this during reassembly.

  15. iPod Nano 3rd Generation Battery Replacement: 15 단계, 이미지 1/1
    • Battery replacement on the iPod Nano 3rd Generation requires soldering. Before proceeding, be sure you have all the required tools and a general feel for soldering small electronic components.

    • Before de-soldering the battery cables, you must remove a small amount of black rubbery adhesive securing them to the logic board.

  16. iPod Nano 3rd Generation Battery Replacement: 16 단계, 이미지 1/1
    • Push the tip of a spudger beneath the rubber adhesive and toward the battery to free it from the surface of the logic board.

    • Start freeing the adhesive from around one of the outer leads, then free it from the two gaps between leads, and finally push the spudger along the back side of the leads to completely remove it from the logic board/battery leads.

    • The battery leads are delicate, so be careful to not tear them while removing the black adhesive.

  17. iPod Nano 3rd Generation Battery Replacement: 17 단계, 이미지 1/1
    • The battery leads, now free of adhesive, should look like this.

  18. iPod Nano 3rd Generation Battery Replacement: 18 단계, 이미지 1/1
    • The next few steps require a soldering iron.

    • The ends of the battery leads are fed through small holes in the logic board and held in place by a small amount of solder.

    • Begin by heating the exposed end of the white battery lead with the tip of a soldering iron while simultaneously pulling the lead away from the connection, using tweezers to grasp the lead by the insulation.

    • Due to the delicate nature of electronic components, it is imperative to limit the amount of heat transferred from the soldering iron to the logic board. An easy way to accomplish this is to pull on the battery lead with light continuous tension while the soldering iron heats up the connection. As soon as the solder melts and the lead slides out, immediately lift the solder tip off the connection to avoid damage.

  19. iPod Nano 3rd Generation Battery Replacement: 19 단계, 이미지 1/2 iPod Nano 3rd Generation Battery Replacement: 19 단계, 이미지 2/2
    • De-solder the remaining leads, following the procedure illustrated in the previous step.

  20. iPod Nano 3rd Generation Battery Replacement: 20 단계, 이미지 1/1
    • All leads should now be de-soldered and disconnected from the logic board.

  21. iPod Nano 3rd Generation Battery Replacement: 21 단계, 이미지 1/2 iPod Nano 3rd Generation Battery Replacement: 21 단계, 이미지 2/2
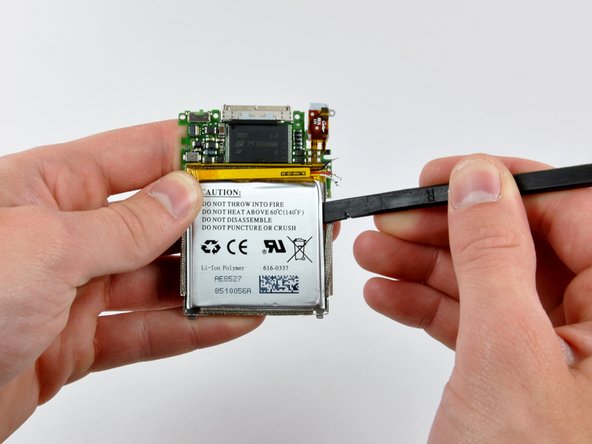
    • Using a spudger, pry the battery up from the adhesive holding it to the battery shield.

    • Start prying at the upper right corner of the battery and work your way around the perimeter until the battery has lifted enough to grab it with your fingers.

    • Remove the battery from the battery shield.

결론

To reassemble your device, follow these instructions in reverse order.

Walter Galan

694,561 평판

안내서 1,203개 작성하였습니다

댓글 0개

댓글 쓰기

조회 통계:

24 시간 전: 0

7일 전: 0

30일 전: 1

전체 시간: 3,350