주요 콘텐츠로 건너뛰기

이 안내서에는 최근 변경 사항이 더 있습니다. 최신 비검증 버전으로 전환하십시오.

iPod Shuffle 1st Generation USB Port Replacement

필요한 것

  1. iPod Shuffle 1st Generation USB Port Replacement, Hold Switch: 1 단계, 이미지 1/1
    • Before opening your iPod, ensure that the hold switch is in the locked position.

  2. iPod Shuffle 1st Generation USB Port Replacement: 2 단계, 이미지 1/1
    • Use a spudger to pry up the white plastic hold switch.

  3. iPod Shuffle 1st Generation USB Port Replacement, Casing: 3 단계, 이미지 1/1
    • If present, remove the cap from the USB port.

  4. iPod Shuffle 1st Generation USB Port Replacement: 4 단계, 이미지 1/1
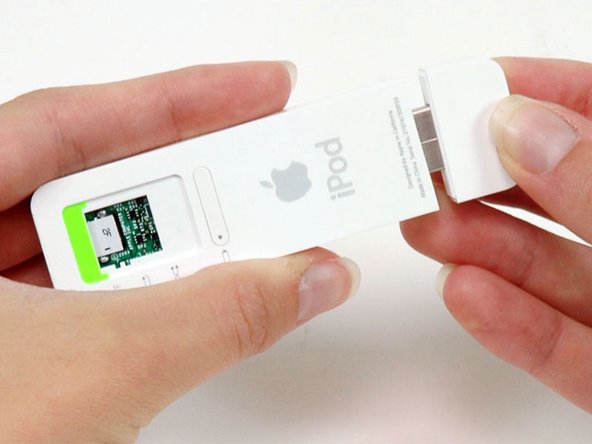
    • The following step can be challenging and time consuming. Be sure to go slowly and have patience to prevent damaging your iPod.

    • Use an Exacto knife to separate the glue holding the USB port on the iPod. Run the knife along the seam between the two sections of the iPod until the glue is separated. Expect to run the knife along this edge 20-30 times before the glue will be entirely freed.

  5. iPod Shuffle 1st Generation USB Port Replacement: 5 단계, 이미지 1/1
    • Continue to run the knife around all four edges of the USB port until the glue is released. You may be able to gently wiggle the knife from side to side to help release the glue.

  6. iPod Shuffle 1st Generation USB Port Replacement: 6 단계, 이미지 1/1
    • Use a spudger to push on the headphone jack and slide the USB port out of its housing.

    • If the USB port doesn't come free, check to make sure all the glue holding the USB port in place has been released. Pulling on the USB port itself is not recommended as there is a fragile ribbon cable that can be ripped if the USB port suddenly comes free.

  7. iPod Shuffle 1st Generation USB Port Replacement: 7 단계, 이미지 1/1
    • After the USB port comes free, carefully slide it out of its housing. Don't pull it out too far because there's still a ribbon cable connecting it to the logic board.

  8. iPod Shuffle 1st Generation USB Port Replacement: 8 단계, 이미지 1/1
    • Continue to slide the iPod out of its casing by using a spudger to push on the logic board near the headphone jack.

  9. iPod Shuffle 1st Generation USB Port Replacement: 9 단계, 이미지 1/1
    • Turn the iPod so that the click wheel is facing up. This will prevent the battery indicator from falling out.

    • If the battery indicator does fall out, don't forget to replace it prior to reassembling the iPod. Getting the battery indicator back in place can be tricky. You'll have to slide it in from the end of the iPod's casing and get it to fall into its slot in the casing.

    • Slide the iPod out of its casing.

  10. iPod Shuffle 1st Generation USB Port Replacement, USB Port: 10 단계, 이미지 1/1
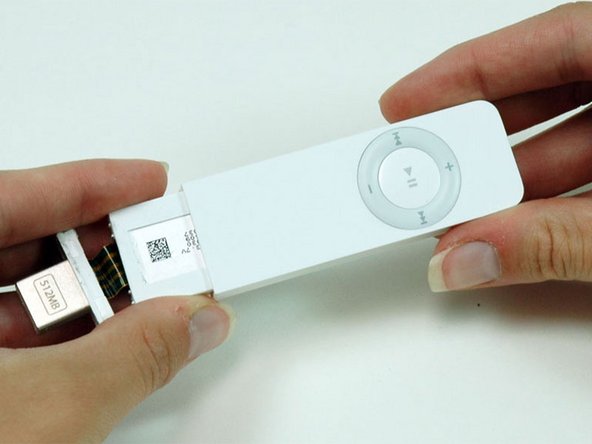
    • Use a spudger to flip up the black plastic tab holding the USB port ribbon in place. The black tab will rotate up 90 degrees, releasing the ribbon cable.

  11. iPod Shuffle 1st Generation USB Port Replacement: 11 단계, 이미지 1/1
    • Carefully peel the yellow USB ribbon up from the battery.

  12. iPod Shuffle 1st Generation USB Port Replacement: 12 단계, 이미지 1/1
    • Slide the USB ribbon out of its connector.

    • Lift the USB port and detached ribbon cable out of the iPod.

결론

To reassemble your device, follow these instructions in reverse order.

다른 4명이 해당 안내서를 완성하였습니다.

iRobot

회원 가입일: 09/24/09

1 평판

안내서 636개 작성하였습니다

댓글 한 개

Will this be back in stock in the near future?

Maanav Patel - 답글

댓글 쓰기

조회 통계:

24 시간 전: 3

7일 전: 8

30일 전: 31

전체 시간: 17,709