주요 콘텐츠로 건너뛰기

iRULU AX106 Battery Replacement

필요한 것

  1. iRULU AX106 Battery Replacement, iRULU AX106 Disassembly: 1 단계, 이미지 1/1
    • Using a Philips head #00 screwdriver locate and remove each of the four screws located along the tall side of the iRulu.

    • There may be plastic covers protecting the screws, if this is the case take a phillips head screwdriver, and gently apply pressure on the covers until they come off.

  2. iRULU AX106 Battery Replacement: 2 단계, 이미지 1/2 iRULU AX106 Battery Replacement: 2 단계, 이미지 2/2
    • Use the opening tool to pry the screen from the case applying pressure at each of the four corners of the screen.

    • While a good deal of force is required to separate the screen from the case, make sure to separate the screen from the case at each corner before attempting to completely remove the screen. There are delicate wires that may be damaged if the screen is removed is before the corners are separated.

  3. iRULU AX106 Battery Replacement: 3 단계, 이미지 1/3 iRULU AX106 Battery Replacement: 3 단계, 이미지 2/3 iRULU AX106 Battery Replacement: 3 단계, 이미지 3/3
    • Using a pair of tweezers, gently unplug connectors A and B from the logic board.

    • Completely separate the screen and case.

  4. iRULU AX106 Battery Replacement, Battery: 4 단계, 이미지 1/2 iRULU AX106 Battery Replacement, Battery: 4 단계, 이미지 2/2
    • The battery is located right above the logic board, and can be identified as a large flat black rectangle.

    • Use the plastic opening to scrape away the glue that is holding down the battery.

  5. iRULU AX106 Battery Replacement: 5 단계, 이미지 1/1
    이 단계에 사용된 도구:
    Desoldering Pump
    $3.99
    구매
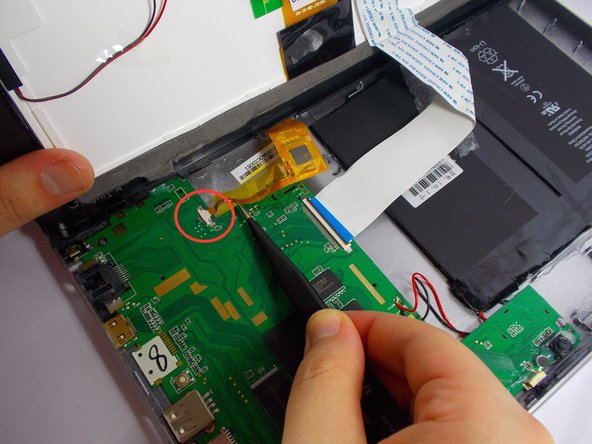
    • You should see that the battery is connected by 2 wires, one black and one red that lead to the logic board.

    • Make note of what color wire is soldered to the respective node before un-soldering the wires.

    • Heat up a soldering iron and melt the solder that is connecting the battery to the logic board.

    • Use a solder sucker to remove the solder as it melts, using caution to remove the wire.

    • Completely remove the battery from the device.

    • Insert the new battery and re-solder the corresponding wires to their respective locations.

결론

To reassemble your device, follow these instructions in reverse order.

다른 2명이 해당 안내서를 완성하였습니다.

James McLean

회원 가입일: 03/24/15

9 평판

안내서 1개 작성함

UMass Dartmouth, Team 4-7, Vijaybhaskar Spring 2015 UMass Dartmouth, Team 4-7, Vijaybhaskar Spring 2015 회원

UMASSD-VIJAYBHASKAR-S15S4G7

3 회원들

안내서 8개 작성하였습니다

댓글 3개

Where do you get a new battery

Janet dowdy - 답글

The batteries should be in a holder, not have to unsolder and solder. Most people do not have a soldering iron.

Lynn Buckingham - 답글

Is that a iPad battery?

Yanny 57 - 답글

댓글 쓰기

조회 통계:

24 시간 전: 0

7일 전: 1

30일 전: 1

전체 시간: 4,042