주요 콘텐츠로 건너뛰기

why! N240BU Access to major components

필요한 것

  1. why! N240BU Access to major components, Battery: 1 단계, 이미지 1/2 why! N240BU Access to major components, Battery: 1 단계, 이미지 2/2
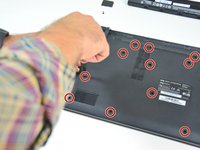
    • Start by unlocking the right locking latch.

    • Then, by simultaneously unlocking the left latch, lift the battery out of its socket.

  2. why! N240BU Access to major components, Access to main components: 2 단계, 이미지 1/2 why! N240BU Access to major components, Access to main components: 2 단계, 이미지 2/2
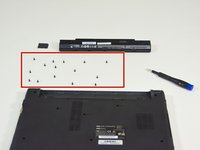
    • Begin by spotting the dummy memory card.

    • Then, remove it and put it on your workplan.

  3. why! N240BU Access to major components: 3 단계, 이미지 1/3 why! N240BU Access to major components: 3 단계, 이미지 2/3 why! N240BU Access to major components: 3 단계, 이미지 3/3
    • Locate the 15 screws that hold the bottom cover of the device in place.

    • Unscrew them and place them on your work surface.

    • Then, un-clip the bottom cover, starting with the side shown in the third picture.

결론

To reassemble your device, follow the instructions in reverse order.

다음 번역가들에게 특별히 감사 드립니다:

fr en

100%

Israel님은 저희가 세상을 수리하는데 동참하신 분입니다! 기여하시겠습니까?
번역 시작하기 ›

Felice Suglia

회원 가입일: 06/15/13

30,527 평판

안내서 259개 작성하였습니다

댓글 0개

댓글 쓰기

조회 통계:

24 시간 전: 0

7일 전: 1

30일 전: 10

전체 시간: 343