주요 콘텐츠로 건너뛰기

why! W670SZQ1 Replacement SSD Disk

필요한 것

  1. why! W670SZQ1 Replacement SSD Disk, The Batteries: 1 단계, 이미지 3개 중 1개 why! W670SZQ1 Replacement SSD Disk, The Batteries: 1 단계, 이미지 3개 중 2개 why! W670SZQ1 Replacement SSD Disk, The Batteries: 1 단계, 이미지 3개 중 3개
    • Unlock the lock latch on the left.

    • Unlock the lock latch on the right.

    • Remove the battery while holding the lock latch unlocked.

  2. why! W670SZQ1 Replacement SSD Disk, Access to Major Components: 2 단계, 이미지 3개 중 1개 why! W670SZQ1 Replacement SSD Disk, Access to Major Components: 2 단계, 이미지 3개 중 2개 why! W670SZQ1 Replacement SSD Disk, Access to Major Components: 2 단계, 이미지 3개 중 3개
    • Using the Philips # 0 screwdriver, unscrew the 2 screws from the bottom cover.

    • Lift the bottom right cover with the iFixit Opening Tool.

    • Lift the lower left cover with the iFixit Opening Tool.

    • Finally clear the bottom cover completely to access the main components.

  3. why! W670SZQ1 Replacement SSD Disk, SSD disk: 3 단계, 이미지 3개 중 1개 why! W670SZQ1 Replacement SSD Disk, SSD disk: 3 단계, 이미지 3개 중 2개 why! W670SZQ1 Replacement SSD Disk, SSD disk: 3 단계, 이미지 3개 중 3개
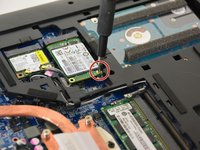
    • Unscrew the SSD fixing screw using the Philips # 0 screwdriver.
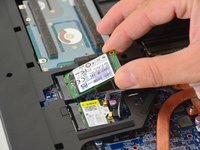
    • Lift the SSD.

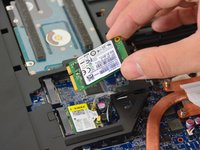
    • Remove the SSD from its connector.

결론

To reassemble your device, follow the instructions in reverse order.

다음 번역가들에게 특별히 감사 드립니다:

fr en

100%

Israel님은 저희가 세상을 수리하는데 동참하신 분입니다! 기여하시겠습니까?
번역 시작하기 ›

작성자

1다른 기여자 명과 함께

Felice Suglia

회원 가입일: 06/15/13

31,564 평판

안내서 264개를 작성함

댓글 0개

댓글 쓰기

조회 통계:

지난 24시간: 0

지난 7일: 0

지난 30일: 1

전체 시간: 145