주요 콘텐츠로 건너뛰기

필요한 것

해당 분해도는 수리 안내서가 아닙니다. Belkin WeMo Switch 수리는 저희 서비스 설명서를 사용하십시오.

  1. Belkin WeMo Switch Teardown, Belkin WeMo Switch Teardown: 1 단계, 이미지 1/2 Belkin WeMo Switch Teardown, Belkin WeMo Switch Teardown: 1 단계, 이미지 2/2
    • Model: F7C027

    • FCC ID: K7SF7C027

    • Input: 120 V, 15 A, 60 Hz

    • Output: 120V, 15 A, 60 Hz

  2. Belkin WeMo Switch Teardown: 2 단계, 이미지 1/2 Belkin WeMo Switch Teardown: 2 단계, 이미지 2/2
    • Remove the four 11.9 mm triangle screws securing the two halves of the case together.

    • The upper two screws are hidden underneath the label, so you'll need to cut away the sticker directly above the screws.

  3. Belkin WeMo Switch Teardown: 3 단계, 이미지 1/2 Belkin WeMo Switch Teardown: 3 단계, 이미지 2/2
    • Carefully pry the back case off.

  4. Belkin WeMo Switch Teardown: 4 단계, 이미지 1/1
    • Remove the two 9.9 mm Phillips #1 screws securing the power board to the device.

  5. Belkin WeMo Switch Teardown: 5 단계, 이미지 1/1
    • Use a pair of tweezers to disconnect the power plug from the motherboard.

  6. Belkin WeMo Switch Teardown: 6 단계, 이미지 1/2 Belkin WeMo Switch Teardown: 6 단계, 이미지 2/2
    • Remove the power board from the device.

  7. Belkin WeMo Switch Teardown: 7 단계, 이미지 1/3 Belkin WeMo Switch Teardown: 7 단계, 이미지 2/3 Belkin WeMo Switch Teardown: 7 단계, 이미지 3/3
    • Use the flat end of spudger to gently pry the retaining flaps away from the motherboard.

    • The motherboard should now come free.

  8. Belkin WeMo Switch Teardown: 8 단계, 이미지 1/2 Belkin WeMo Switch Teardown: 8 단계, 이미지 2/2
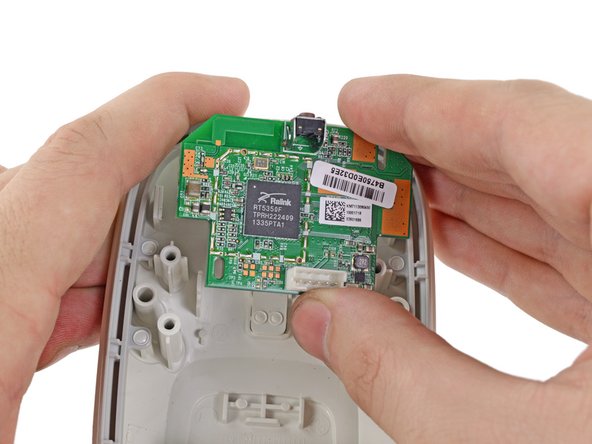
    • Components on the motherboard:

    • Ralink RT5350 Wi-Fi SoC

    • Winbond W9825G6JH-6 256 Mb 166 MHz SDRAM

    • Macronix MX25L12835EMI-10G 128 Mb NOR Flash Memory

    • Momentary push button switch for factory reset

    • Momentary push button switch for power switch

  9. Belkin WeMo Switch Teardown: 9 단계, 이미지 1/2 Belkin WeMo Switch Teardown: 9 단계, 이미지 2/2
    • Components on the power board:

    • Hongfa HF3FA 10 A Relay

    • Power Integrations LNK606DG 5.5 W AC/DC Converter

    • TAICON 6.8 µF Capacitor (x2)

    • FOAI 680 µF Capacitor (x2)

    • JOYIN JVR10N471K 385 V 70 J Varistor

    • Chipsen EPC13 50 W Transformer

    • PANJIT International TB8S 800 V 30 A Bridge Rectifier Diode

  10. Belkin WeMo Switch Teardown: 10 단계, 이미지 1/1
    • Final layout.

Geoff Wacker

회원 가입일: 09/30/13

89,934 평판

안내서 89개 작성하였습니다

댓글 4개

I notice that’s a 240V 10amp relay they’ve used. Do you think there is any electrical difference (aside from the plug pattern) between the US 110V version and the EU/Australian 220V one?

Greg Bromage - 답글

Thank you, that was a big help! The exterior on off button had come loose and was rattling around inside and I was able to repair it thanks to your tear down guide.

L Threet - 답글

A T-7 torx screwdriver works well if you don't have the 2mm triangle

olaf - 답글

Thanks, also here 2 of them after little use: The exterior on off button had come loose and was rattling around inside. Very poor quality now I have opened them. Guess need to try and glue them back on.

Helmuth van Es - 답글

댓글 쓰기

조회 통계:

24 시간 전: 0

7일 전: 5

30일 전: 20

전체 시간: 9,876