์ฃผ์š” ์ฝ˜ํ…์ธ ๋กœ ๊ฑด๋„ˆ๋›ฐ๊ธฐ

ํ•„์š”ํ•œ ๊ฒƒ

ํ•ด๋‹น ๋ถ„ํ•ด๋„๋Š” ์ˆ˜๋ฆฌ ์•ˆ๋‚ด์„œ๊ฐ€ ์•„๋‹™๋‹ˆ๋‹ค. Car and Drivers Auto HandHeld Vacuum Bagless ์ˆ˜๋ฆฌ๋Š” ์ €ํฌ ์„œ๋น„์Šค ์„ค๋ช…์„œ๋ฅผ ์‚ฌ์šฉํ•˜์‹ญ์‹œ์˜ค.

  1. Car and Drivers Auto HandHeld Vacuum Bagless Teardown, Car and Drivers Auto HandHeld Vacuum Bagless Teardown: 1 ๋‹จ๊ณ„, ์ด๋ฏธ์ง€ 1/3 Car and Drivers Auto HandHeld Vacuum Bagless Teardown, Car and Drivers Auto HandHeld Vacuum Bagless Teardown: 1 ๋‹จ๊ณ„, ์ด๋ฏธ์ง€ 2/3 Car and Drivers Auto HandHeld Vacuum Bagless Teardown, Car and Drivers Auto HandHeld Vacuum Bagless Teardown: 1 ๋‹จ๊ณ„, ์ด๋ฏธ์ง€ 3/3
    • Locate the four screws locate outer gray shelll

    • ''I REMOVED THE SCREWS WITH PH #OO SCREWDRIVER FROM (IFIXIT)

    • New PLace four screws to the side

  2. Car and Drivers Auto HandHeld Vacuum Bagless Teardown: 2 ๋‹จ๊ณ„, ์ด๋ฏธ์ง€ 1/1
    • Here are the four screws from vacuum

  3. Car and Drivers Auto HandHeld Vacuum Bagless Teardown: 3 ๋‹จ๊ณ„, ์ด๋ฏธ์ง€ 1/3 Car and Drivers Auto HandHeld Vacuum Bagless Teardown: 3 ๋‹จ๊ณ„, ์ด๋ฏธ์ง€ 2/3 Car and Drivers Auto HandHeld Vacuum Bagless Teardown: 3 ๋‹จ๊ณ„, ์ด๋ฏธ์ง€ 3/3
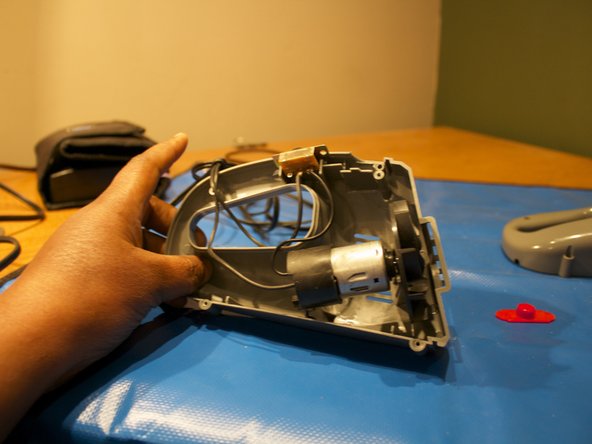
    • Remove the top grey shell of the vacuum

    • Place a red tab to the side

    • Let start looking at the 9volt motor with wire and on/off switch.

    • I remove the outer shell . I remove the motor and wires and on/off switch.

  4. Car and Drivers Auto HandHeld Vacuum Bagless Teardown: 4 ๋‹จ๊ณ„, ์ด๋ฏธ์ง€ 1/1
    • This it complete teardown on Car and Driver HandHeld Vacuum bagless!

kempc8

ํšŒ์› ๊ฐ€์ž…์ผ: 11/22/13

899 ํ‰ํŒ

์•ˆ๋‚ด์„œ 7๊ฐœ ์ž‘์„ฑํ•˜์˜€์Šต๋‹ˆ๋‹ค

ํŒ€

K and K Fixit K and K Fixit ํšŒ์›

Business

1 ํšŒ์›

์•ˆ๋‚ด์„œ 11๊ฐœ ์ž‘์„ฑํ•˜์˜€์Šต๋‹ˆ๋‹ค

๋Œ“๊ธ€ 0๊ฐœ

๋Œ“๊ธ€ ์“ฐ๊ธฐ

์กฐํšŒ ํ†ต๊ณ„:

24 ์‹œ๊ฐ„ ์ „: 0

7์ผ ์ „: 5

30์ผ ์ „: 13

์ „์ฒด ์‹œ๊ฐ„: 1,063