주요 콘텐츠로 건너뛰기

필요한 것

추천 문서

해당 분해도는 수리 안내서가 아닙니다. CucinaPro Cordless Crepe Maker 수리는 저희 서비스 설명서를 사용하십시오.

  1. CucinaPro Cordless Crepe Maker Teardown, CucinaPro Cordless Crepe Maker Teardown: 1 단계, 이미지 1/1
    • The CucinaPro crepe maker has two main components: a heating body and a power base.

    • Disconnect the power base from the heating body to prevent undesired heating. Also disconnect from power so you don't die!

  2. CucinaPro Cordless Crepe Maker Teardown: 2 단계, 이미지 1/2 CucinaPro Cordless Crepe Maker Teardown: 2 단계, 이미지 2/2
    • Flip over the heating body of the crepe maker to access bottom screws.

    • Use a #1 Phillips screwdriver to unscrew 7 #1-20 x11mm and 1 #1-20x7mm screws along the bottom of the heating pan and the handle.

  3. CucinaPro Cordless Crepe Maker Teardown: 3 단계, 이미지 1/2 CucinaPro Cordless Crepe Maker Teardown: 3 단계, 이미지 2/2
    • Lift dipping pan from the plastic casing.

    • Dipping pan connects to plastic casing with nondetachable wiring.

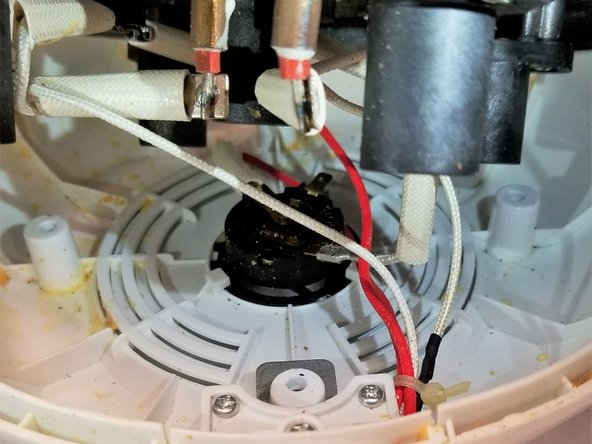
    • The two wires connected to the black connector transfer the AC power from the base to the heating coil underneath the pan surface.

    • White sleeves surround the wires, protecting them from heat damage.

    • The black connector also holds a grounding strip not connected to a wire.

    • Used crepe makers will probably look as dirty as this. Unless you are the cleanest person to ever exist.

  4. CucinaPro Cordless Crepe Maker Teardown: 4 단계, 이미지 1/3 CucinaPro Cordless Crepe Maker Teardown: 4 단계, 이미지 2/3 CucinaPro Cordless Crepe Maker Teardown: 4 단계, 이미지 3/3
    • Unscrew 3 #1-20x10mm screws connecting the top of the handle to reveal the inside of the handle, switch wiring, and yellow tab covering the LED.

    • When the switch is open, the flow of electricity is interrupted and no heating occurs

  5. CucinaPro Cordless Crepe Maker Teardown: 5 단계, 이미지 1/1
    • Underneath the heating element are 4 black stands that provide stability by ensuring space between the bottom of the pan and the dipping plate.

  6. CucinaPro Cordless Crepe Maker Teardown: 6 단계, 이미지 1/2 CucinaPro Cordless Crepe Maker Teardown: 6 단계, 이미지 2/2
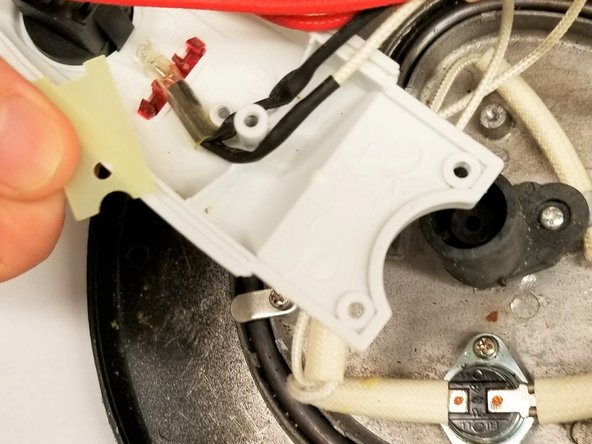
    • Unscrew #1-20x6mm screw on black temperature sensor to reveal a gooey substance between sensor and the metal undercoating of the heating surface

    • While the coil heats and the heating surface is below optimal cooking temperature, power enters the coil and turns on the LED.

    • Upon reaching the optimal temperature, the power to the coil shuts off and the LED turns off, indicating the crepe is done.

  7. CucinaPro Cordless Crepe Maker Teardown: 7 단계, 이미지 1/2 CucinaPro Cordless Crepe Maker Teardown: 7 단계, 이미지 2/2
    • Unscrew 3 #1-20x10mm screws from the bottom of the power base and separate 2 base pieces and a connector piece.

    • Connector piece allows electrical power flow from the wall socket to the heating body.

    • Also spy a model number on the bottom.

  8. CucinaPro Cordless Crepe Maker Teardown, Final Thoughts: 8 단계, 이미지 1/1
    • CucinaPro Cordless Crepe Maker earns a 8 out of 10 on our repairability scale (10 is the easiest to repair).

    • The Crepe Maker is easy to use and handle; the overall system is relatively light.

    • Temperature sensor made it easy to know when the crepe was done cooking.

    • Dipping plate was an effective way to put crepe batter on plate.

    • It is easy for batter to get in between the crevices of the device.

    • There is no easy way to clean the device.

    • Surface area of the dipping plate is relatively small.

Sophia De Guia

회원 가입일: 10/01/15

582 평판

안내서 1개 작성함

Cal Poly, Team 4-6, Maness Fall 2015 Cal Poly, Team 4-6, Maness Fall 2015 회원

CPSU-MANESS-F15S4G6

4 회원들

안내서 10개 작성하였습니다

댓글 0개

댓글 쓰기

조회 통계:

24 시간 전: 0

7일 전: 1

30일 전: 7

전체 시간: 976