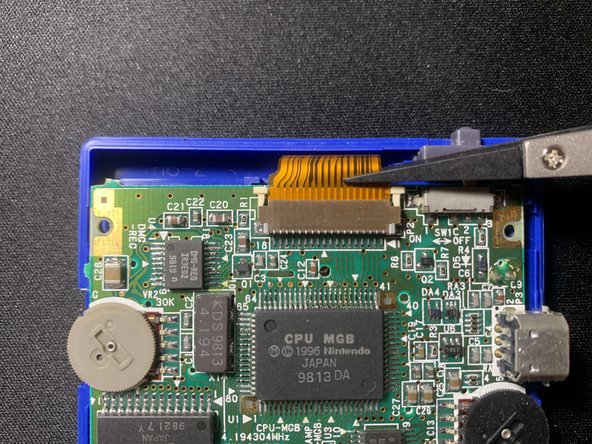
주요 콘텐츠로 건너뛰기

필요한 것

해당 분해도는 수리 안내서가 아닙니다. Game Boy Pocket 수리는 저희 서비스 설명서를 사용하십시오.

  1. Game Boy Pocket Teardown, Game Boy Pocket Teardown: 1 단계, 이미지 1/2 Game Boy Pocket Teardown, Game Boy Pocket Teardown: 1 단계, 이미지 2/2
    • Turn the game boy pocket around and remove the battery cover and batteries.

    • Please do note that I don’t have a battery cover.

  2. Game Boy Pocket Teardown: 2 단계, 이미지 1/2 Game Boy Pocket Teardown: 2 단계, 이미지 2/2
    • Using a Y00 screw, remove 6 screws from the back.

  3. Game Boy Pocket Teardown: 3 단계, 이미지 1/1
    • Remove back cover.

  4. Game Boy Pocket Teardown: 4 단계, 이미지 1/2 Game Boy Pocket Teardown: 4 단계, 이미지 2/2
    • Remove 4 screws from the cartridge panel using a JIS000 screw.

    • Remove cartridge panel.

  5. Game Boy Pocket Teardown: 5 단계, 이미지 1/1
    • Remove 3 screws on the motherboard using a JIS00 screw

  6. Game Boy Pocket Teardown: 6 단계, 이미지 1/1
    • Push on two lock pins that are locking the ribbon cable for the screen using a spudger.

  7. Game Boy Pocket Teardown: 7 단계, 이미지 1/3 Game Boy Pocket Teardown: 7 단계, 이미지 2/3 Game Boy Pocket Teardown: 7 단계, 이미지 3/3
    • Using a plastic tweezer, remove the ribbon cable.

    • Be careful not to scratch or break the ribbon cable!

  8. Game Boy Pocket Teardown: 8 단계, 이미지 1/2 Game Boy Pocket Teardown: 8 단계, 이미지 2/2
    • Remove motherboard.

  9. Game Boy Pocket Teardown: 9 단계, 이미지 1/2 Game Boy Pocket Teardown: 9 단계, 이미지 2/2
    • Remove covering on buttons.

    • Remove buttons.

  10. Game Boy Pocket Teardown: 10 단계, 이미지 1/2 Game Boy Pocket Teardown: 10 단계, 이미지 2/2
    • Remove display using a spudger.

    • Be careful not to break the display!

  11. Game Boy Pocket Teardown: 11 단계, 이미지 1/1
    • Done!

John

회원 가입일: 07/04/22

376 평판

안내서 2개 작성하였습니다

댓글 한 개

Came here because I thought I missed a screw in the back or something. Nope, still had a game inserted which holds the two parts together, haha.

Bart - 답글

댓글 쓰기

조회 통계:

24 시간 전: 3

7일 전: 24

30일 전: 125

전체 시간: 1,088