주요 콘텐츠로 건너뛰기

필요한 것

해당 분해도는 수리 안내서가 아닙니다. Google Home Mini 수리는 저희 서비스 설명서를 사용하십시오.

  1. Google Home Mini Teardown, Google Home Mini Teardown: 1 단계, 이미지 1/1
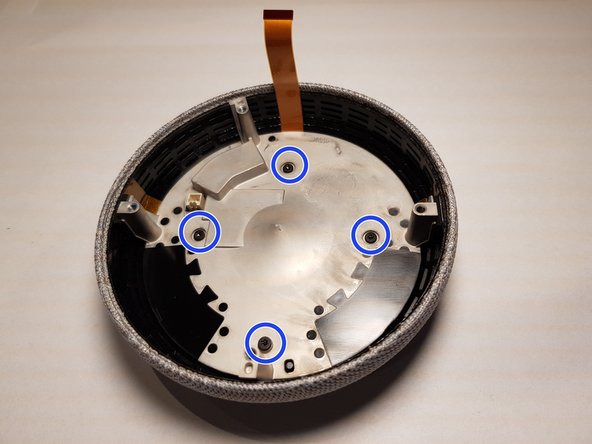
    • The Google Home Mini opens from the bottom There is an orange plastic disc with a piece of orange rubber attached to it. The piece of orange plastic is glued to the device.

  2. Google Home Mini Teardown: 2 단계, 이미지 1/3 Google Home Mini Teardown: 2 단계, 이미지 2/3 Google Home Mini Teardown: 2 단계, 이미지 3/3
    • Use the metal spudger and place it between the housing and the rubberized plastic disc.

    • NOTE: You need to set the spudger to go under the plastic disk, not between the rubber and the plastic disk. The Google Home Mini opens from the bottom. This is a rubberized plastic disc glued to the device.

  3. Google Home Mini Teardown: 3 단계, 이미지 1/2 Google Home Mini Teardown: 3 단계, 이미지 2/2
    • Now move around with the spudger under the plastic plate until the adhesive has dissolved on the entire surfacem

    • Next, carefully peel the plate off.

  4. Google Home Mini Teardown: 4 단계, 이미지 1/1
    • Now remove the 4 screws.

    • 4 x 6mm T6 screws

    • If there is still glue over the screw heads you can easily pierce with the screwdriver. Do not remove glue, as the bottom will not hold otherwise later.

  5. Google Home Mini Teardown: 5 단계, 이미지 1/3 Google Home Mini Teardown: 5 단계, 이미지 2/3 Google Home Mini Teardown: 5 단계, 이미지 3/3
    • After turning the device over, you can gently lift the fabric-covered top.

    • While keeping the device close to the device as in the picture, first disconnect the ribbon cable from the connector with a spudger.

  6. Google Home Mini Teardown: 6 단계, 이미지 1/3 Google Home Mini Teardown: 6 단계, 이미지 2/3 Google Home Mini Teardown: 6 단계, 이미지 3/3
    • Now loosen 4 more screws on the top of the unit

    • 4 x 8mm T9 screws

  7. Google Home Mini Teardown: 7 단계, 이미지 1/3 Google Home Mini Teardown: 7 단계, 이미지 2/3 Google Home Mini Teardown: 7 단계, 이미지 3/3
    • Now remove the speaker cable with a spudger.

    • Next, loosen 4 more screws

    • 4x 9mm T6 screws

  8. Google Home Mini Teardown: 8 단계, 이미지 1/3 Google Home Mini Teardown: 8 단계, 이미지 2/3 Google Home Mini Teardown: 8 단계, 이미지 3/3
    • Now remove the metal insert and carefully lift the board with a spudger

    • The board is glued to 2 locations lightly, but can still be removed easily.

  9. Google Home Mini Teardown: 9 단계, 이미지 1/3 Google Home Mini Teardown: 9 단계, 이미지 2/3 Google Home Mini Teardown: 9 단계, 이미지 3/3
    • Motherboard

    • Microphones

    • Status LEDs

다음 번역가들에게 특별히 감사 드립니다:

de en

100%

이 번역자 분들은 저희가 세상을 수리하는데 동참해 주시는 분입니다! 기여하시겠습니까?
번역 시작하기 ›

Norman Schleicher

회원 가입일: 01/13/18

365 평판

안내서 1개 작성함

댓글 21개

Sehr gute Anleitung. Fachlich korrekt(habe es selbst ausprobiert) und passende Bilder. Vielen Dank.

Regionaut - 답글

Do you know the resistance (ohm) of the speaker?

Bennet Heidekorn - 답글

Did you ever find this out? I know the home is 4ohm, presuming this is the same?

Barry Craig -

For anyone coming to this late, it is a 4ohm speaker.

Barry Craig -

Is it a 4 Ohm 3 Watt driver?

NÖME Technologys and Designs -

댓글 쓰기

조회 통계:

24 시간 전: 10

7일 전: 84

30일 전: 557

전체 시간: 65,089