소개
The motherboard died on this laptop so I thought, good enough excuse for a teardown?
Yup.
This guide should help you, regardless of whether you need to replace memory or the entire LCD.
필요한 것
-
-
-
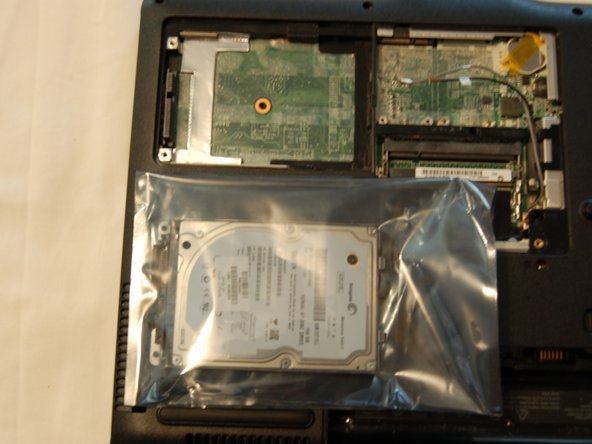
Use an unbent paper clip or some other stiff wire-type tool to poke in the tiny hole in the cd tray, and grasping the tray firmly, pull slowly out of the laptop.
-
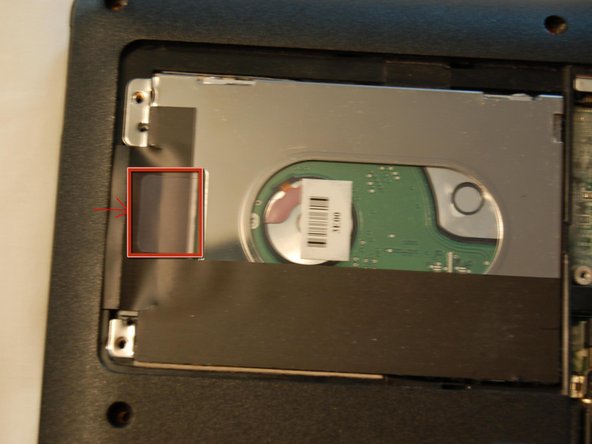
Remove the 3 screws exposed by removing the drive
Oh I forgot to mention I got a new motherboard for 100 and it's working again:)
tabormeister로 부터 인용:
Oh I forgot to mention I got a new motherboard for 100 and it's working again:)
Be extra 110% sure to update the BIOS on that thing ASAP to keep it from happening again! The dying motherboard is a problem that plagues _all_ AMD-based HP dvx000's that haven't had their BIOS updated. Go to HP's site, enter your full model number (e.g. dv6258se - check the white sticker on the bottom), and look for a BIOS update. That'll help to prevent the problem in the future, but be sure to keep the heat sink clean!
Matt Falcon로 부터 인용:
Be extra 110% sure to update the BIOS on that thing ASAP to keep it from happening again! The dying motherboard is a problem that plagues _all_ AMD-based HP dvx000's that haven't had their BIOS updated. Go to HP's site, enter your full model number (e.g. dv6258se - check the white sticker on the bottom), and look for a BIOS update. That'll help to prevent the problem in the future, but be sure to keep the heat sink clean!
Oh dude, definitely did that already 1st thing after I put it back together. I just checked again to be extra sure.
and as for the heatsink...it's got Arctic MX-2 on it, so I don't see how it could be overheating, though it does generally run in the upper 70's (laptop cooling fans I blame).
mac4life로 부터 인용:
use your optical drive and harddrive in enclosures
No need, sir! the laptop again lives. I might update the teardown with pictures of it running.
mac4life로 부터 인용:
did you put 7 on it?
I will eventually, but Vista is acceptable for now.
mac4life로 부터 인용:
what version
Home Premium. it's decent with service pack 2.
Is there a wire with the cd player and can it be replaced after this step
saadrana2003로 부터 인용:
Is there a wire with the cd player and can it be replaced after this step
What exactly do you mean? ...wire?
also, which step?
tabormeister로 부터 인용:
What exactly do you mean? ...wire?
also, which step?
Regarding step 6... I can not fully understand how the cd player is connected to the rest of the frame .
saadrana2003로 부터 인용:
Regarding step 6... I can not fully understand how the cd player is connected to the rest of the frame .
Ahh!
It doesn't have a wire or anything, there's a connector that plugs right in when you push the unit in, when you pull it out it...well, it pulls right out. no need to disconnect anything but the screws, just pull it out.
-
-
-
Pop off the bezel closest to the screen, taking care not to damage the delicate ribbon cables underneath.
-
Unclip the three cables connecting the bezel to the laptop, lift away.
-
If you are struggling to get the bezel disconnected try closing the laptop and flipping it over. I did this and when I opened it again the bezel disconnected by itself.
-
-
-
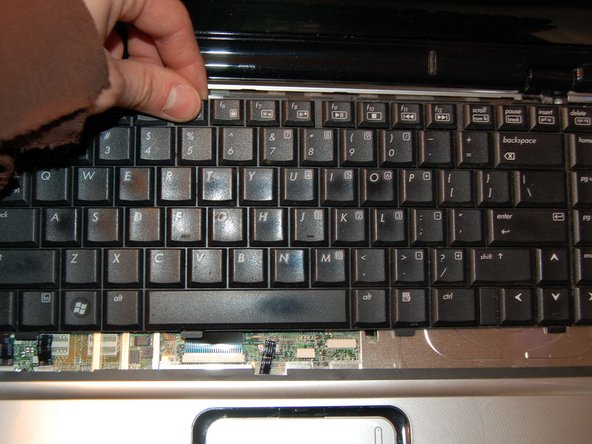
Lift up the back of the keyboard and slide it slowly towards the screen. Unclip the ribbon cable near the touchpad. Set the keyboard aside.
Make sure you remove all the screws in Step 2, even if you're not tearing it all down. There are three keyboard screws that need to be removed before it will slide out. I struggled with that and bent the keyboard a bit before I realized there were more screws. After that, it slide right out.
When reconnecting, the keyboard cable doesn't seem like it's all the way in. It doesn't go in very far, and I took a chance. It works!
-
-
-
Time to take off the screen.
-
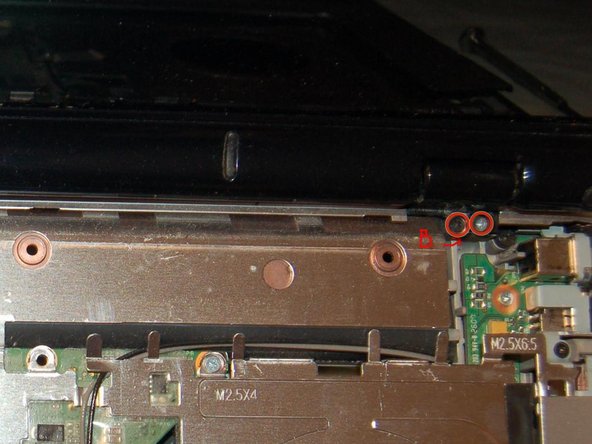
A. Remove the screw on the left that holds the clip down, unclip it.
-
B. Remove the four screws at the base of the screen, and lift out, taking care with the antenna wires on the right.
-
C. Thread them out of the clips, towards the touchpad. You can then pull them through the board, checking on the bottom to make sure they’re free.
-
-
-
Remove the two standoffs on the bottom (5mm socket)
-
Unclip this clip and lift off the touchpad bezel
-
The two ribbon cables in the third image (one I took out before taking the picture) are simply seated in their clips, you will need to apply some force to get them out, just be careful to apply it straight away from the clips.
-
-
-
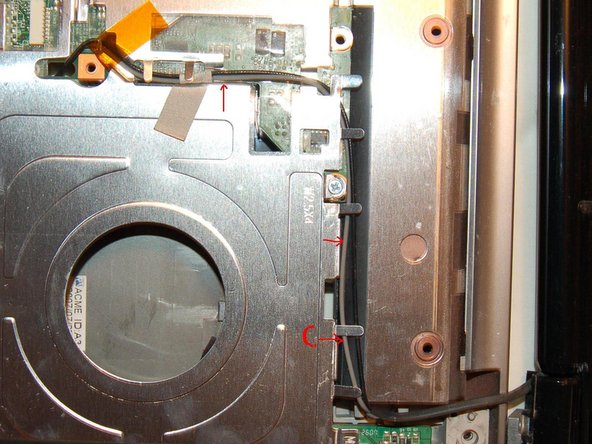
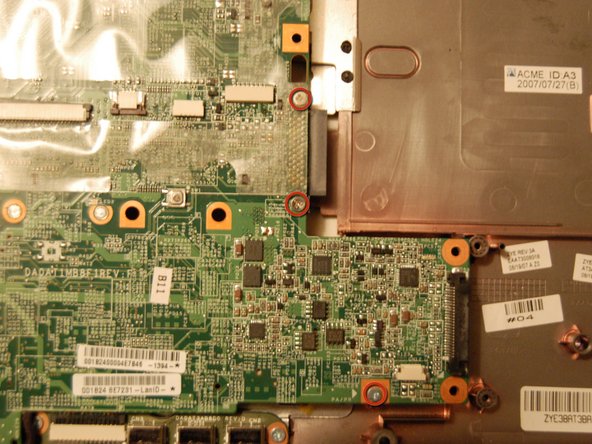
Remove these four screws, and pull the express card module away from the motherboard.
-
Remove these three screws, and then these clips, (you can get at them better after you remove the screws, and the larger of the two should come apart first) and lift the board away from the shell, taking care with the audio jack cable.
-
-
-
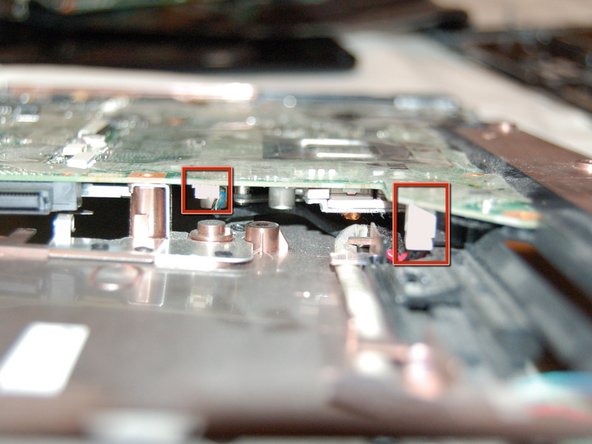
You can now unclip the audio jack cable.
-
Heatsink-there are four screws to remove and the clip, and it simply lifts off. The processor comes out by turning this switch to the unlock position. Quite an easy last step.
-


댓글 7개
Any idea who manufactures the touch sensitive strip and where to get a replacement?
NIs anybody still connected to this article? My laptop stopped working quite some years ago now, and I can't remember what the problem was, I only remember that at the time I found that it was a known HP problem, being sorted stateside not in the UK!! Anyway I wasn't on with a desktop, (Apple) but now again need to run Windows, so am hoping to get this machine working, a source of components might also be helpful.
THanks in advance
B Turner
A quite common problem with this range and age of Dv6 laptops is that they generate a lot of heat and desolder the gpu from the motherboard. I had mine fixed twice under warranty, now it is basically unusable.
It will load windows but as soon as you put any load on the gpu it heats up far too quickly and it will shutdown.
Well, I cant say about your machine, however, my machine is purchased in 2008 and is still like new. The performance is same as the day 1 when I bought it in 2008. The only reason I am going for a macbook now is because now I have started feeling weight of this laptop after handling macbook air or for that matter dell xps 13 or x1 carbon or T460s. I dont wish to but I will have to let go off this master piece. let me know if you need this laptop for your research purpose. there's lot that can be done on this laptop hardware, but I don't have that much time to put on it. 9 years and still counting on. It still gives tough competition in looks as I have maintained it very delicately.
I have the same exact model and had it since 2008 roughly. I do not know anything about computers, let alone The internal components. Planned on recycling this computer and was 30 seconds away from using my Incredible Hulk strength to bust it apart.
Decided to Google how to disassemble the same exact computer and this forum popped up. Not only was it super ridiculously easy to take apart, but I actually enjoyed it as well. Just wanted to commend the author on a job very well done. The pictures along with the locations marked in red made it extremely easy and helpful!!
Jon Oneill - 답글
Very Simple, short, clear even for a non-technical person with interest to dismantle dv6000...Kudos to the author of dv6000 tear down.