소개
Look alive! We are going to tear down the Jura Impressa A9—your award-winning machine for your favorite cup 'o Joe.
What's more annoying than arriving at the office looking forward to a nice latte macchiato doppio and the machine won't grind or brew, or fails to steam the milk properly? Time to summon your last caffeine reserves and fix that source of acuteness of mind. It's teardown time!
What's the buzz about? Find out by following us at Facebook, and be sure to keep us up to speed by sharing your latest repair stories on Instagram and Twitter!
필요한 것
-
-
This machine cranks out caffeine at the touch of a
buttonscreen. Here are some of the highlights straight from Jura: -
Touchscreen display
-
Twelve specialty coffees
-
High efficiency grinder
-
Height-adjustable dual spout with fine foam technology
-
-
-
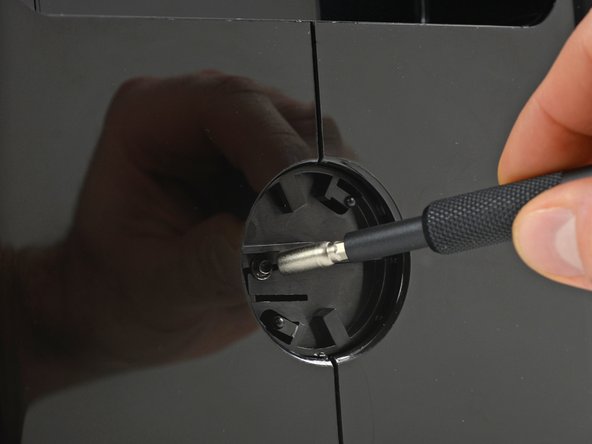
Next up, we remove the Jura cover plate with a quick counterclockwise twist and find ourselves in an awkward situation...
-
This oval-headed screw isn't unique, but it's a rarity for sure. We had to dig through our 64 Bit and Macro Bit Kit before finding the right Oval bit in our Universal Bit Kit. If you just need the single Oval bit we have it here.
-
With the security screw defiantly removed, we slide up the side-panel locking latch and move right along.
I have A9 P.E.P. The Jura cover plate is flush. I can’ t grasp it enough (even with rubber gloves) to twist it. Afraid it will break if I pry it. How do I proceed?
Use two strips of sticky tape, align horizontally. Stick one at location of 12 o'clock on the face of Jura cover, and another one at 6 o'clock, in a way that you have extra length on each strips to pull the strips horizontally to spin the Jura cover counterclockwise.
Just one pull and the cover is released.
Will C -
There are very small slots located in the outermost ring of the Jura logo. You can put an electronics-sized flat head screwdriver into the slot hole and use that for leverage to rotate counterclockwise. Then, after removing the oval screw with an oval bit key, pull very firmly upwards on the horizontal plastic ledge inside the revealed plastic circle to “unlock” this back clip.
Ben Berman - 답글
-
-
-
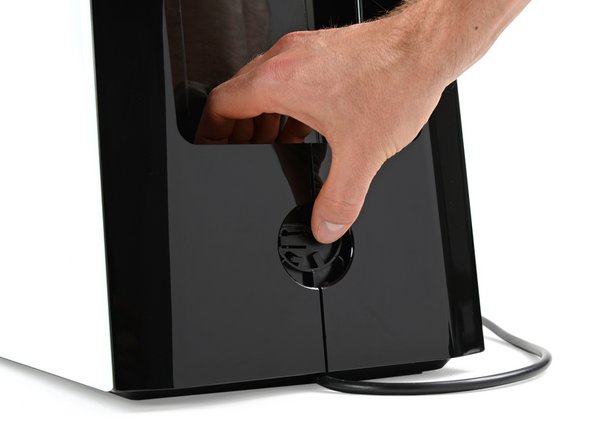
Even with the latch released, the side panels don't want to budge, so we turn our attention to the top of the case for more clues.
-
Our slim and sturdy Jimmy comes in handy to handle the mechanism on both sides beneath the cover plate.
If you just plan on doing a repair inside, you need access to the screws hidden by this panel, but you do not have to remove the electronics.
Ben Berman - 답글
To release the right side I slipped a thin screw driver in where the picture shows the jimmy, and pressed a release toward the middle. Then I repeated for the left side. After both sides are released slide the panel rearward to lift it up.
-
-
-
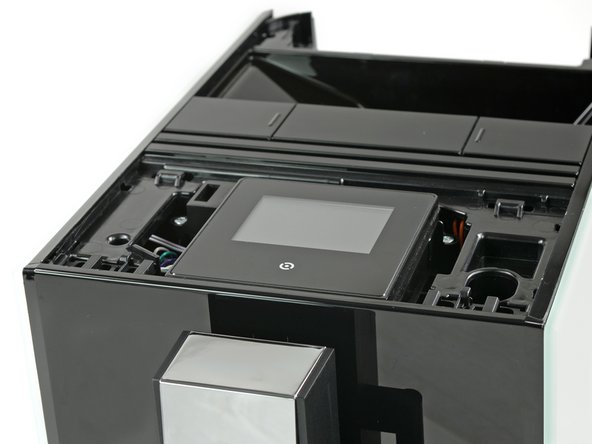
As a short intermezzo we take a look at the display which seems to have some kind of service port to gather information in case of a malfunction.
-
We flip it over, unscrew two small Phillips screws and discover the brains of this piece of modern coffee technology:
-
Renesas R5S72660W144FP 32-bit microcontroller
-
Macronix MX25L12835F 128Mb serial multi I/O NOR flash memory
-
Unisonic Technology MC34063A DC-DC converter
-
STMicroelectronics L7805CV 1.5 A voltage regulator
-
Oscillator
Microphone? Are you sure it's a microphone? Looks like oscillator to me.
Thanks, we fixed it!
The microcontroller inside is a Renesas R5S72660W144FP#V0 I bet -- this is based on a SH2A SuperH RISC core. Bit of an oddball part, but it certainly has more than enough heft for controlling a coffee machine. Product folder: https://www.renesas.com/en-us/products/m...
-
-
-
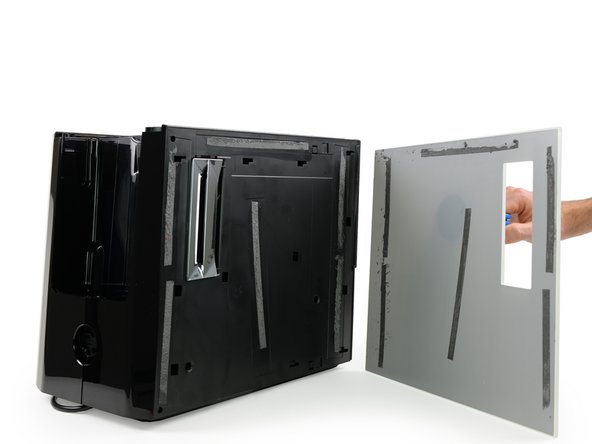
Now all we have to do is simply grab a hold on the machine, poke the top latch, release the lower clasp, then slide the side panel out to the back. Right?
-
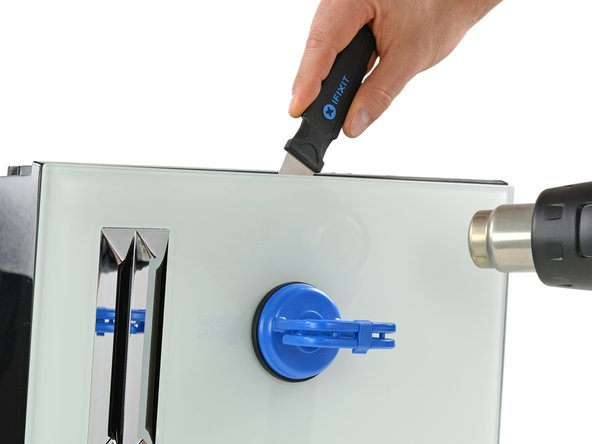
Left with few options, we bring out the big guns to help negotiate our way inside.
-
With the right application of heat and strength, we finally manage to muscle the glass panel off the machine.
Which way should I be pulling? Got this far but this panel will not come off
benfreeman - 답글
This teardown is not a guide (just to clear things up ;) That being said, pulling towards the back will release the side. Take a look at the next step to get an idea of the procedure. It is not easy but with four hands a some patience I think you can do it. If this won’t work, you might want to try the same way we went with the first side (heat gun/hair dryer to loosen the glue and get the glass front off to see the latches).
The “official” way is not to disengage the glasspanel. As you can see in step 7 the panel is held by two locks. It´s really difficult, but you can open them using a very long screwdriver. Lay the device on one side, there are openings on the bottom in which you can insert the scrwedriver and hopefully find the two locks…
Remove the screws on top of the water reservoir. To get to these two locks, look for two small openings on the bottom and the top of the unit along the edge of the side panels. These holes are located closer to the front of the device. If you look through them on a piano white unit, you’ll see white ABS plastic tabs. These can be disengaged easily with a long screwdriver, I used a long Allen wrench. Then, as Tobias mentioned, pull towards the back. You will notice this piece starting to give much easier as soon as you disengage one of the two tabs. There also appears to be a plastic pull-away anchor that is normally under the control panel’s plastic U frame which may or may not play a role in removing the side panel.
-
-
-
-
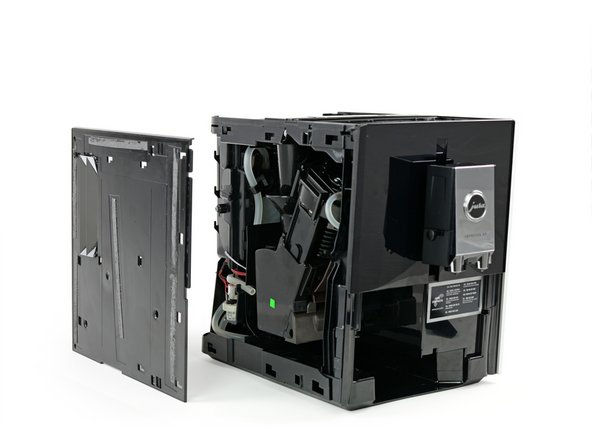
Finally, with no glass panel to obfuscate its clip-in mechanism, we can see exactly where to focus our efforts.
-
The second time around our four-handed effort pays off and … et voilà, off comes the side panel.
-
No more heat gun drama on the other side—we can safely add this to the list of teardown skills we've mastered.
-
-
-
After all this hustle we're relieved to find a handful of Torx screws securing the brewing unit on the machine's port side.
Bonjour,
J'ai une Jura A5 qui a la même architecture mise à part les parroies latérales en aluminium et le pupitre de commande à boutons.
À cette étape numéro 8, contrairement à ce que vous citez, ce n’est pas le broyeur mais l'ensemble presseur de café / chambre d'infusion.
D'ailleurs, cet ensemble est démontable pour nettoyage et changement des joints… il y a quelques sous ensembles à l'intérieur.
Ma machine remplissait systématiquement le bac à Marc d'eau, et les quantité de liquide se voyaient à la baisse dans les tasses. Un nettoyage intégral après 3 ans d'utilisation n'étant pas un luxe…
Les dépôts de Marc se collent partout et ont un peu de mal à s'evacuer. Du coup l'étanchéité au niveau de la chambre d'infusion est altérée par ces dépôts et ne permettent plus un bon fonctionnement.
David Roch - 답글
Bonjour David :) Merci beaucoup pour votre remarque. Vous avez entièrement raison. J’ai donc corrigé en utilisant le terme infuseur qui permet de rester fidèle à la longueur du texte d’origine. La prochaine fois, n’hésitez pas à corriger vous-même le texte en cliquant sur Traduire, en haut à droite de l’étape. J’espère que vous avez pu et démonté et nettoyé votre machine avec succès. Encore merci pour les yeux de lynx et bonnes réparations ! Claire
These are the first screws that use a finer twist than all the other parts in the machine, so take care not to mix them up with anything else. This part kind of works like an electric Aeropress - the long column-shaped small diameter gear on the brew group connects flush with the primary motor inside the Jura, a motor that pushes water through the grounds. You’ll observe the coffee grounds bowl will shift into a “drop into basket” position as you rotate the column and cause the coffee press to assume different positions. There’s a small plastic frame near the water flush you will also pull out. Otherwise it is pretty safe to handle.
Ben Berman - 답글
-
-
-
Having found the brain behind the display, this would be the heart of the machine, providing power to every component.
-
Removing those colorful connectors and three Torx screws lets us get our hands on this junction.
-
STMicroelectronics L7805CV 1.5 A / 5 V regulator
-
ON Semiconductor (formerly Fairchild Semiconductor) MOC3062M triac driver optocoupler
I think you should highlight the brand names of capacitors and relays too, as well as other power components. These are often the parts that determine the quality and longevity of the finished product.
In this here coffee machine the relays are Matsushita (Panasonic) - a quality brand
The capacitors though are Su'scon - a typical no-name brand of questionable quality with some reports of them failng.
-
-
-
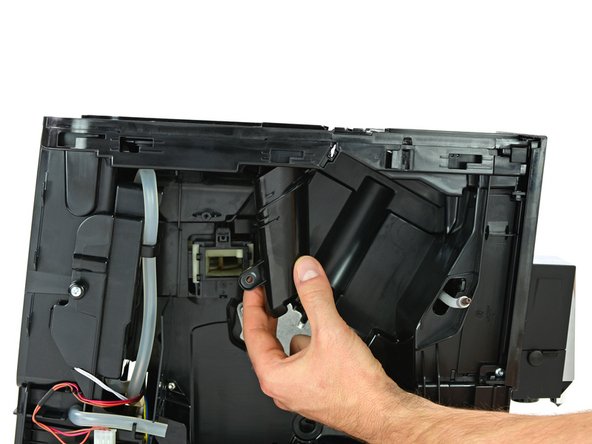
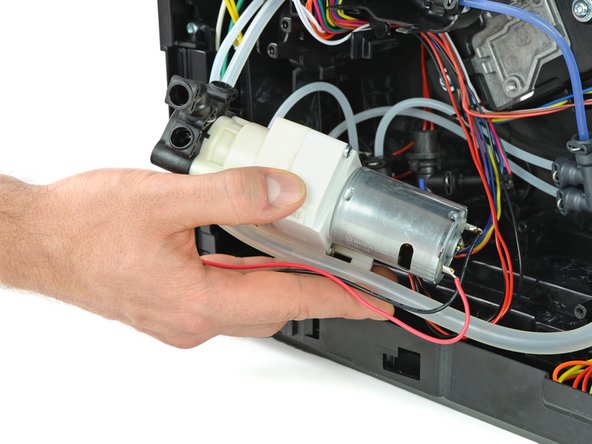
Next we focus on the pump. After opening the metal clamp we unplug the hose running from the pump to the thermoblock.
-
The tube at the bottom can simply be pulled off by hand when taking out the unit.
Comment se nomme la piece au dessus de la pompe et alimentant en eau le thermobloc? Merci
-
-
-
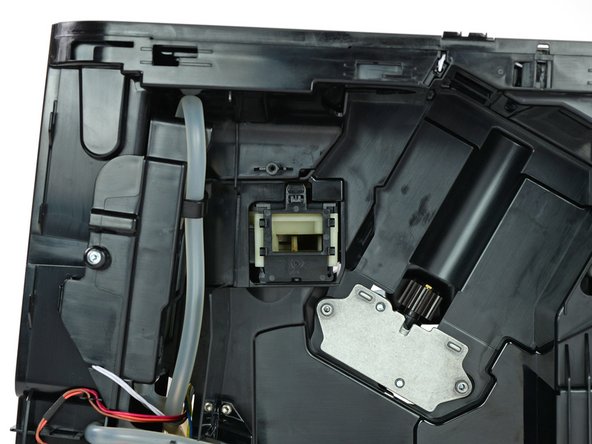
This reveals a small plastic frame which needs to be moved upwards to unlock the grinder.
Observe how the motor is positioned here with a void where the brew group’s gear column goes. You’ll want to make sure the brew group is seated as deep and neatly into this column void as possible when you put it back in. Put the screws into the brew group’s four holes first before putting it in.
Ben Berman - 답글
-
-
-
The gear motor with its encoder attached is fixed with only two Torx screws.
Another component that often leads to failure if it is of low quality - the motors. It would be cool if you showed the make and model of all motors. Especially the gear motor and grinder motor which are the most prone to failure.
The ceramic valve uses a mabuchi (Japan) RS-545SH-18150 motor with carbon brushes - A good product from a quality brand
The drainage motor is a Saia (Switzerland) stepper motor
-
-
-
With the bulk of the modules spread across our teardown table, the remaining guts are just a few hoses and pipes. We've earned a cup of coffee and the Impressa A9 has earned a repairability score of 7 out of 10 (10 is the easiest to repair):
-
The coffee maker is built with modular components that can be maintained separately. All screws inside are standard Torx.
-
There are no adhesives or one-way-clips used inside the machine. However the side panels with their glass front and tiny, invisible hooks are a major drag (even authorized technicians might struggle at this point).
-
The oval head screw behind the logo plate is one proprietary screw too many. The sole purpose of it is to keep you out.
-
There is no official documentation for repairs of internal components.
-


팀

댓글 13개
I agree that its an oscillator / clock. The X1 screen printed on the PCB next to the item outlined in green, usually denotes X for Xtal (Crystal)
Thanks, we fixed it!
Amazing work, but I have the Jura ena9 model. Is it a similar rigmarole?
Vielen Dank für die sehr schöne und detailierte Beschreibung. Sie hat mit heute sehr dabei geholfen, die Brüheinheit auszubauen und zu reinigen.Im Wesentlichen, ihr überhaupt durch die Seitenwände 'auf die Pelle zu rücken'. Hätte ich ohne die Anleitung wohl nicht geschafft bzw. gewagt!!!
Hallo Bernd,
freut uns zu hören, dass dir der Teardown helfen konnte.
Hallo und Danke auch für diese Anweisung.
Ein wertvoller Tip wäre die Seitendeckel von vorne nach hinten wegschieben,
dies geht aber sehr schwer - also vorne an der Kante flach ein Stück Holz anlegen und mit einem Hammer nach hinten klopfen.
Das klappt dann wunderbar.
LG und viel Spaß
Joe Shorty - 답글
Amazing. thank you for the breakdown! My Jura Impressa A9 shuts off in the middle of a cup. The first time it happened I though I had tripped a breaker. Now it seems, I can make one cup but after that all attempts to use the machine results in it turning off. Not sure what part needs to be replaced or where to purchase it. Please advise
Thanks!
Seth
Mine was dispensing about 1/2 the requested coffee, and the other half in the drain. Milk and hot water seemed fine, so I thought there was a clogged coffee hose. This was after a dormant month (and it's in the tropics, where all machinery left sitting dies quickly). Within a week after my return, it went from 1/2 expected to zero coffee output.
Upon disassembly [thank you for these great instructions! ... I found another video that helped get the sides off: https://www.youtube.com/watch?v=fiy17KTY... which shows a ENA Micro, similar to an A9], there were no lines squirting coffee, nothing obviously plugged.
I ran the rinse cycle repeatedly looking. Best I could tell, the brew unit, when dispensing the puck, also released the water that wasn't coming out.
I also noticed that the hot water was "spitting" too, although seemed to dispense the correct amount.
I removed the hose above the pump, and started a rinse cycle, and it spit out there too: so am assuming it's the pump: 1/2 price unit at Amazon.
Corrections to the above: the pump was definitely an issue, but the brew group seems to be the main reason why it's only dispensing approximately half expected coffee beverages. In the YouTube video I mentioned above, he says "the brew group is the source for most problems".
Rebuilding the brew group is covered here: https://www.youtube.com/watch?v=m1DJ1dzH...
... the rebuild kit is about $20. I found a rebuilt brew group for $100 on EBay.
perhaps the power button micro switch?
https://www.jura-parts.com/Jura-A-C-E-D-...
Where is that exactly? I didn’t notice it in the video or on the teardown table
Thanks!
Nice tear down guide. Looks like good explanations and photos. But where is the service manual? This is alluded to at the beginning, but there isn’t a link.
Hello Lisa, thanks for pointing that out. Unfortunately we don’t have repair guides available for this device. The note at the beginning should read differently. I’ll forward your input.
Is there a coffee counter in the a9?
I used this guide on an Jura Impressa A1 for a repair and I’ll post more comments below. Thanks for the nice guide!
Ben Berman - 답글
Dear fellow Jura lovers ,
Your Teardown article was very helpful exactly at the time I needed guidance with my wonderful Jura , thanks
Gabriel Steinfeld - 답글