주요 콘텐츠로 건너뛰기

필요한 것

해당 분해도는 수리 안내서가 아닙니다. LED Birne 230V 수리는 저희 서비스 설명서를 사용하십시오.

  1. LED Light Bulb Teardown, Removing Diffuser: 1 단계, 이미지 1/3 LED Light Bulb Teardown, Removing Diffuser: 1 단계, 이미지 2/3 LED Light Bulb Teardown, Removing Diffuser: 1 단계, 이미지 3/3
    • Carefully cut and pry with razor blades between the diffuser and body of light bulb.

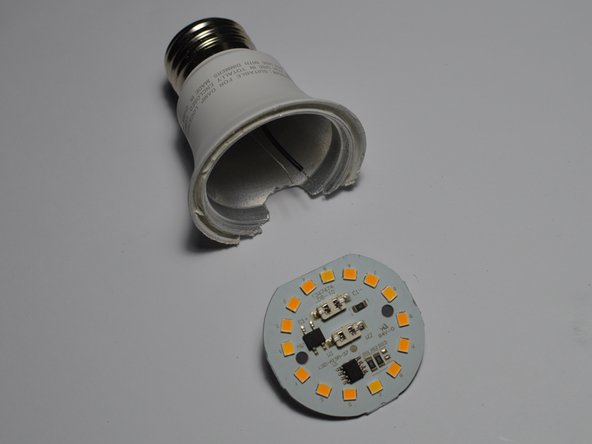
    • Diffuser is sealed onto body of bulb.

  2. LED Light Bulb Teardown, Body without Diffuser: 2 단계, 이미지 1/2 LED Light Bulb Teardown, Body without Diffuser: 2 단계, 이미지 2/2
    • 15 LEDs spread in ring.

  3. LED Light Bulb Teardown, Cross section of body: 3 단계, 이미지 1/3 LED Light Bulb Teardown, Cross section of body: 3 단계, 이미지 2/3 LED Light Bulb Teardown, Cross section of body: 3 단계, 이미지 3/3
    • Filing into the side of the bulb.

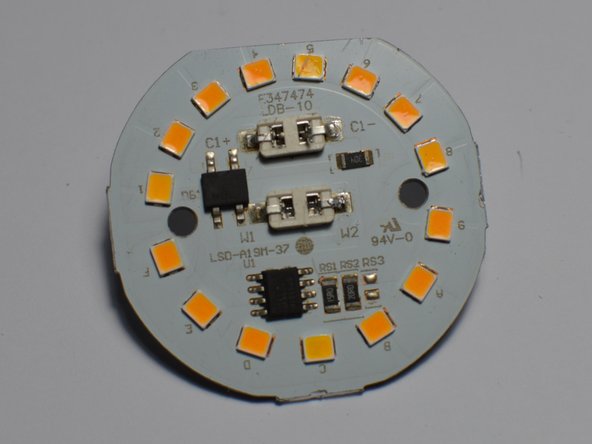
    • Top layer is circuit board.

    • V-shaped metal is casing about 1mm thick.

  4. LED Light Bulb Teardown, Removing Circuit Board: 4 단계, 이미지 1/3 LED Light Bulb Teardown, Removing Circuit Board: 4 단계, 이미지 2/3 LED Light Bulb Teardown, Removing Circuit Board: 4 단계, 이미지 3/3
    • With open gap circuit board can be removed.

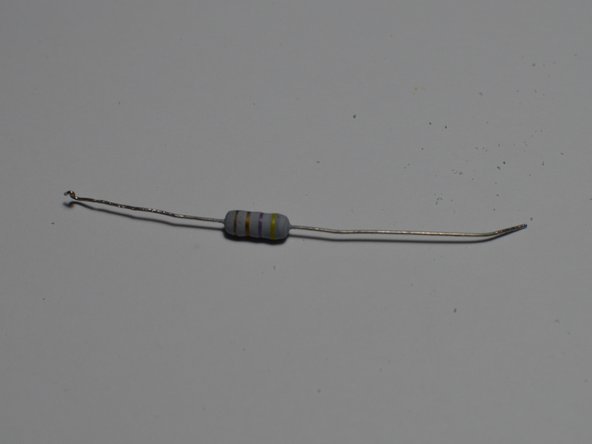
    • Attached with wire and resistor to base of bulb.

    • Release clips to release wires.

  5. LED Light Bulb Teardown, Remove Capacitor: 5 단계, 이미지 1/3 LED Light Bulb Teardown, Remove Capacitor: 5 단계, 이미지 2/3 LED Light Bulb Teardown, Remove Capacitor: 5 단계, 이미지 3/3
    • Capacitor is removed as previous wires in Step 4 were removed.

    • Capacitor is 10 mircoFarads.

  6. LED Light Bulb Teardown, Remove Resistor: 6 단계, 이미지 1/3 LED Light Bulb Teardown, Remove Resistor: 6 단계, 이미지 2/3 LED Light Bulb Teardown, Remove Resistor: 6 단계, 이미지 3/3
    • Resistor removed by popping of bottom cap.

    • Resistor is 4.7 ohms.

  7. LED Light Bulb Teardown, All Parts: 7 단계, 이미지 1/3 LED Light Bulb Teardown, All Parts: 7 단계, 이미지 2/3 LED Light Bulb Teardown, All Parts: 7 단계, 이미지 3/3
    • Parts laid out and details.

Wieli

회원 가입일: 01/08/23

1,707 평판

안내서 10개 작성하였습니다

댓글 3개

I'm curious, if anyone has taken apart enough failed LED light bulbs to discover if there is a trend in what part fails first. This would be interesting if it is a component that can potentially be replaced. A buck or less to get more life out of a $10 bulb seems like a good trade off!

jaeckerb - 답글

I've wondered the same thing myself. It seems likely that it would be a failing capacitor or possibly one of the LED's in a series circuit, where if one fails they all go off or flash as the failing LED works, heats up, fails, cools down, works again, and repeat) as often failed LED bulbs do.

Mike Klingler - 답글

Diode usually. you can take your meter and on both sides of each diode test each individually when it lights up u know that one is bad. pop bad led off with pick and take lead out of graphite pencil shaving on circuitry and/or. little drop of super glue to allow it to bond and test again light should be fixed.... easier done then explained lol.... god bless.

CryptoCros - 답글

댓글 쓰기

조회 통계:

24 시간 전: 11

7일 전: 113

30일 전: 763

전체 시간: 6,701