주요 콘텐츠로 건너뛰기
단지 전제 조건
이 안내서는 다른 가이드의 선행 작업으로 사용하기 위한 것입니다. 그 자체로는 불완전합니다.

필요한 것

해당 분해도는 수리 안내서가 아닙니다. LG VX3200 수리는 저희 서비스 설명서를 사용하십시오.

  1. LG VX3200 Teardown, Battery: 1 단계, 이미지 1/1
    • Press button labeled "Push". In the photo depicted the button is being depressed by the left finger.

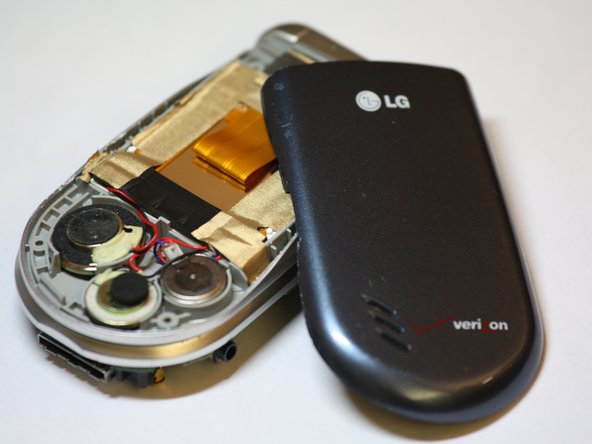
    • Pull back panel toward bottom of phone.

  2. LG VX3200 Teardown: 2 단계, 이미지 1/1
    • From the lip on the top of the battery, lift it out of the phone.

  3. LG VX3200 Teardown, LG VX3200 Teardown: 3 단계, 이미지 1/1
    • Remove the five screws from the back panel, under the battery.

    • There is a hidden screw under the rubber pad next to the antenna. To remove this pad use a screwdriver to pry out rubber.

  4. LG VX3200 Teardown: 4 단계, 이미지 1/1
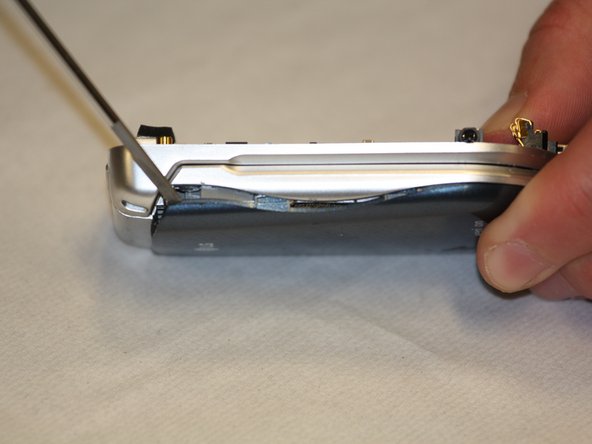
    • Starting at the top of the phone near the antenna, use a screwdriver or other small tool, maybe even fingernails, to pry the rear panel off.

    • There are 4 places where the panel snaps together to the main part of the phone.

    • By systematically prying up the edges of the back panel, moving about a quarter of an inch, and prying again, the panel will begin to lift off.

    • Don't be afraid to damage anything, the panel requires a bit of force to detach.

  5. LG VX3200 Teardown: 5 단계, 이미지 1/1
    • In order to remove the back panel of the screen half of the phone, you have to remove the 4 screws.

    • First, open the phone and remove the 4 rubber pads that are around the screen. you can use a small screwdriver or a pin to pop them out.

  6. LG VX3200 Teardown: 6 단계, 이미지 1/1
    • Remove the four screws using your Phillips head screwdriver.

  7. LG VX3200 Teardown: 7 단계, 이미지 1/2 LG VX3200 Teardown: 7 단계, 이미지 2/2
    • Similar to removing the panel underneath the battery, you need to pry the colored panel off of the top half of the phone.

    • There are 4 snap-in points and some sticky tape holding the panel on. Starting on the side nearest the antenna, pry off the panel, moving slowly around the panel.

  8. LG VX3200 Teardown: 8 단계, 이미지 1/2 LG VX3200 Teardown: 8 단계, 이미지 2/2
    • The logic board is only held on with 4 tabs. Simply pry from one side using a screwdriver, popping out the board.

    • Note that the logic board is still connected to the screen by an electrical ribbon.

  9. LG VX3200 Teardown: 9 단계, 이미지 1/1
    • The speakers are held in by a sticky glue. Be careful not to break any of the components, simply pry slowly from underneath until the speakers pop out.

  10. LG VX3200 Teardown: 10 단계, 이미지 1/1
    • To remove the screen, grab hold of one or more of the speakers and pry up using the connecting wire. The tape holding the screen in should lift up, and the screen should easily separate from the case.

  11. LG VX3200 Teardown: 11 단계, 이미지 1/1
    • Detaching the two halves of the phone from each other takes a bit of force.

    • With the phone open, pry from the right side of the hinge with a screwdriver. Using a bit of force, pull apart the two halves.

    • Be careful not to tear the ribbon connecting the logic board to the screen.

Bradley Hutchinson

회원 가입일: 01/19/10

42 평판

안내서 5개 작성하였습니다

Cal Poly, Team 5-9, Forte Winter 2010 Cal Poly, Team 5-9, Forte Winter 2010 회원

CPSU-FORTE-W10S5G9

5 회원들

안내서 10개 작성하였습니다

댓글 0개

댓글 쓰기

조회 통계:

24 시간 전: 0

7일 전: 0

30일 전: 0

전체 시간: 2,439