주요 콘텐츠로 건너뛰기

해당 분해도는 수리 안내서가 아닙니다. Desktop PC 수리는 저희 서비스 설명서를 사용하십시오.

  1. Microdigital TK 85 Teardown, The TK 85 case and connectors: 1 단계, 이미지 1/3 Microdigital TK 85 Teardown, The TK 85 case and connectors: 1 단계, 이미지 2/3 Microdigital TK 85 Teardown, The TK 85 case and connectors: 1 단계, 이미지 3/3
    • 9V DC = Nomo P2 power supply

    • Expansão = Expansion connector 2x23 edge pins.

    • Joystick = Joystick connector DIN-6-07M.

    • Mic = audio output for a datacorder.

    • Ear = Audio input for a datacorder.

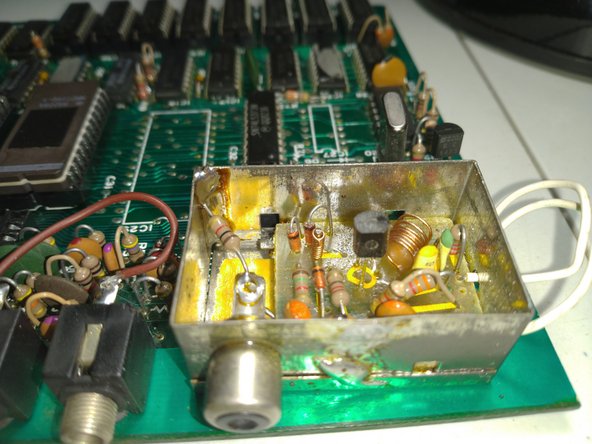
    • Video = RF chanel 3 VHF output.

  2. Microdigital TK 85 Teardown, Inside the TK85: 2 단계, 이미지 1/3 Microdigital TK 85 Teardown, Inside the TK85: 2 단계, 이미지 2/3 Microdigital TK 85 Teardown, Inside the TK85: 2 단계, 이미지 3/3
    • Open it carefully because of the 2 keyboard flat cables.

    • Those flat cables are very problematic

  3. Microdigital TK 85 Teardown, Keyboard removed: 3 단계, 이미지 1/2 Microdigital TK 85 Teardown, Keyboard removed: 3 단계, 이미지 2/2
    • The upper part of the case is the keyboard, but the keyboard itself is not removable.

    • The lower part of the case is just a plastic part.

  4. Microdigital TK 85 Teardown, The circuit board: 4 단계, 이미지 1/2 Microdigital TK 85 Teardown, The circuit board: 4 단계, 이미지 2/2
    • The circuit board is a very compact circuit board with dual layer traks.

  5. Microdigital TK 85 Teardown, Rom and Ram: 5 단계, 이미지 1/2 Microdigital TK 85 Teardown, Rom and Ram: 5 단계, 이미지 2/2
    • MM2716Q-5 => 16Kb Eprom

    • 52164KSF/N => 64kb Rom ? It is a custom Microdigital Rom compatible with the NMC2764.

    • MCM4116BC-15 => 8 x 16,348 bits Ram = 16Kb Ram

  6. Microdigital TK 85 Teardown, The RF generator: 6 단계, 이미지 1/3 Microdigital TK 85 Teardown, The RF generator: 6 단계, 이미지 2/3 Microdigital TK 85 Teardown, The RF generator: 6 단계, 이미지 3/3
    • Just a RF Chanel 3 VHF modulator.

  7. Microdigital TK 85 Teardown, Microchips identification: 7 단계, 이미지 1/2 Microdigital TK 85 Teardown, Microchips identification: 7 단계, 이미지 2/2
    • Microprocessor

    • Rom

    • Eprom

    • Ram

    • Oscilator 555. Works as an PWM 5 Volt power supply to the micropocessor.

    • Spare space for an audio integrated circuit. It was never implemented in producion in this model.

    • Voltage regulator 7805

    • Frequency divider = 6,5Mhz used for video and 3,25Mhz used for actual clock.

Vinicius Rodrigues Bellini

회원 가입일: 12/12/22

956 평판

안내서 6개 작성하였습니다

댓글 0개

댓글 쓰기

조회 통계:

24 시간 전: 2

7일 전: 14

30일 전: 43

전체 시간: 810