주요 콘텐츠로 건너뛰기

필요한 것

해당 분해도는 수리 안내서가 아닙니다. Nikon Coolpix 3500 수리는 저희 서비스 설명서를 사용하십시오.

  1. Nikon Coolpix 3500 Teardown, Nikon Coolpix 3500 Teardown: 1 단계, 이미지 1/1
    • Remove the battery cover.

    • Remove the battery.

  2. Nikon Coolpix 3500 Teardown: 2 단계, 이미지 1/1
    • Remove two 4.5 mm screws next to the battery slot.

    • Remove one 3 mm screw above the CF memory card slot.

    • Remove one 4.5 mm screw next to the CF memory card slot.

  3. Nikon Coolpix 3500 Teardown: 3 단계, 이미지 1/1
    • Remove two 4.5 mm screws from inside the battery slot.

  4. Nikon Coolpix 3500 Teardown: 4 단계, 이미지 1/1
    • Remove two 5 mm screws from the opposite end of the battery slot.

  5. Nikon Coolpix 3500 Teardown: 5 단계, 이미지 1/1
    • Remove the plastic cap and the 5 mm screw underneath.

  6. Nikon Coolpix 3500 Teardown: 6 단계, 이미지 1/1
    • Remove the five 3.5 mm screws from the bottom of the camera.

    • Gently pry off the grey faceplate.

    • Do not pull hard; there are two wires connecting the faceplate to the motherboard.

  7. Nikon Coolpix 3500 Teardown: 7 단계, 이미지 1/3 Nikon Coolpix 3500 Teardown: 7 단계, 이미지 2/3 Nikon Coolpix 3500 Teardown: 7 단계, 이미지 3/3
    • Use a spudger to disconnect the white-capped wire at the bottom of the camera.

    • Use a spudger to disconnect the orange-capped wire at the bottom of the camera and set the faceplate aside.

  8. Nikon Coolpix 3500 Teardown: 8 단계, 이미지 1/1
    • Disconnect the grey-capped wires from the motherboard.

    • Disconnect the blue wire attached to the green chip from the center of the motherboard.

  9. Nikon Coolpix 3500 Teardown: 9 단계, 이미지 1/2 Nikon Coolpix 3500 Teardown: 9 단계, 이미지 2/2
    • Remove the 3.5 mm screw from the motherboard next to the rotating lens.

    • Flip the motherboard and lens over to access the three wires on the back that connect to the LED screen.

  10. Nikon Coolpix 3500 Teardown: 10 단계, 이미지 1/2 Nikon Coolpix 3500 Teardown: 10 단계, 이미지 2/2
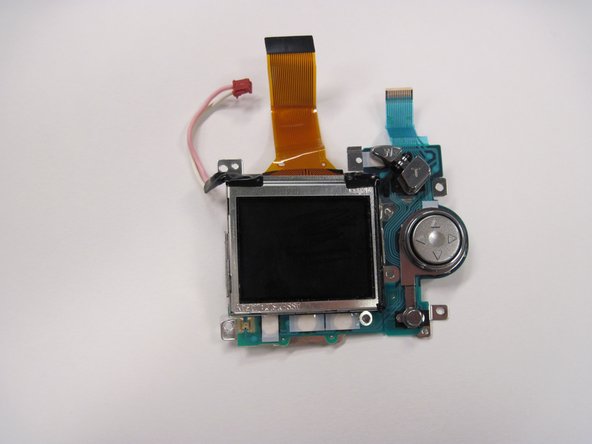
    • Disconnect the blue wire connecting the motherboard to the LED screen.

    • Disconnect the orange wire using a spudger while pushing out horizontally.

    • Disconnect the red capped wire from the motherboard.

    • Lift the motherboard and lens (still connected) out of the back case.

  11. Nikon Coolpix 3500 Teardown: 11 단계, 이미지 1/1
    • Lift up on the black covering and remove the orange wire connecting the lens to the motherboard.

  12. Nikon Coolpix 3500 Teardown: 12 단계, 이미지 1/1
    • Remove the 2.5 mm screw next to the red capped wire.

    • Remove the two 3.4 mm screws on the back of the directional buttons.

    • Remove the two 4.4 mm screws in the metal plate across from the orange wire.

  13. Nikon Coolpix 3500 Teardown: 13 단계, 이미지 1/2 Nikon Coolpix 3500 Teardown: 13 단계, 이미지 2/2
    • Gently lift the LED screen out of the remaining casing and set it aside.

    • Be careful not to let the rubber backing of the buttons fall out of place.

richard guenther

회원 가입일: 04/19/10

183 평판

안내서 6개 작성하였습니다

Cal Poly, Team 30-38, Garner Spring 2010 Cal Poly, Team 30-38, Garner Spring 2010 회원

CPSU-GARNER-S10S30G38

5 회원들

안내서 11개 작성하였습니다

댓글 0개

댓글 쓰기

조회 통계:

24 시간 전: 0

7일 전: 0

30일 전: 6

전체 시간: 7,755